Pages

Sunday, December 12, 2010

And the winner is....

Our winner is... (drum roll please)...

Marlm!!! Marlm said "I love the wreath you made. It turned out so beautiful
TKS"


Thanks to everyone who played along and hopped along with us on Friday! Have a happy holiday and make it a safe one!

I will be emailing you soon.

~ Grace ~

Thursday, December 9, 2010

Reuse, Recycle, & Ribbon Blog Hop! - "C is for..."

Welcome to the Reuse, Recycle, & Ribbon Blog Hop! All of us bloggers were brought together by www.creamcityribbon.com and their wonderful products.

So lets get hopping!!!! I am the third stop on the list and you should have come from here... Mandie at Mandie's Scrappin'. After you check out my Reuse, Recycle, and Ribbon project you will see the next blog at the bottom.

GIVE AWAY!
- I will have one winner randomly chosen from the comments on my left on this post. You must comment anytime on Friday until 11:59 pm PST to be eligible to win and you must also fallow my blog so we can keep in touch! You will receive a Holiday Scrapbooking RAK from me including some of the wonderful unique Cream City Ribbon and some beautiful DCWV Holiday Collection Papers! Doesn't that sound great?

My hubby would say that is a bad thing... but then again he has the Beastie boys song "She's Craft" as my ring ton on his phone and he always does the shifty eyes when he talks with someone about my creativeness. LOL.

Here is an item I made for the Michales Holiday Magic Contest on their FB page. I love Michaels and all the wonderful things I find in there... so here is a bit of a tutorial also.

Supplies:

1 - book (preferably paper back and one you wont read again) with aged pages
2 - small branches from a tree
3 - yards (give or take depending on the size of the next item) of yarn
1 - large 12" letter, number or symbol... either chipboard, cardboard or foam core
1 - wire or straw wreath base (if using straw you will need a piece of fabric to wrap around it till it is covered)
1 - hot glue gun and glue
1 - sheet of printable transparency
3 - clear ornaments
3-4 - public domain images from the internet
3 - glittered wire floral curls
1 - yard of Cream City Ribbon
2 - yards or so of gold thread
Brown ink pad
Bronze and Gold Ritzy Ditzy Glitz

STEP 1 - Ink all outer edges of the book pages in brown.
STEP 2 – Rip pages gently from binding and ink remaining last side of pages

STEP 3- Roll all pages need into a cone shape with one corner being the point adhere closed with glue dots.

STEP 4 – If using a straw wreath, wrap it in a light colored fabric strips, securing fabric with hot glue.

STEP 5 - Use hot glue gun to adhere cones to wreath base. Start with back row first finishing with the front row.

STEP 6 – Mist edges of cones with a metallic misting spray and let dry.

STEP 7 – Wrap desired yarn around large chipboard letter and secure it with hot glue.

STEP 8 - Tie yarn into a series of knots to create berries. Hot glue the berries onto the twigs.

STEP 9 – Print desired images onto transparency paper in the correct size to fit into the plastic ornaments. Color if needed, cut out and roll to insert into plastic ornament.

STEP 10 – Glue the Cream City Ribbon under one page cone on the front layer of the wreath. Weave above and under pages all around the wreath, repeat with gold thread if desired. Here you can see the Natural Red Cream City Ribbon doing this.

STEP 11 - Find one blank page in your book, remove it and print your journaling onto the book page. Mist it with your metallic mist and let dry. (See pic for step 7)

STEP 12
– Assembly. Arrange all items to achieve desired look and hot glue into place.

STEP 13 – Cut a piece of yarn 1 1/2 “ft long. Fold in half and knot the two cut edges together. You now should have a loop of yarn. Tie it at the top of your wreath around the straw base. This is how you will hang the wreath, make sure it is not visible when it is on the wall.

If you give it a try you need to know you might need a good movie and some snacks that wont melt in your hands... hehe!

Are you enjoying the hopping so far? What kinda of off the page projects do you like to make?

Here's a list of blogs that you'll hop to with us today. Take a peek!

Nikki at Nikki, In Stitches

Mandie at Mandie's Scrappin'

YOU ARE HERE ---> Grace at Grace's Scrap Attic

YOUR NEXT STOP IS ---> Kim at Kreative Krafts

Meighen at Scrappin_3rdeeschik

Chris at Turned Gypsy

Tracey at The Cropping Canuck

Thanks for checking my post out!

Wednesday, December 8, 2010

Paper Tree Tutorial

Over at P K Glitz we have had some of you ask how to make the trees from my nativity project. Well I threw together a tutorial for you so you can have some fun. People just love these, On their own or in a setting they are just simply beautiful!
Here is my project once again.


Step 1 –
Roll a cone out of cardstock to create desired height and width.


Step 2 – Use Sticky Tape to secure the cone in place. Trim the point at the open edge so cone sits flat on table.


Step 3 –
Cut strips 2″ wide from your scrapbook paper. Put sticky tape along one of the long sides on the back side of the paper.

Optional Step 3a – If you would like to have the edges of your branches glittered this is a good time. on the front side of the scrapbook paper squares line two sides with the P K Glitz Sticky Tape 1/8 “. Peel backing off and glitter with desired color then continue to step 4.


Step 4 –
Cut the strips into 2″ squares.


Step 5 – Remove Sticky Tape Backing and roll squares into cones. Adhere to cone, working in rows starting from the bottom up. When you have room for about two more rows at the top you will need to scale down the size of your squares. The the second row from the top should be 1/4″ smaller squares and the top row should be 1/2″ smaller then the main rows.


Step 6 – Punch a large flower out of one of the papers you used.


Step 7 – Cut a “pie” shape out of it and then roll into a loose cone and adhere closed.


Step 8 – Top it with the flower cone and any other decorations you wish.


Step 9 – Embellished if desired. I used some pearls and placed them randomly on branches.

Other Glitter tips:
You can apply the glitter to the tips of the branches after assembly to make it look like snow. Brush glue onto the tips of the branches and dust with P K Glitz Glitter in White Pearl, Crystal Clear or White Orchid.

I hope you enjoy this little tutorial and have a Happy Holiday Season.
~ Grace ~

Friday, December 3, 2010

Creating Memories for Years to Come

Today I am excited to show you two projects. The first one is an altered item that I created for this Christmas season. The holidays are my favorite time of year and I just had to make something this year to decorate my table. This nativity scene took me a while but I just love it and all the little splashes of sparkle from P K Glitz. Each character of the nativity has glitter and glitz on them. Jesus, Mary and Joseph are simple and poor so they have the perfect amount of glitz on their heavenly halos. The three wise men however brought expensive gifts so I adorned each one of them with a different type of metallic colored glitter; silver, bronze and gold. The star up above the tree is spritzed with gold Ritzy Ditzy Glitz. And the Art Acetate Angel is full of seven different colors of P K Glitter Glitz.

nativity I Hope this project will be something my kids remember for many, many Christmases to come. When they look back on their memories, my projects will set the mood and scenes. Maybe just maybe when they see something crafty and they will think of how I loved to do what I do and all the fun and crafty things we created together.


The second one is a layout for my daughters album. As scrapbookers we all strive to preserve the memories we have in our photos and in our minds for our children and our children’s children. This is a very important picture of her as a baby. It is the only time both my Hubby’s Grandmother and my Grandmother were in the same place with my daughter. Since this picture was taken, my Hubby’s Grandmother has passed away so this was once in a lifetime for my daughter.


In this layout I used my favorite tool in the P K Glitz arsenal… Sticky Paper! This is such a wonderful tool and makes glittering so easy! I run it through my cricut on the cardstock settings and with the multi cut button on. Just make sure you have the sticky side down and the peal back backing up. Once I cut my three images I removed the backing and glitzed them up with three colors of P K Glitter Glitz to give them all a unique sparkle.


I hope you have a scrappy day!

Monday, November 29, 2010

Just the right amount of Glitter

Good day to you all! Today I am sharing with you two of my layouts. Both of which I only used one shade of P K Gltiz Glitter. Shocking I know. Usually I have multiple colors and lots of sparkle like in a project I will be sharing with you later this week… I used over ten colors of glitter on one project! However, today I challenged myself to hold back, choose one specific color that accented the entire layout and to use it in specific places to add a sweet and simple elegance.


Guess what! It worked! I truly love these layouts. Sweet and elegant indeed. The first one I would like to show you has several pictures of our family. Here I used P K Glitz’s NST Copper Glitter to accent the corners of the layout and the butterflies. Working with just those few elements added a since of formal framing to the layout and a splash of whimsy and playfulness with the butterflies. Both of which accent the photos perfectly.


The second layout is one of my daughter in her bath when she was a baby. The color of glitter I chose for this layout was Gold Leaf China. I also used two Ritzy Ditzy Glitz colors, Copper and Silver. I lightly spritzed the background shape with the copper and then changed the white flowers by heavily spritzing them until they were completely silver.


The title was cut out on my cricut with sticky paper and then glittered with the Gold Leaf China. I also used my Quicky Glue Pen to accent some of the Cosmo Cricket stickers. One is the boarder sticker and the other the LOV3 one. You can see both of them and one of the silver flowers in this closeup below.


Thank you for taking the time to view our blog. Have a wonderfully glitzy day!

Wednesday, November 24, 2010

Win a Big Shot! - Link below

Deanna is giving away a Big Shot! Check out the video at http://www.youtube.com/watch?v=qRtXxSlFiAc or on her blog at http://fernsfrills.blogspot.com/

It is open for 2 weeks, and you can get chances to win by: following the blog, subscribing on you tube, commenting on this video, posting a link to the blog or videos or simply mentioning me on any social network, If someone subscribes and says that they came because of you you get another chance to win. I hope you all have fun!

Done forget to let her know that Grace L. sent you! And Good Luck!

Think outside the Box - Shaped cards

Hello once again!

Today I was inspired to create some shaped cards. I have created cards shaped like circles, ovals, pennants and various characters but today I saw a project from Bo Bunny that inspired me to think outside the standard shape. The sizes are still the normal rectangle and square so they fit into envelopes.


The first one I am going to show you is the square card. I had so much fun doodling with the Quickie Glue Pen on this one. The image in the center is fancy cut out of coordinating paper from the paper pack. It all seemed pretty bland with the two toned look so I added dimension with pop dots and three colors of P K Glitter Glitz; Royal Paisley, Cinnabun and Golden Cadillac.


The Royal Paisley was chosen to add the third color. I matched it to the stripe paper that coordinated with the paper pack. I just love how that splash of unexpected color sets it off. In this closeup you can really see the spritz of the Bronze Ritzy Ditzy Glitz I used over the top parentheses shape.

I am so happy I am able to start posting Christmas Cards. In this one I wanted to highlight my two new colors of the Ritzy Ditzy Glitz… Garnet and Emerald. When I look at this card I just love the flowers and leaves. I would like to let you know that both of them are the exact same cricut cut. It is a (letter J), tall/boarder die-cut from the Storybook cartridge. They were cut out of a golden brown textured cardstock. Once removed from the background paper I took each die-cut and sprayed one with Emerald and one with Garnet. Creating two totally different colors. I just love my Ritzy Ditzy Glitz. I did not have a metallic red or green cardstock so I just made my own.


The leaves are spritzed with Emerald Ritzy Ditzy Glitz and have Chocolate and Gilded Grape Leaf, PK Glitter Glitz details. The Poinsettias have Garnet Ritzy Ditzy Glitz and Cinnabun P K Glitter Glitz details. I also took a sticker and glitzed it out for the sentiment.

Friday, November 12, 2010

PK Glitz and The Scrappiest partner up for a Thankful Challange!

This month P K Glitz is teaming up with Liz from The Scrappiest. She has created two wonderful sketches for you to work with. Your challenge will be to use one or both of these sketches with the theme of “Thankful”. You can use the word in your title or sentiment or the project can just reflect the thought of being “Thankful”. You will have until November 30, 2010 11:59 CST to complete this challenge.

If you like these sketches, you can always find more at The Scrappiest so stop in and give Liz a visit!

The first sketch is a 12 x 12 inch layout. Feel free to adapt this sketch to whatever size you like to work with as long as it is at least 8 x 8 inches.


The Prize:


$21_1Wheel_1Brush_2Spoons_3 1 Glitter Wheel, 3 Art Acetate Designs, 1 Small Goat Hair Brush, and 2 Spoons

(colors and designs may vary)

The Rules:

*Use one or both sketches to complete a layout and / or card with the theme of “Thankful”.

* Use glitter and/or embossing powder products on your layout and / or card.

(You do NOT have to use P K Glitz products in order to be eligible to win)

*Add a link to your blog post to the linky at the bottom – not to the blog itself, but to the individual posts! You can post more than one project, just add more links! The links should look something like:

http://yourblogaddress.com/shoe-challenge/

and NOT like this:

http://yourblogaddress.com/

*You may enter as many times as you like – the more you enter the more chances you get

*If you do not have a blog or website, then email your projects to info@pkglitz.com and we will upload them for you.

(P K Glitz Designers are not eligible to win)

*At this time, we are only able to ship prizes to the continental United States. Sorry.

*The ”Thankful” challenge ends November 30, 2010, 11:59 CST

Use the Linky Tools link to upload your image at the end of this blog post... click here


The Sketches and Examples:


Wednesday, November 10, 2010

Festive fall cards

Hello everyone! I wanted to share some seasonal cards with you today. I love using PK Glitter on everything now. So don't be surprised but these all are glitzy to the max.


The first card is one I created with some the {Stamps} of life stamps. I love these pumpkins!!!


Next I also use the pumpkins on this card with several shades of PK Glitter. Got to love the elegance this card has. I used some sprinkles of glitter to spice up the patterned paper and to create that glitzy boarder punched from the PK Glitz "Sticky Paper".


This last one is an image I drew up for a school flier for our PTO harvest festival. I loved it so much I had to copy it and put it on a card. Then of course Make is full of sparkles and glitter is up. Can you tell I love glitter?

Oh one more tid bit of news... this week I am the Glue Dots Fan of the Week on FB so come click on the link and check out the Glue Dots Brand Adhesives. If you have not tried them you are missing out.

Happy Scrapping!

~ Grace ~

Sunday, November 7, 2010

Projects, Projects and more Projects

I know, I know, I have been a bad blogger. I would like to share with you some fun and special projects I have created in the last month.

With the Dixie Pieces April kit "Full Bloom" in my hands I was ready to create some fun projects.

The PTO notebook was the last project I created with this kit. I took the scraps from all the fabulous papers I had used and combined them to make my PTO notebook look spectacular. Using PK Glitter to sparkle it all up and make it go "bling bling". My favorite part is the butterfly. It is made of of a paisley bird. I love turning images into things there were not. I love how easy it is to work with kits that are well coordinated.

The first layout I created was one for the boys. I wanted to show how versatile this kit was and it is not just for the girls. I love the greens and navys that were represented. Dixie Pieces did a great job coordinating this kit. The flowers I reshaped just a bit and used some PK Ritzy Ditzy Glitz.

My daughter has a special way about her and the little things she does. I took this pic of her feet on the playground one day and thought I wonder where they will take her. She has a limitless imagination and the guts to accomplish anything. I can't wait to see what her life will hold for her.

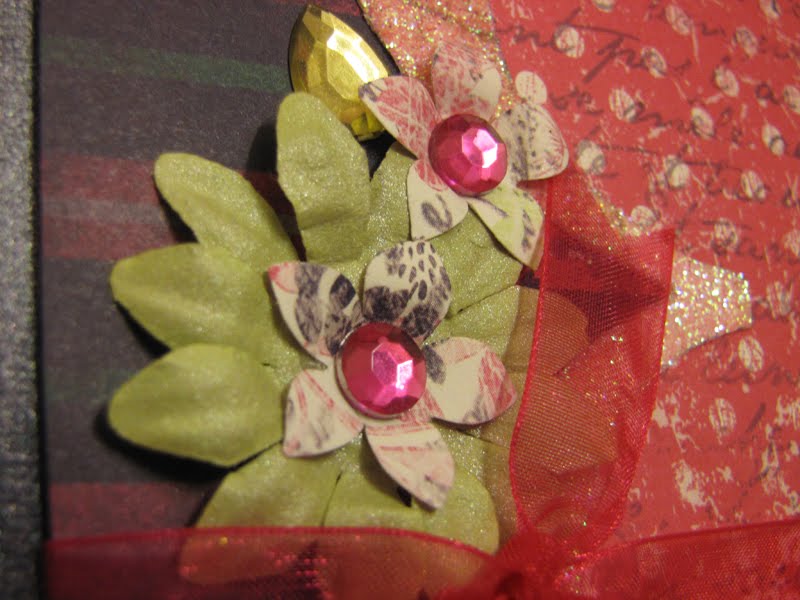
This card was created for my Hubby in honor of our wedding anniversary. I love the colors and the frame. I spirtzed it with Ritzy Ditzy Glitz from PK Glitz and it now sparkles. I love that! The flowers were in the kit but I cut them and rolled them to make them look 3-d.


This card is for any occasion. I used it for a birthday card by writing happy birthday in the circle with a silver zig paint pen. Looked Great. I usually like making blank cards so that I can use them for any occasion. Just add a sentiment and a special message inside.

Go check out Dixie Pieces and their wonderful kits. Just click on the pic of the kit below.


Happy Scrapping Everyone!