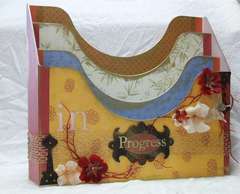
Challenge #3 - In Progress Projects, finished projects and albums
I don't know about you all but I have a lot of in-progress projects. Some are mini albums some are pages (since it usually takes be 2 days to get a layout completed with interruptions). I almost always have a project like invitations or V-day cards for my son's class in the works too. I am NOT a chronological scrapbooker so I am bouncing back and forth between all the different albums I am working on.
So lets get this under control.
Step #1 - Identify what type of in-progress projects you have going on a regular basis.
Step #2 - Are these short term in-progress projects or long term? For example a layout would be a short term project. A baby album or school album would be a long term. You might have both.
Step #3 - Separate the items you have purchased exclusively for that project from your stash.
Step #4 - Get organized - Choose a storage option...
a) Ziploc Gallon baggies - Works for smaller temporary projects like layouts etc. You can keep these baggies in a drawer. Or you can get a pretty file box and alter it if it doesn't match. Most kits come organized like this and can also be stored with this method for an easy project on the go.
b) Page Planners - Mine are from Creative memories but the ones listed below are cropper hopper brand. These are perfect for keeping the items for you pages together. I use them to pre-plan my page and have them ready to go. They are great for social and solo scrapbookers alike. As I am working on the layouts or pre-planning them. I store these folders in this unit on my desk.
(this in-progress type holder would also work with the Ziploc baggy option)
c) Cropper hoppers plastic container - stack nicely and can hold supplies for almost an entire album. These probably work best for mini albums or larger themed albums. These are ideal for people who like to take projects like this to crops.
d) 12x12 storage boxes - they look like photo boxes but lager. These also are great for mini albums and themed album pages and supplies. Unlike the cropper hopper they are cheaper yet they don't stack. They also can be altered easier. But they are harder to take out to crops.
e) A drawer- lots of the plastic drawer organizers you buy at M's and JA's are large enough to be able to use the drawers like a 12 x 12 storage box or the cropper hopper, without the mobility. These also work great for those solo scrappers. Keeping the projects in a drawer gives you quick and easy access to your project and to put it away. You could organize a baby album keeping all together.
Anyone else have and wonderful ideas on how to organize this? :heart: Please share.
Wednesday, February 10, 2010
Monday, February 8, 2010
Two of a kind
I made my first layout and card in my new scraproom this weekend. The room is not fully unpacked and far from being organized, but I could not resist and it was for my Design Team I am part of on The Scrappiest Sketch #51.

Here is the coordinating card I created from the scraps of this layout...

I hope you all have a wonderful day and have time to be creative. HAPPY SCRAPPING!

Here is the coordinating card I created from the scraps of this layout...
I hope you all have a wonderful day and have time to be creative. HAPPY SCRAPPING!
Challenge #2 - Adhesives
Challenge #2 - Adhesives
Things to know:
The key here is to always make sure that what ever adhesive you are using you need to make sure it is Acid Free. (This includes you glitter glue!!) No point in working so hard creating a beautiful album of fabulous pages for your family to have forever just to run those pages over time with the wrong adhesive. Here are 10 different types of adhesives. If you have not herd of some please ask and I would be happy to share. There are probably more out there too so let's enlighten each other on the wonderful world of things that stick.
(excerpts of an article on http://www.xomba.com/10_types_scrapbooking_adhesives )
"*Dimensional- usually a foam center between two pieces of adhesive; gives dimension to your page, be it photos or embellishments.
*Dots (also called tabs) - small pieces of adhesive, usually found in a roll or on cards, that are perfect for attaching small embellishments like buttons, chipboard letters, or acrylic items.
*Liquid - often quick drying with an even consistency, good as a multi-purpose adhesive for scrapbooking.
*Multi-purpose - handles multiple types of media used in scrapbooking (paper, fabric, chipboard, embellishments); a good choice for a beginner.
*Permanent - when you want your photos and embellishments to stick forever, permanent is the way to go. Comes in a variety of formats (including dots, liquids, glue sticks, and sheets), and cannot be moved. Ever.
* Re-positionable - allows you to move pieces of your layout for a short amount of time before they become affixed to the page. This also comes in a variety of forms.
*Runners (also called tape runners) - easy application, allows for control over the amount used. These also work on a variety of media types.
*Sheets - used to create stickers, often used with a machine. When used with a machine, great for die-cuts and paper letters.
*Spray - use for "invisible" hold, for items like vellum or transparencies.
*Stick - easy application, works well with a variety of surfaces and media. A very good choice for a beginning scrapbooker."
Storage Solutions: Basket or drawer on or in your desk, Hanging them up on the wall in front of you, photo box
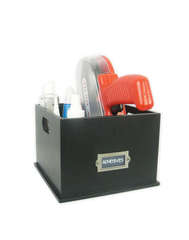
Storage Crate:
Adhesive shelf: http://www.scrapbook.com/gallery/?m=image&id=2544059&type=searchwords&s=adhesive+storage&types=1,3,5
Desk organizer:
The key with storing these is to have them within arms reach NO ONE can create any paper crafts without adhesives.
Tips:
Check for any that might need refills soon. Add them to your shopping list.
Clean up all tips and ones that have adhered themselves to something. Make sure they are all in ready to use condition.
For liquid glue - like glitter glue can have bubbles in it when you are trying to apply it to your work. To keep this from happening so much try storing it upside down... JUST MAKE SURE IT IS FULLY CLOSED so it does not leak... YIKES!!
Things to know:
The key here is to always make sure that what ever adhesive you are using you need to make sure it is Acid Free. (This includes you glitter glue!!) No point in working so hard creating a beautiful album of fabulous pages for your family to have forever just to run those pages over time with the wrong adhesive. Here are 10 different types of adhesives. If you have not herd of some please ask and I would be happy to share. There are probably more out there too so let's enlighten each other on the wonderful world of things that stick.
(excerpts of an article on http://www.xomba.com/10_types_scrapbooking_adhesives )
"*Dimensional- usually a foam center between two pieces of adhesive; gives dimension to your page, be it photos or embellishments.
*Dots (also called tabs) - small pieces of adhesive, usually found in a roll or on cards, that are perfect for attaching small embellishments like buttons, chipboard letters, or acrylic items.
*Liquid - often quick drying with an even consistency, good as a multi-purpose adhesive for scrapbooking.
*Multi-purpose - handles multiple types of media used in scrapbooking (paper, fabric, chipboard, embellishments); a good choice for a beginner.
*Permanent - when you want your photos and embellishments to stick forever, permanent is the way to go. Comes in a variety of formats (including dots, liquids, glue sticks, and sheets), and cannot be moved. Ever.
* Re-positionable - allows you to move pieces of your layout for a short amount of time before they become affixed to the page. This also comes in a variety of forms.
*Runners (also called tape runners) - easy application, allows for control over the amount used. These also work on a variety of media types.
*Sheets - used to create stickers, often used with a machine. When used with a machine, great for die-cuts and paper letters.
*Spray - use for "invisible" hold, for items like vellum or transparencies.
*Stick - easy application, works well with a variety of surfaces and media. A very good choice for a beginning scrapbooker."
Storage Solutions: Basket or drawer on or in your desk, Hanging them up on the wall in front of you, photo box
Storage Crate:
Adhesive shelf: http://www.scrapbook.com/gallery/?m=image&id=2544059&type=searchwords&s=adhesive+storage&types=1,3,5
Desk organizer:

The key with storing these is to have them within arms reach NO ONE can create any paper crafts without adhesives.
Tips:
Check for any that might need refills soon. Add them to your shopping list.
Clean up all tips and ones that have adhered themselves to something. Make sure they are all in ready to use condition.
For liquid glue - like glitter glue can have bubbles in it when you are trying to apply it to your work. To keep this from happening so much try storing it upside down... JUST MAKE SURE IT IS FULLY CLOSED so it does not leak... YIKES!!