THE KEY TO GOOD PATTERNED PAPER ORGANIZATION IS TO: have it organized to match your train of thought.
HORIZONTAL OR VERTICAL?
(click here for full article)
"Scrapbook Paper Storage Idea #1: Horizontal Paper http://www.scrapbook.com/gallery/?m=image&id=2579363&type=searchwords&s=paper+storage&types=1,3,5
Most scrapbook stores will store their paper horizontally because they have the room for rows and rows of shelves and racks. Now, most of us don't have room for all those shelves, but horizontal storage is still a possibility with 12" x 12" plastic snap top cases. You can buy them individually or as part of a three-drawer or six-drawer cart, so you can make the most use out of your vertical space. "
Racks
Wire cubes
Cubes
"Scrapbook Paper Storage Idea #2: Vertical Paper http://www.scrapbook.com/gallery/?m=image&id=2580403&type=searchwords&s=paper+storage&types=1,3,5
Depending on your preferences, you can use traditional magazine storage files for 8.5" x 11" paper (or on your scrapbook table to store scrap paper), but you will have to get special storage files for 12" x 12" scrapbook paper. Vertical paper storage is best for cardstock or other papers that you will be accessing frequently because you can just slide the storage file out and pick the paper you need.
These paper holders also come with dividers, so you can store multiple colors within a singe file! Just one thing to keep in mind is that you will need very tall shelves if you plan on using these vertical storage files in a bookshelf."
Baskets
Cubes vertical
Files
HOW TO ORGANIZE IT - Now that you have thought about WHAT to store them in lets talk about HOW...
Cardstock - seem simple enough, by color right or brand? But what about those patterned papers? Do you Separate your cardstock from your patterned paper? Or would it work better for you if you had all the pink patterned paper then pink cardstock together?
Patterned Papers -
1) By color - Are you the type that reaches for the color first when you need something in your scraproom? Within each color do you organize it from lighter to darker colors?
Cropper hoppers by color:
http://www.scrapbook.com/gallery/?m=image&id=1300547&type=searchwords&s=paper+storage&start=600&types=1,3,5
http://www.scrapbook.com/gallery/?m=image&id=2104481&type=searchwords&s=paper+storage&start=240&types=1,3,5
2) By Brand & MFG - do you have a great memory for brands. Do you think to your self when you are scrapping..."that rust and white flourish paper from the Everafter line that Cosmo Cricket put out would be perfect!" If so they by Brand and collection would be the way for you to organize.
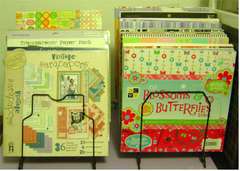
Great way to organize by collection and brand if you like to keep them in their stacks...
3) By Theme and Pattern - Are you a graphic scrapper? One who knows they need a stripe or a polka-dot paper to balance out the floral you just picked as the background paper. Or do you scrap by theme a lot. Maybe you create a lot of mini albums or you prefer ballet shoe paper for your little princesses recital page.
There ya go... these are the best ways to organize it... now you can do it in sub categories... say you want to organize it by Brand but within each brand you want it by theme or color. Maybe it is by color first and within that color it is by pattern and theme. That works too but one of these three will be the Main way you will organize with a possible sub category.
Consider size - do you sort the scraps (if you separate these from your full sheets we will go over how to store them latter this week) into your full sheets or maybe you buy 6x6 paper. Do you sort it into your 12x12? That is up to you. Just keep in mind that when you are working on a 12x12 page you can't always use the 6x6.
THINGS YOU SHOULD KNOW...
1) never store in direct sunlight preferably a cool, dry place
2)Store it completely separate from other supplies. If you mix them you are undoubtedly asking for creasing or tearing.
3)When looking for storage make sure that you choose a container that fits a 12x12 piece of paper or a 8x8, if that is your size preference. Keeping the paper fitting snugly will keep it from getting bent or damaged.
4)If you keep it organized it will lead to an easier scrapbooking experience. So make sure you keep it organized.[/list]
You can store them on shelves without organizational units. Keep in mind though that they will slip easily and have a chance of making a mess. Storing horizontally with out organizers creates the same problem. When you need one near the bottom all the others will begin to fall and it becomes one large balancing act.
**** Don't have the cash to fork out for these organizers? Try these almost free solutions -
Horizontal
Vertical
Step by step instructions: http://www.wescrap.com/scrapbooking-resources/tutorials/altered-art/168-creating-decorated-verticle-paper-storage-boxes
JUST TO DROOL OVER....
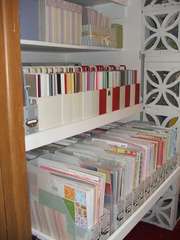
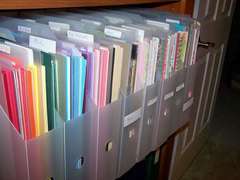
MY STORAGE SOLUTIONS:
I chose to sort by color. Each color has it's own vertical cropper hopper. The Patterned Paper is first then the Cardstock with a cropper hopper divider in-between. I am loving this system... if I am creating a blue page I can snag my Patterned paper and Cardstock all at one time. Streamlining the way my brain thinks and coordinating it with the organizational choices in my room. Perfect!

Challenge #1 Week #2 - Patterned Paper/ Cardstock

