Challenge#4 - Weekend - Week #1: Tools (This includes cutting, die and embossing machines, punches, paper trimmers, brushes, scissors, cropadials, tool kits etc.)
Please note that this and Fridays can be done anytime this weekend. I know you all have lives so if you can't do it then just print it out and go back to it later this month when you do have more time.
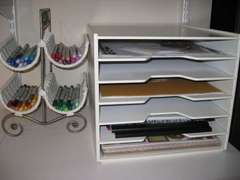
TOOLS AT YOUR DESK: What tools do you use 100% on every page? Exacto knife, bone folder, files, paper piercing tools, cropadial (finally totally stoked mine is the orange one and not pink cause it matches my room now...LOL), compass, adhesive eraser, bone folder, etc... These can be stored in a drawer, on a shelf or on your desk the key is to try to keep them in arms reach.
DESK TOP STORAGE SOLUTIONS:
Pegboard:
http://www.scrapbook.com/gallery/?m=image&id=2421551&type=searchwords&s=tool++storage&types=1,3,5
http://www.scrapbook.com/gallery/?m=image&id=2272467&type=searchwords&s=tool++storage&start=20&types=1,3,5
Tool Caddy:
Baskets and buckets:
http://www.scrapbook.com/gallery/?m=image&id=2077491&type=searchwords&s=tool++storage&start=40&types=1,3,5
http://www.scrapbook.com/gallery/?m=image&id=1998587&type=searchwords&s=tool++storage&start=60&types=1,3,5
Home made (for those handy with real tools):
http://www.scrapbook.com/gallery/?m=image&id=161339&type=searchwords&s=tool++storage&start=200&types=1,3,5
CUTTING AND EMBOSSING MACHINES:
These need table top space. If you don't store them on the table top you at least need a sheared space you can use when you bring the machine out to use it. The dies and cartridges need to be stored close at hand to the machine. If you have electrical cartridges store them in a dry, temperature controlled, dust free environment. The cricut needs storage for the tools and a place to store the mats flat as well.
Cricut: The biggest thing about this machine is that it needs room to work. Make sure you have a clearance in front and behind for the mat to go in and out.
http://www.scrapbook.com/gallery/?m=image&id=2266093&type=searchwords&s=cricut+storage&start=20&types=1,3,5
Cartridges and books:
Space saver:
http://www.scrapbook.com/gallery/?m=image&id=2588165&type=searchwords&s=cricut+storage&types=1,3,5
http://www.scrapbook.com/gallery/?m=image&id=2580223&type=searchwords&s=cricut+storage&types=1,3,5
In boxes:
http://www.scrapbook.com/gallery/?m=image&id=1730151&type=searchwords&s=cricut+storage&start=100&types=1,3,5
Sizzix:
Machine needs a flat surface with enough room to operate it.
Dies and Embossing folders:
Cubby and shelf storage:
http://www.scrapbook.com/gallery/?m=image&id=2289407&type=searchwords&s=sizzix+storage&types=1,3,5
http://www.scrapbook.com/gallery/?m=image&id=1531777&type=searchwords&s=sizzix+storage&types=1,3,5
http://www.scrapbook.com/gallery/?m=image&id=1637985&type=searchwords&s=sizzix+storage&types=1,3,5
http://www.scrapbook.com/gallery/?m=image&id=101273&type=searchwords&s=sizzix+storage&start=40&types=1,3,5
Thincuts container:
http://www.scrapbook.com/gallery/?m=image&id=2294503&type=searchwords&s=sizzix+storage&types=1,3,5
Cuddlebug: Similar storage to the Sizzix. Please share your ideas.
PUNCHES:
Can be stored just about any where! They are durable though they are bulky.
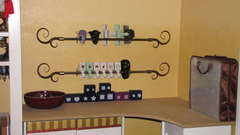
Towel rack or curtain rods:
Baskets:
http://www.scrapbook.com/gallery/?m=image&id=1998585&type=searchwords&s=punches+storage&start=40&types=1,3,5
http://www.scrapbook.com/gallery/?m=image&id=391769&type=searchwords&s=punches+storage&start=160&types=1,3,5
Thumbtacks (Cheap and ingenious):
In a drawer:
http://www.scrapbook.com/gallery/?m=image&id=1467301&type=searchwords&s=punches+storage&start=100&types=1,3,5
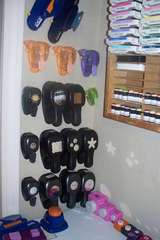
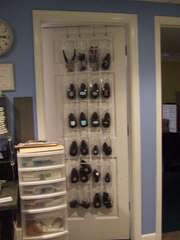
Door hanging shoe rack:
On a shelf:
http://www.scrapbook.com/gallery/?m=image&id=1382641&type=searchwords&s=punches+storage&start=100&types=1,3,5
CropinStyle Punch Pall:
http://www.scrapbook.com/gallery/?m=image&id=875359&type=searchwords&s=punches+storage&start=140&types=1,3,5
PAPER TRIMMERS:
Paper trimmers must have a flat surface to work correctly. They can be stored else where but when operating them they need to be on a hard table top. Some paper trimmers come with decorative blades that can be switched out. These blades and extra strait edge or perforated replacement blades need a storage place out of reach of little ones.
Bind - it - all... the only thing about these for storage is to make sure you have the room to use it where you want to. It would be nice like all machines if you don't use it that often to have a cover for it or a bag to store it in, but not necessary as long as you clean it occasionally with some air in a can.
Lamination Machines - I could not find anything about home lamination Machines. I know the refill material is usually heat sensitive so I would suggest to store that in a cool place. You few that have one might want to check your product guide to see if there are any specifications.
OTHER: Did I miss anything? Lamination machines etc... does anyone have those?
Sorry this one is shorter then the last one I just typed out and lost but I am running out of time today to post this.
I hope you all have a fun weekend working on these and had time to play catch up in my tardiness of posting this challenge. :Heart:
Saturday, February 5, 2011

Friday, February 4, 2011
Photo Friday and Fun!
Week #3 Week #1 - Photo Friday $ Fun - Photos & Memorabilia
DUN DUN DUN... are you ready for this? It is a huge undertaking that we will be working on every Friday for the rest of this challenge.
SET A GOAL: Some of you may be the type who want to sit down and get it all done at once. That is fine if that is your goal. Note: You will have Fridays for fun the rest of the month if you do this . However if you are like me I can only take so much of one thing for so long. SET A REASONABLE GOAL! It maybe working on photo organization for 1 or 2 hours, maybe it is to get 1 or 2 boxes organize tonight. Maybe you want to get an entire album planned out with your photos pulled and placed in the albums. No matter what your goal is... MAKE IT, DO IT and CELEBRATE IT... tell us you did it and move on to create something fun. There is a creative challenge at the end of this post by a Guest Challenger.
BEFORE BEGINNING: IF YOU HAVE MOSTLY HARD COPIES OF PHOTOS PLEASE FINISH THE OTHER CHALLENGES FIRST BEFORE STARTING THIS ONE. I want your space to be clean and free of small pieces of metal, chipboards and such items. These are you memories and the most precious part of our scrapbooking. Care for them well.
Photo Preservation:
Image Master's website -
Now that we know how to store and handle photos... just a brief reminder... we need to sort them. Sorting them by event and chronological order is usually the most common.
I think I am going to sort mine by color... J/K. Some people sort them by person, family and events. Especially if they are doing albums for each child etc.
There are not many photo storage options out there it is up to you to choose what will work best for you. The key is to keep them in a dry dark place.
MEMORABILIA - Many of these items are not asid free or photo safe, though with paper in between them (acting as a barrier) and the photo you can scrap them onto the page.. I would suggest also storing them in a dry dark place for the sun and moisture can damage these as well.
The storage options for this could be the same as your photos. You may not be able to keep them all in the same boxes mixed together but you can put them on the same shelf in matching boxes so they are handy.
Cross referencing - Sorting memorabilia the same way you sort your photos will help with the easy of finding what you need when you need it.
If you have a piece of memorabilia for a certain date or event. Place a 4x6 piece of scrap photo safe paper in with the photos with a reminder that you have the memorabilia item in the other box. This will keep you from forgetting the memorabilia when you go to pull your photos for that event or person.
If you have tons of memorabilia you may want to do a page of just that. If you keep a log of what pages you need to create for what albums make sure you add these memorabilia pages to that log. This would be a great thing to use you binder for.
LABELING - Use dividers frequently. This is very important for ease of locating the photos you want. If you don't have any or you don't want to buy more then make your own out of some of your photo safe scraps. Add a tab at the top so you can easily see what you write on the label above the tops of the photos.
NOTE OF STORAGE PLACEMENT: I know there are only a few of you who have your scrap areas in the basement and have fear of flooding. I live in a flood zone with no basement and I want EVERYONE to be aware of this. God forbid if any of us have to deal with this but even a broken pipe can cause excessive water damage and I would hate for any of you to loose your photos or your albums. The higher the better. If you are in a place that never floods I would suggest only a foot or two minimum off of the floor but if you have a greater chance place place these items higher accordingly.
DIGITAL PHOTOS: Sorting would be the same way. Since you can't put a place holder next to the photos with memorabilia then maybe just adding a word document with a memorabilia log for you to check and save it within the file your coordinating photos are in.
BACK THEM UP BACK THEM UP BACK THEM UP... I don't care how you do it... external hard drive, USB memory stick, a photo hosting website, CD... ONCE YOU HAVE TAKEN THE TIME TO ORGANIZE IT PLEASE BACK THEM ALL UP!!!!!
Once you finish your goal then reward yourself with some creative time! Maybe alter the photo boxes or scrapbook those oh so irresistible photos you found while sorting through them all. Bottom line here REWARD YOURSELF WITH SOME FUN!
DUN DUN DUN... are you ready for this? It is a huge undertaking that we will be working on every Friday for the rest of this challenge.
SET A GOAL: Some of you may be the type who want to sit down and get it all done at once. That is fine if that is your goal. Note: You will have Fridays for fun the rest of the month if you do this . However if you are like me I can only take so much of one thing for so long. SET A REASONABLE GOAL! It maybe working on photo organization for 1 or 2 hours, maybe it is to get 1 or 2 boxes organize tonight. Maybe you want to get an entire album planned out with your photos pulled and placed in the albums. No matter what your goal is... MAKE IT, DO IT and CELEBRATE IT... tell us you did it and move on to create something fun. There is a creative challenge at the end of this post by a Guest Challenger.
BEFORE BEGINNING: IF YOU HAVE MOSTLY HARD COPIES OF PHOTOS PLEASE FINISH THE OTHER CHALLENGES FIRST BEFORE STARTING THIS ONE. I want your space to be clean and free of small pieces of metal, chipboards and such items. These are you memories and the most precious part of our scrapbooking. Care for them well.
Photo Preservation:
Image Master's website -
"PHOTO STORAGE . . .
When possible, keep photographs in enclosures that protect them from light and dust and provide physical support during display or use. Chemically stable plastic or paper enclosures, free of sulfur, acids, and peroxides, are recommended. Plastic sleeves should be constructed of uncoated polyester, polypropylene, or polyethylene.
For most photographic materials, unbuffered paper enclosures are preferred over buffered enclosures. Alkaline buffering is added to archival storage papers to absorb acidity from the stored material or the environment surrounding it. However, some photographs may be altered by the buffering in alkaline papers, so unbuffered paper is recommended for most processes.
Film-based negatives, which can produce acidic gasses as they age, should be placed in archival, buffered enclosures and stored separately from other photographic materials. Store cased objects, such as daguerreotypes and ambrotypes, in their original cases or frames with the addition of custom-made, four-flap paper enclosures to reduce wear and tear on fragile cases. Place individually housed prints, negatives, and cased objects in acid-free, durable boxes that will afford further protection from light, dust, and potential environmental fluctuations.
The storage of photographs in albums serves the dual purpose of organizing groups of images while protecting them from physical and environmental damage. Albums can be wonderful sources of historic and genealogical information. Preserve them intact when possible and store them in custom-fitted archival boxes. For the storage of family photographs, albums constructed with archival materials are available from conservation suppliers. Magnetic or self-adhesive albums can be detrimental to photographs and should not be used.
HANDLING PHOTOGRAPHS . . .
Most damage to photographs results from poor handling. A well-organized and properly housed collection promotes respect for the photographs and appropriate care in handling. When images can be located quickly, there is less possibility of physical damage. The enclosures should be designed in relation to the intended use of the photographs, as well as their type and condition. Establish handling procedures and adhere to them whenever photographs are being used. View photographs in a clean, uncluttered area, and handle them with clean hands. Wear white cotton gloves to lessen the possibility of leaving fingerprints and soiling the materials; however, gloves may reduce the manual dexterity of the user.
Keep photographs covered when they are not being viewed immediately. Do not use ink pens around photographic materials. Mark enclosures with pencil only. If it is necessary to mark a photograph, write lightly with a soft lead pencil on the back of the image."
Now that we know how to store and handle photos... just a brief reminder... we need to sort them. Sorting them by event and chronological order is usually the most common.
I think I am going to sort mine by color... J/K. Some people sort them by person, family and events. Especially if they are doing albums for each child etc.
There are not many photo storage options out there it is up to you to choose what will work best for you. The key is to keep them in a dry dark place.
MEMORABILIA - Many of these items are not asid free or photo safe, though with paper in between them (acting as a barrier) and the photo you can scrap them onto the page.. I would suggest also storing them in a dry dark place for the sun and moisture can damage these as well.
The storage options for this could be the same as your photos. You may not be able to keep them all in the same boxes mixed together but you can put them on the same shelf in matching boxes so they are handy.
Cross referencing - Sorting memorabilia the same way you sort your photos will help with the easy of finding what you need when you need it.
If you have a piece of memorabilia for a certain date or event. Place a 4x6 piece of scrap photo safe paper in with the photos with a reminder that you have the memorabilia item in the other box. This will keep you from forgetting the memorabilia when you go to pull your photos for that event or person.
If you have tons of memorabilia you may want to do a page of just that. If you keep a log of what pages you need to create for what albums make sure you add these memorabilia pages to that log. This would be a great thing to use you binder for.
LABELING - Use dividers frequently. This is very important for ease of locating the photos you want. If you don't have any or you don't want to buy more then make your own out of some of your photo safe scraps. Add a tab at the top so you can easily see what you write on the label above the tops of the photos.
NOTE OF STORAGE PLACEMENT: I know there are only a few of you who have your scrap areas in the basement and have fear of flooding. I live in a flood zone with no basement and I want EVERYONE to be aware of this. God forbid if any of us have to deal with this but even a broken pipe can cause excessive water damage and I would hate for any of you to loose your photos or your albums. The higher the better. If you are in a place that never floods I would suggest only a foot or two minimum off of the floor but if you have a greater chance place place these items higher accordingly.
DIGITAL PHOTOS: Sorting would be the same way. Since you can't put a place holder next to the photos with memorabilia then maybe just adding a word document with a memorabilia log for you to check and save it within the file your coordinating photos are in.
BACK THEM UP BACK THEM UP BACK THEM UP... I don't care how you do it... external hard drive, USB memory stick, a photo hosting website, CD... ONCE YOU HAVE TAKEN THE TIME TO ORGANIZE IT PLEASE BACK THEM ALL UP!!!!!
Once you finish your goal then reward yourself with some creative time! Maybe alter the photo boxes or scrapbook those oh so irresistible photos you found while sorting through them all. Bottom line here REWARD YOURSELF WITH SOME FUN!
Thursday, February 3, 2011
Key to my Heart
Getting ready for Valentines day is one of my favorite things to do. I just love the colors and the emotions behind the sentiments.
Today I want to share with you a card I made for just this occasion. It is called "Key to my Heart".

I found a wonderful flower tutorial on youtube by RoseS915 and had to try it. I used Ritzy Ditzy Glitz in Silver to soften the scalloped circle die cuts and to give it some shimmer. I also used my Quickie Glue Pen and P K Glitter Glitz in Silver to add the glittered edge once it was dry. I threw in a layer of tool spritzed and glittered the same way. I just love this flower!!!

Here is her video... (make sure to watch her part 2)
The padlock and key were cut from sticky paper and silver velum then glittered with P K Glitter Glitz in Silver and Tudor Rose. I just love this color combo, don't you?

Now to decide who to give it to... hehe.
Happy Scrapping!
~ Grace ~
Wednesday, February 2, 2011
Scraproom Makeover - Color Altering Items - Challenge #2
Challenge #2 - Week #1 - (Wednesday) Color Altering Items - Inks, pens, mists, powders, and paints
This is the day we sort out our colors! Any color altering items or ink.

Lets discuss and figure out what we are going to do with these items.
*** Pens - Storing Scrapbook Pens, pencils and Markers (quoted from scrapbook.lifetips .com)
"One of the most important things to remember when storing pens and markers is to store them horizontally so that the ink flows evenly. Most people may be inclined to buy containers that stand vertically, but storing them this way will make all the ink flow to one end. If the ink is at one end of the pen or marker they may not last as long or work as well. Storage drawers will allow the markers and pens to be stored horizontally. You can leave your markers in their original box and store them in a desk drawer or plastic organizer drawer.
Another suggestion is to buy a marker storage case that holds pens and markers; these cases are portable and make it easy to keep all of your coloring and writing utensils in the same place for quick access."
Once you have decided where to store them you will need to TEST every pen quickly to make sure they still work. Trash the ones that don't! Make a list in your binder of ones that need to be replaced.
Sort pens by: Color or color families
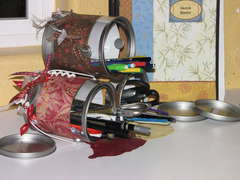
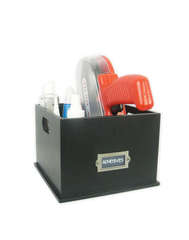
Storage Solutions: Organized within a drawer, wine bottle holder, Altered Cylinder containers form the kitchen.
PVC PIPES
Pails on the side of your table
Plastic 1$ pen boxes: Scraproom By LeaLa
Acrylic cups
Colored Pencil Storage and Swatch File
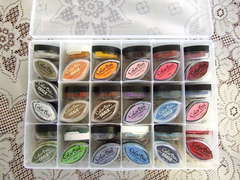
*** Ink pads and refills - (quoted from Scrapjazz)
"Ink pads are best stored flat. Each pad is filled with liquid ink, and this ink can travel throughout the pad over time if not stored properly. For example, if you stored your ink pads vertically, over time the ink would drop to the bottom edge of the pad, and you would no longer be able to get a fully-inked image when you tried to use the full surface of your ink pad. For this same reason, it is highly recommended that you store your ink pads upside down (unless you have Stampin' Up they already are designed to do this). This will keep the ink flow at the surface of the pad, rather than allowing the ink to seep down to the bottom. This is especially important for dye-based ink pads, as this ink is thinner than some other inks and will migrate through the pad at a faster rate. Ink pads containing thicker inks, such as pigment ink, can be stored face up."
How to sort your in pads? - By color, manufacture, ink type or size
Storage solutions:
Wooden Cassette holder
Custom built holder, store bought rotating caddies, or simply stack on a shelf (make several smaller stacks. This will make it easier to access without towers of inks toppling down when you need the bottom color.)
Ink pads can be cumbersome at your workstation. Most people store them off to the side. Why not have a reference guide at your table so you know exactly what color you will need?
This is a MUST SEE IMAGE of a great Color Swatch for your Inks.
*** Mists - These can be stored or displayed nicely on a shelf. Putting them in a color order would make it appealing. If you have the mini misters you can store them on a counter top in the store bought holder or have your resident handy man drill some holes into a block of wood and don't forget to alter it to match your space decor.
Mini Mister holder
Shelf Unit
Drawer Storage - Though I love the organization of this option I don't like not seeing the colors of the mists. Maybe if you put a dot sticker (used for yard sale pricing, found at Walmart) You can spray it as a sample and stick it to the top of the lid.
*** Paints - Paints have no specific way to store them as long as they are not exposed to extreme temperatures hot or cold. Though I have found if you store them upside down you can make your experience working with them a bit less frustrating. One of the benefits is you can always see the colors through the bottom of the bottles. If the bottom is up then you can see at a glance what colors you have. When the bottle gets low just dab the bottom of the container with the paint and let dry. The other reason is that the paint will be near the top when you go to use the bottle so it can easily be removed quickly onto your paint pallet. If you do this just make sure the lids are on tight and know that with less air in and out of the bottle when in use the less they will dry out.
*** Other (?) - Did I miss anything? Please bring it to my attention.
REMEMBER: Always leave room for your stuff to grow!!! Especially you collectors!
This is the day we sort out our colors! Any color altering items or ink.

Lets discuss and figure out what we are going to do with these items.
*** Pens - Storing Scrapbook Pens, pencils and Markers (quoted from scrapbook.lifetips .com)
"One of the most important things to remember when storing pens and markers is to store them horizontally so that the ink flows evenly. Most people may be inclined to buy containers that stand vertically, but storing them this way will make all the ink flow to one end. If the ink is at one end of the pen or marker they may not last as long or work as well. Storage drawers will allow the markers and pens to be stored horizontally. You can leave your markers in their original box and store them in a desk drawer or plastic organizer drawer.
Another suggestion is to buy a marker storage case that holds pens and markers; these cases are portable and make it easy to keep all of your coloring and writing utensils in the same place for quick access."
Once you have decided where to store them you will need to TEST every pen quickly to make sure they still work. Trash the ones that don't! Make a list in your binder of ones that need to be replaced.
Sort pens by: Color or color families
Storage Solutions: Organized within a drawer, wine bottle holder, Altered Cylinder containers form the kitchen.
PVC PIPES
Pails on the side of your table
Plastic 1$ pen boxes: Scraproom By LeaLa
Acrylic cups
Colored Pencil Storage and Swatch File
*** Ink pads and refills - (quoted from Scrapjazz)
"Ink pads are best stored flat. Each pad is filled with liquid ink, and this ink can travel throughout the pad over time if not stored properly. For example, if you stored your ink pads vertically, over time the ink would drop to the bottom edge of the pad, and you would no longer be able to get a fully-inked image when you tried to use the full surface of your ink pad. For this same reason, it is highly recommended that you store your ink pads upside down (unless you have Stampin' Up they already are designed to do this). This will keep the ink flow at the surface of the pad, rather than allowing the ink to seep down to the bottom. This is especially important for dye-based ink pads, as this ink is thinner than some other inks and will migrate through the pad at a faster rate. Ink pads containing thicker inks, such as pigment ink, can be stored face up."
How to sort your in pads? - By color, manufacture, ink type or size
Storage solutions:
Wooden Cassette holder
Custom built holder, store bought rotating caddies, or simply stack on a shelf (make several smaller stacks. This will make it easier to access without towers of inks toppling down when you need the bottom color.)
Ink pads can be cumbersome at your workstation. Most people store them off to the side. Why not have a reference guide at your table so you know exactly what color you will need?
This is a MUST SEE IMAGE of a great Color Swatch for your Inks.
*** Mists - These can be stored or displayed nicely on a shelf. Putting them in a color order would make it appealing. If you have the mini misters you can store them on a counter top in the store bought holder or have your resident handy man drill some holes into a block of wood and don't forget to alter it to match your space decor.
Mini Mister holder
Shelf Unit
Drawer Storage - Though I love the organization of this option I don't like not seeing the colors of the mists. Maybe if you put a dot sticker (used for yard sale pricing, found at Walmart) You can spray it as a sample and stick it to the top of the lid.
*** Paints - Paints have no specific way to store them as long as they are not exposed to extreme temperatures hot or cold. Though I have found if you store them upside down you can make your experience working with them a bit less frustrating. One of the benefits is you can always see the colors through the bottom of the bottles. If the bottom is up then you can see at a glance what colors you have. When the bottle gets low just dab the bottom of the container with the paint and let dry. The other reason is that the paint will be near the top when you go to use the bottle so it can easily be removed quickly onto your paint pallet. If you do this just make sure the lids are on tight and know that with less air in and out of the bottle when in use the less they will dry out.
*** Other (?) - Did I miss anything? Please bring it to my attention.
REMEMBER: Always leave room for your stuff to grow!!! Especially you collectors!
Tuesday, February 1, 2011
Scraproom Makeover - Adhesives - Challenge #1
Challenge #1, Week #1 - Adhesives
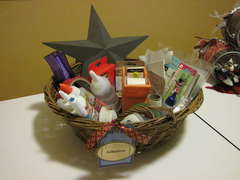
Welcome to the first challenge of the Scraproom Makeover 2011. Here is my video about my cleaned out basket of Adhesives. I made two videos but had trouble downloading the first one about me during the clean out... so here is the final basket once the challenge was complete.
Please Note: This is my first video of this sort so bare with me.
Things to know:
The key here is to always make sure that what ever adhesive you are using you need to make sure it is Acid Free. (This includes you glitter glue!!) No point in working so hard creating a beautiful album of fabulous pages for your family to have forever just to run those pages over time with the wrong adhesive. Here are 10 different types of adhesives. If you have not herd of some please ask and I would be happy to share. There are probably more out there too so let's enlighten each other on the wonderful world of things that stick.
There are many different types of adhesives and they are used for many different things. Here is a good reference list.
Storage Solutions: Basket or drawer on or in your desk, Hanging them up on the wall in front of you, photo box...
The key with storing these is to have them within arms reach NO ONE can create any paper crafts without adhesives.
Tips:
Check for any that might need refills soon. Add them to your shopping list.
Clean up all tips and ones that have adhered themselves to something. Make sure they are all in ready to use condition.
Trash - all glue that is drying up or tapes that are no longer sticky even adhesives that you just simply don't like. You will just end up throwing it away later once it is dried up... so why store it until then?
Liquid glue - can have bubbles in it when you are trying to apply it to your work. To keep this from happening so much try storing it upside down... JUST MAKE SURE IT IS FULLY CLOSED so it does not leak... YIKES!!!
So lets clean up and organize these items, find a "within arms reach" spot for them and purge those unused or unusable.
Welcome to the first challenge of the Scraproom Makeover 2011. Here is my video about my cleaned out basket of Adhesives. I made two videos but had trouble downloading the first one about me during the clean out... so here is the final basket once the challenge was complete.
Please Note: This is my first video of this sort so bare with me.
Things to know:
The key here is to always make sure that what ever adhesive you are using you need to make sure it is Acid Free. (This includes you glitter glue!!) No point in working so hard creating a beautiful album of fabulous pages for your family to have forever just to run those pages over time with the wrong adhesive. Here are 10 different types of adhesives. If you have not herd of some please ask and I would be happy to share. There are probably more out there too so let's enlighten each other on the wonderful world of things that stick.
There are many different types of adhesives and they are used for many different things. Here is a good reference list.
* Dimensional - usually a foam center between two pieces of adhesive; gives dimension to your page, be it photos or embellishments.
* Dots (also called tabs) - small pieces of adhesive, usually found in a roll or on cards, that are perfect for attaching small embellishments like buttons, chipboard letters, or acrylic items.
* Liquid - often quick drying with an even consistency, good as a multi-purpose adhesive for scrapbooking.
* Multi-purpose - handles multiple types of media used in scrapbooking (paper, fabric, chipboard, embellishments); a good choice for a beginner.
* Permanent - when you want your photos and embellishments to stick forever, permanent is the way to go. Comes in a variety of formats (including dots, liquids, glue sticks, and sheets), and cannot be moved. Ever.
* Re-positionable - allows you to move pieces of your layout for a short amount of time before they become affixed to the page. This also comes in a variety of forms.
* Runners (also called tape runners) - easy application, allows for control over the amount used. These also work on a variety of media types.
* Sheets - used to create stickers, often used with a machine or punches. When used with a machine, great for die-cuts and paper letters. It is usually accompanied with glitter, flocking, beads etc.
* Spray - use for "invisible" hold, for items like vellum or transparencies.
* Stick - easy application, works well with a variety of surfaces and media. A very good choice for a beginning scrapbooker.
Storage Solutions: Basket or drawer on or in your desk, Hanging them up on the wall in front of you, photo box...
The key with storing these is to have them within arms reach NO ONE can create any paper crafts without adhesives.
Tips:
Check for any that might need refills soon. Add them to your shopping list.
Clean up all tips and ones that have adhered themselves to something. Make sure they are all in ready to use condition.
Trash - all glue that is drying up or tapes that are no longer sticky even adhesives that you just simply don't like. You will just end up throwing it away later once it is dried up... so why store it until then?
Liquid glue - can have bubbles in it when you are trying to apply it to your work. To keep this from happening so much try storing it upside down... JUST MAKE SURE IT IS FULLY CLOSED so it does not leak... YIKES!!!
So lets clean up and organize these items, find a "within arms reach" spot for them and purge those unused or unusable.
Monday, January 31, 2011
We Have a WINNER!
Drum roll Please ---------------
We have a winner and would like to announce that Mel was the 27th entry to the contest chosen by random.org
She received three entries one for being a follower, one for posting a comment, and one for sharing it on FB.
Congrats Mel for having the 27th entry!!!! I have emailed her and she has chosen Songbird as her cartridge!!! Once again Congrats Mel!

Here are the numbers:
Nana's Fun Stuff - 2
Pink Sassy Scrapbooker - 2
Jocelyn - 2
Annie - 2
Lillian Child - 4
Gloria - 2
Madeline Kaye - 2
Heather - 2
Denise - 3
alwayscharlie - 3
Mel - 3

We have a winner and would like to announce that Mel was the 27th entry to the contest chosen by random.org
Mel said - "You know I LOVE ya Grace!! I don't have a scrappy blog, but I'm going to post on my FB page... I have LOTS of scrappy friends there. :) "
She received three entries one for being a follower, one for posting a comment, and one for sharing it on FB.
Congrats Mel for having the 27th entry!!!! I have emailed her and she has chosen Songbird as her cartridge!!! Once again Congrats Mel!
Here are the numbers:
Nana's Fun Stuff - 2
Pink Sassy Scrapbooker - 2
Jocelyn - 2
Annie - 2
Lillian Child - 4
Gloria - 2
Madeline Kaye - 2
Heather - 2
Denise - 3
alwayscharlie - 3
Mel - 3

Sunday, January 30, 2011
Quick Tip: Keep your ribbon from fraying
QUICK TIP: Do you have problems keeping your ribbon from fraying? I do... this quick tip works great for any opaque ribbon.
Take a piece of P K Glitz's Sticky Tape and secure it to the back of the ribbon where you desire to cut it. Once the sticky Tape is secure cut down the middle of it leaving some tape on both sides. I have removed the backing before and used the Sticky Tape to position the ribbon tails of my bows but this time as shown in the pic below I just left the backing on the tails but it will keep them from fraying! I love this trick!

Take a piece of P K Glitz's Sticky Tape and secure it to the back of the ribbon where you desire to cut it. Once the sticky Tape is secure cut down the middle of it leaving some tape on both sides. I have removed the backing before and used the Sticky Tape to position the ribbon tails of my bows but this time as shown in the pic below I just left the backing on the tails but it will keep them from fraying! I love this trick!
