Hello
Organizers,
Ok so I know I said there were only two left
but as I was reviewing last years I saw a challenge we threw in at the
end that was not listed and posted in the front... It was for "in
progress projects" I will post it on Monday. Here is this weekend's
challenge:
Challenge #16 - Week #4 - STAMPS, Rubber, Foam and Acrylic
I can here everyone groaning as I type lol. There are several ways to
store your stamps. First though lets look into the three main types of
stamps out there.
Rubber - These stamps come in four ways, mounted on
wood, mounted on a plastic roller wheels, unmounted with cleaning backs,
and unmounted with no foam or sticky backs. With rubber stamps you will
be looking for storage with wood or unmounted. The wood mounted stamps
can be removed off of the wood blocks and stored with your unmounted
stamps if you prefer even the ones mounted on wheels.
Acrylic - Come unmounted in a plastic packaging.
Foam - Usually come mounted on foam blocks or the shape
is large and thick with no block. Either way I have not heard of
unmounting these to use like the acrylic or rubber stamps. These are
generally much thicker and take up more space.
Here is an article from Blade Rubber Stamps with some key tips on how to care and store them...
"How to Store and care for Your Rubber Stamps
TYPES OF STAMP
Stamps are available in two formats: mounted to a wooden block, or
unmounted in sheets. These sheets can be cut up and either mounted to
re-positionable foam, or else painted on the back with a re-positionable
adhesive, eg: Stamporium Ultimate Adhesive, then used with an acrylic
block. Stamps are available in two types: traditional rubber (pink, red
or grey) or polymer (which is translucent).
LOOKING AFTER YOUR STAMPS
The two main points:
Never wash a mounted stamp under the tap - the rubber can come off the
cushion. However, if the rubber does come off, don't panic - stick the
image back on using rubber solution glue.
Never leave a rubber stamp out in the sun - this makes the rubber brittle and it can perish over time.
CLEANING STAMPS
Stamp-cleaning mats are excellent - just wet under the tap and re-use over and over. Dry off on kitchen towel.
Alchol-free baby wipes are excellent for cleaning stamps, hands, and
also to remove most inks from the handle of the stamp (the block).
Finish by blotting with kitchen towel.
Filthy, ink-clogged stamps can be cleaned with an old toothbrush -
either dampened with plain water or with a designated stamp cleaner.
Rinse off by wiping with damp kitchen roll, a damp flannel or old towel,
then dry with kitchen roll.
Absolutely disgustingly gunged stamps? Use Staz-On cleaner - this will
remove virtually any ink build-up. Finish by wiping with damp kitchen
roll etc, as above.
Polymer stamps can become a little sticky after cleaning: simply dust with baby powder.
STORAGE OF MOUNTED STAMPS
Store stamps flat, rubber side down, or else standing on edge (as in a stamp shop) facing away from the sun.
DON'T throw them into a pile in a box where the rubber or polymer is
distorted by the blocks of other rubber stamps pressing down on them.
This will create a permanent dent in the surface. Also, don't store in
wire baskets (for the same reason). Once damaged in this way, you will
find the damage is permanent.
You can layer stamps on top of each other but not too many or, again,
you may distort the rubber. Keep the big (heavy) ones at the bottom and
make sure the rubber is supported. Personally, I think two layers is
enough.
A good stop-gap for storing stamps are pizza boxes (clean, unused ones)
but again, not more than 2 or 3 on top of each other, or there will be
too much weight on the bottom layer.
Huge block stamps can be difficult to store: investigate the option of
deep drawers or cardboard boxes which can then be stored on a shelf.
Block stamps are expensive and need to be kept out of the sun - on all
surfaces! An easy, cheap option whilst you are searching for the perfect
storage solution is use an old box - one that held detergent tablets.
These have a small flap, which can be tucked inside or fastened with
self-adhesive Velcro tabs. They are the right dimensions and made of
very strong cardboard, so are stackable. If you don't like the
appearance of the box, paint it or collage scrapbook papers over the
top.
Clear nail varnish painted on the wood around the stamp helps to keep it clean, if ink stains really worry you.
If you get do ink on the block of the stamp, just get over it! A stamp
is a tool, and made to be used - don't get too worried about it, or you
will be too afraid to use it.
STORAGE OF UNMOUNTED STAMPS
Unmounted stamps are popular as they take up much less space. Store the acrylic handles in a drawer and use over and over.
WITHOUT ADHESIVE
If you prefer to use your UMs without adhesive (using glue stick on the
back, and washing off when you clean your stamps) storage is very easy.
Stamp the image onto the front of an envelope, and tuck the stamp inside. Store upright in a card file box, by category.
Too big? Use giant envelopes, and store flap-side upwards in a ring binder.
WITH ADHESIVE OR EZ MOUNT
The back of the stamp will be sticky, or clingy (to adhere to the acrylic blocks used as handles).
Stick onto the front of transparency sheets, with the index (image)
sheet behind, so that you can identify your stamps, and store in a ring
binder.
OR: Use a photo album (the sort where you peel away the protective
sheet). Place the index sheet on the cardboard under the protective
sheet, smooth back down, then stick the stamps on the front, over the
index sheet so that you can see which stamp is which. Simple!
Don't put too many stamps in each binder, or they will be too heavy to
stand up. Again, the aim is to keep the stamps clean and out of the
sun."
"Keep Away From Cardboard
Avoid storing them in contact with cardboard, it will cause the
rubber to dry out more rapidly and reduce the life of your stamps.
Plastic baskets, plastic shoe boxes, and plastic silverware organizers
are good for using in drawers to protect your stamps. You can also use a
tackle box, the depth of the drawers is ideal for most stamps, and you
can remove dividers by scoring them with a blade to make more wide open
drawers."
By QueenBeeCrafts
Storage solutions:
Mounted:
Here is a way to store your mounted stamps in crates.
http://www.scrapbook.com/gallery/?m=image& id=252371...
Single stamp storage for wood:
http://www.scrapbook.com/gallery/?m=image& id=243874...
 stamp storage
 By
J3Mel
Mini stamp storage in Cropper hopper drawers...
http://www.scrapbook.com/gallery/?m=image& id=250120...
Wall shelf unit:
http://www.scrapbook.com/gallery/?m=image& id=232774...
Jars??? - Yup -
http://www.scrapbook.com/gallery/?m=image& id=209188...
Baskets:
http://www.scrapbook.com/gallery/?m=image& id=204051...
http://www.scrapbook.com/gallery/?m=image& id=203724...
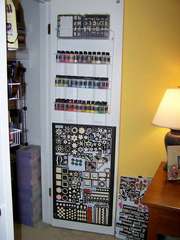
Cabinet Alphabetical by size of container:
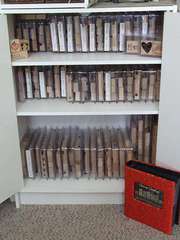 Stamp Catalog and shelf unit
 By
Hanging By A Moment
Unmounted: Here is a video that explains several types
of storage for unmounted stamps. She explains how to store them in
Baggies, laminated sheets in binders and in CD jewel cases. How to make
your own laminated sheets to store in the binders without a laminator or
purchasing them at a store.
http://www.youtube.com/watch?v=zjflQYXwS10
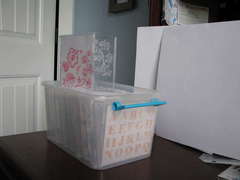
 Unmounted Stamps Storage (EZ Cling)
 By
Yadee87 She has explained nicely how to do this with Avery page protectors.
This blog shows a method of storing unmounted stamps in a large photo
box by categories and on cardstock cards she created with contact paper.
http://mynextthirtyyears.com/sharing-my-newly-orga nized...
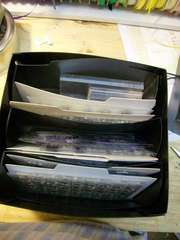 inside cm clear stamp storage
 By
Mrs. Tristan
If you don't want to remove them from MFG packaging here is an option with a binder...
http://www.scrapbook.com/gallery/?m=image& id=255637...
CD Cases:
http://www.scrapbook.com/gallery/?m=image& id=237130...
http://www.scrapbook.com/gallery/?m=image& id=232774...
http://www.scrapbook.com/gallery/?m=image& id=225914...
CD in a basket:
http://www.scrapbook.com/gallery/?m=image& id=223229...
 My Stamp Storage 1
 By
Becki Jo
Zutter Bind it All kit:
http://www.scrapbook.com/gallery/?m=image& id=235108...
Foam:
Cases:
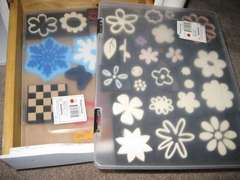 Foam Stamp Storage - 2009
 By
Reyasunshine
Drawers:
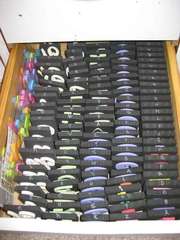 Foam Alpha Stamp Storage - 2009
 By
Reyasunshine
http://www.scrapbook.com/gallery/?m=image& id=184743...
PEG BOARD:
http://www.scrapbook.com/gallery/?m=image& id=168138...
Plastic drawers:
http://www.scrapbook.com/gallery/?m=image& id=107159...
Plastic drawers in baskets:
http://www.scrapbook.com/gallery/?m=image& id=801551...
Magnets:
 Scraproom Re-org - Photo 9
 By
Deend31
Clip it up in Baggies:
http://www.scrapbook.com/gallery/?m=image& id=122714...
Indexes or Catalogs:
Indexes: The video talked about creating an index for your stamps. This
is a great idea and making one for each CD case or your binders will be
time consuming but worth it. Have fun with this and color them too. I
will be doing this for my unmounted collection that has grown so much
recently. Then I will be doing what I did with the catalog. Since it is
hard to see the acrylic image sometimes I have to stamp them first for
an index.
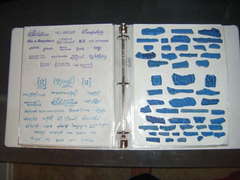
Catalog: I created a catalog for mine wood stamps. It took less time and
was cleaner too then stamping every image however it was more pricey,
adding the cost of printing the photos and the standard 4x6 photo album
it is stored in. Though I love this solution for my mounted stamps
because the stamps are organized by alphabetical and yet in the catalog I
have them sorted by type, alpha, floral/nature, holiday, sentiments...
etc. I took the photos of the sets and photo edited in the name and a
boarder. At the time I did not have a photo editing program so I added
the name in MS Paint. Uploaded it to wal-mart's photo printing site and
added a boarder from their selection.
Here is a photo of my system.
Stamp Catalog and shelf unit By
Hanging By A Moment
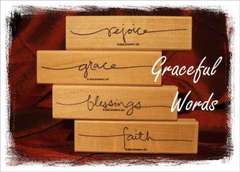 Photo of Stamp set for Catalog
 By
Hanging By A Moment Pin It


