Challenge #1 Week #1 - Adhesives - This challenge is begin hosted and discussed on Scrapbook.com
Things to know:
The key here is to always make sure that what ever adhesive you are using you need to make sure it is Acid Free. (This includes you glitter glue!!) No point in working so hard creating a beautiful album of fabulous pages for your family to have forever just to run those pages over time with the wrong adhesive. Here are 10 different types of adhesives. If you have not herd of some please ask and I would be happy to share. There are probably more out there too so let's enlighten each other on the wonderful world of things that stick.
There are many different types of adhesives and they are used for many different things. Here is a good reference list. (excerpts of an article on http://www.xomba.com/10_types_scrapbooking _adhesives )
- Dimensional - usually a foam center between two pieces of adhesive; gives dimension to your page, be it photos or embellishments.
- Dots (also called tabs) - small pieces of adhesive, usually found in a roll or on cards, that are perfect for attaching small embellishments like buttons, chipboard letters, or acrylic items.
- Liquid - often quick drying with an even consistency, good as a multi-purpose adhesive for scrapbooking.
- Multi-purpose - handles multiple types of media used in scrapbooking (paper, fabric, chipboard, embellishments); a good choice for a beginner.
- Permanent - when you want your photos and embellishments to stick forever, permanent is the way to go. Comes in a variety of formats (including dots, liquids, glue sticks, and sheets), and cannot be moved. Ever.
- Re-positionable - allows you to move pieces of your layout for a short amount of time before they become affixed to the page. This also comes in a variety of forms.
- Runners (also called tape runners) - easy application, allows for control over the amount used. These also work on a variety of media types.
- Sheets - used to create stickers, often used with a machine. When used with a machine, great for die-cuts and paper letters.
- Spray - use for "invisible" hold, for items like vellum or transparencies.
- Stick - easy application, works well with a variety of surfaces and media. A very good choice for a beginning scrapbooker.
Storage basket:
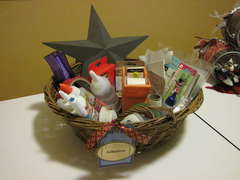 Adhesive basket By Hanging By A Moment
Storage Crate:
 Altered Kasiercraft Storage Crate By Jill
Adhesive shelf: http://www.scrapbook.com/gallery/?m=image& id=254405...
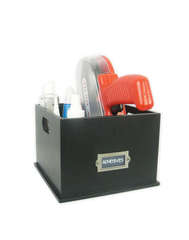
Desk organizer:
 Slice and Adhesives Storage By Mercytiara
Drawer: Adhesive Drawer by AuntJo
 Glue Caddy: http://distressedscrapper .com/2011/09/06/altered-he lmar...
has a post about storing it upside down and the Glue Caddy found on
Etsy:
http://www.etsy.com/search/handmade?search_submit=&q=glue+caddy&view_type=gallery&ship_to=US
Glue Caddy: http://distressedscrapper .com/2011/09/06/altered-he lmar...
has a post about storing it upside down and the Glue Caddy found on
Etsy:
http://www.etsy.com/search/handmade?search_submit=&q=glue+caddy&view_type=gallery&ship_to=USThe key with storing these is to have them within arms reach NO ONE can create any paper crafts without adhesives.
Tips:
- Check for any that might need refills soon. Add them to your shopping list.
- Clean up all tips and ones that have adhered themselves to something. Make sure they are all in ready to use condition.
- Trash - all glue that is drying up or tapes that are no longer sticky even adhesives that you just simply don't like. You will just end up throwing it away later once it is dried up... so why store it until then?
- Liquid glue - can have bubbles in it when you are trying to apply it to your work. To keep this from happening so much try storing it upside down... JUST MAKE SURE IT IS FULLY CLOSED so it does not leak... YIKES!!!
You can do it!
PS... here is my adhesive basket this year: I have an Helmar Habit I think! LOL!


No comments:
Post a Comment
Thank you so much for taking the time to let me know how you feel about this post. I hope you enjoyed your time here and will come back and view more. Don't forget to fallow my blog to keep updated with new projects and ideas.
~ Grace ~