Showing posts with label cardstock. Show all posts

Sunday, November 9, 2014

Handmade for the Holiday's Christmas in a Deployment Box - "Home for the Holiday"


Handmade Holidays 2014 Hop Logo

 Welcome to the final day of the 4th Annual Handmade Holidays Blog Hop! We hope you enjoyed the projects from the last 2 days! A few years ago we were looking online for handmade gift ideas and thought it would be great if there was a resource dedicated JUST to handmade gift ideas. Enter the Handmade Holidays hop! We've gathered over 100 of our creative blogger friends in the craft industry as well as some of our fellow product manufacturers to bring you a plethora of inspiring gift ideas you can make now to give to your friends, family, and colleagues. Pin and bookmark these ideas for this holiday season and to use throughout the year! Each day of the hop features approximately 30 gift projects and you can "hop" from one blog to another to check them all out.

 Grab your favorite beverage and sit back and relax... Here is the gift of "Home for the Holidays" for a "Christmas in a Deployment Box"


  1. Get a box from the post office or any box will do.


And find the glued corner joint


Unfold the box.


Cut one side off so there are now 3 panels. Place packing tape or duct tape, I chose white duct tape to go over the vertical folds that are left. (This is for shipping).


2. Print out photos of your Christmas Tree I deleted some of the excess background to keep it from wasting ink. Enlarge it to fill your normal paper. This paper is a shimmer to give the tree some sparkle... lie our overly used is always filled with glitter. Print 3 regular and 3 reverse (all the same size)


Here is the original image:


3. Print out images of your flooring and other home areas you wish to add. I chose our fireplace decorated with Christmas. The flooring is special too. This flooring was designed and installed by my hubby and I . It is special for us so I know this detail will mean something to him.


 Today I am using Scrapbook-Adhesives.com's supplies. Here is an image of my adhesives, there are some I didn't get to use but I do love them all.


4. Find your placement on the box. I have one tree cut out for here for a visual placement. The tree must go on a vertical fold.


5. Trace your original cut out. Then flip it over and trace it on the other 3 of the opposite printouts.


Then stack them all up so the outlines are suppose to be matching, 3 right side up and 3 right side down. This way they match and line up more clearly, Trees can be hard to match up when hand cut with all those little branches.

6. Choose a color of cardstock for your wall color. I used 4 sheets, 3 hole and one to cut into strips to place over the vertical folds and adhere, I used Scrapbook-Adhesives.com's E-Z Runner. This color matches the color of our walls in our living room.


7. Cut out the flooring to fit on the 3 lower folded flaps and adhere them with Scrapbook-Adhesives.com's E-Z Runner. Like I said before this flooring was a project the hubby and I worked on together and we love how it turned out. It's a nice detail to add by using photos of our own floor.


8. Cut out your accessories like the fireplace and wall art. I used Scrapbook-Adhesives.com's 3D Foam Squares to pop it off the surface a bit. Don't go crazy. Remember it needs to fold up. Keep this one off the vertical folds.


9. Now lets get rolling on our POP UP tree! I am excited about this one! Place one of your 6 trees you cut out in your cutter, WE WILL NOT BE CUTTING! We will be folding. I lined up the bottoms flush with my cutter's guide and then shifted the trees from left to right till the very top of the star was along the edge I was using to help me fold it.


Once lined up I gently worked the cardstock up words until I got a nice fold right down the center point, the top of the star.


Repeat for the rest of your trees. Notice that one side is wider then the other. That is okay because the bottoms and tops will match up I promise.


Using some of Scrapbook-Adhesive.com's Crafty Power Tape I adhered one side of a tree to the same sized side (reverse print out).


Repeat this until you have them all connected and it looks like this.


10. Presents!!!! The real gift of this is giving some our our "Home for the Holidays" this box is for a deployed spouse who won't be here for Christmas. This gives him images of our actual home. The presents are just rectangles with 1/4" fold at the bottom to adhere them to the floor of the box. They have a cute little bow on the tops of them. This still allows it to fold up.

One of the best things about these presents is we have written things we love about our Daddy on the backs. There are 25 gifts so he can read one a day in December till Christmas. You don't have to do the Advent if you don't have the time to send it that far in advance to your service member or college student.


11) Use Scrapbook-Adhesives.com Creative Photo Corners in gold, to "frame" your wallet photos on the wall. I have soccer ones in there because we are sending them to him, however before I mail this it will have our new family wallet photos in the box. Nice thing about the photo corners... you can easily switch out your photos.


12. Write your message. Our's is private and will be written with the kid's help once we can sit down. So it's not pictured here.

13. How to fold it up, it's ready to ship! Make sure all your presents are flattened up and slowly close the right section checking on your presents as you close it. When you get to the tree. I laid it down flat and the side of the box goes right down the middle of the tree.


Then fold the left side with the wallets on it over to the right. Do it slowly checking on your gifts and the tree. Tape, label and ship! Mark on the outside of the box 'OPEN CAREFULLY HERE" with an arrow to the side that can be unsealed. My hubby get's our packages and mail in about 2.5 weeks. So if you want to do this for your's plan ahead for the shipping or leave out the advent part.


My hubby get's our packages and mail in about 2.5 weeks. So if you want to do this for your's plan ahead for the shipping or leave out the advent part.

Let's take a look once again:


The beauty of this is it could lay flat and hung on the wall of their quarters or it could have the floor folded up 90 degrees and sit on a dresser or even a windowsill! Little space for a little bit of "Home for the Holidays".

God bless all our service men and women who can not be with their loved ones this season of joy, love and happiness.


 Are you ready for lots more creative handmade gift ideas and projects?? Follow along on our blog hop! Simply click on each of the links below to be taken to that post with additional information and photos on how to create a handmade gift project. Have fun and pin away! Clearsnap  Westcott  Scrapbook Adhesives by 3L  Ellison Educational Equipment  ICE Resin  Neat and Tangled  Therm O Web  Walnut Hollow  Elizabeth Craft Designs  Rowland Technologies  Graphic 45  Hydrangea Hippo   Pink and Main  The Buckle Boutique  Tami Mayberry Art & Design - Tami Mayberry  Jamie Dougherty - Jamie Dougherty Designs  Elizabeth Craft Designs - Raquel Mason  Meagan - The Charming Farmer  Scrapbook Adhesives by 3L - Angela Ploegman   Carolyn Dube - A Colorful Journey  Pink and Main - Mistyana Wright  The Buckle Boutique - Niki Wilson  It’s Sew Lorine - Lorine Mason   ‎ Therm O Web - Andy Knowlton  L. Grace Lauer - Uniquely Grace  Clearsnap - Meihsia Liu Oh Snap Lizzie - Lizzie Sanchez Graphic 45 - Katie Zoey Ho Charity Wings ICE Resin - Tatiana Allen Polly Carlson - Pieces by Polly Ellison Educational Equipment - Jan Hobbins  RoseRedd Paper Studio - Rochelle Washington a Rafflecopter giveaway


Follow our Handmade Holidays Gift Ideas Pinterest board for even more inspiration!

Follow Jennifer Priest of RainMaker Media Works + Hydrangea Hippo's board Handmade Holidays on Pinterest.  

A huge thank you to our sponsors for this hop - please visit their blogs & websites below and follow them. And be sure to come back tomorrow for another 30+ amazing Handmade Gift Ideas!
Handmade Holidays 2014 Hop Logo SPONSORS 300dpi


Clearsnap || Ellison Educational Equipment || Walnut Hollow || Graphic45 || Westcott || ICE Resin || Therm O Web || Rowland Industries || Scrapbook Adhesives by 3L || Pink and Main || Elizabeth Craft Designs || The Buckle Boutique || Neat and Tangled

Additional Sponsorship provided to bloggers by:

Sakura || Fairfield Processing 

Photobucket

Saturday, May 24, 2014

Minecraft 3D Box Birthday Party Invitations - Custom Handmade Cards

Well my wonderful readers, it's that time of year again, my son's:

Birthday Party Time!!!

The theme this year is: MINECRAFT

Minecraft 3D Box Birthday Party Invitations (click to enlarge)

In a new state we were able to scale down the amount of invitations to only 20 this year! That is huge for this Mama, who is used to inviting upwards of 40 kids! Can you imagine? I think we even had our Harry Potter party where we allowed siblings to attend as well with almost 50 kids in attendance. YIKES!

After a very chilled out BFF only party last year my son is ready to host a bash again this year. So he choose his theme of Minecraft. If you have a child in you life who likes video games I am sure you know what this is. It reverts back to the old 16-bit graphics and is wildly popular with the gaming crowd. I don't mind him playing this game because of many reasons but my favorite thing about it is that it uses creativity. My son will sit here and build a home from the bottom up or a roller coaster or something crazy. Yup, the creativity in this game is what sold me on it.

Enough about that lets get on with the 3D Invitations! Let me know what you think in the comments below.

Minecraft 3D Box Birthday Party Invitations (click to enlarge)
As seen in the image above we used clear 6.5" square envelopes to hand out these cards. They could be mailed also they fold up so thin! How cool is that? Both the back and front of the card is the TNT graphic.

Minecraft TNT Exterior, card flattens for mailing (click to enlarge)
How does it work? Check out this 2 min video where my son, the birthday boy shows you how it works, push play and watch it in action:


Since these are double sided you can always opt to "unfold" one side relieving the inside of the box a bit more while the card is inside the envelope. But we didn't do this... thought it would be more fun to have the 3D surprise in the box when they opened it.

Option 2 on flattening the card (click to enlarge)
Once you open the card it unfolds into a box and the side flaps come down revealing the party info and characters like these here: Steve, Enderdragon, Enderman, Slime and a Zombie Pigman.

Minecraft 3D Box Birthday Party Invitations (click to enlarge)
My son helped me fussy cut out all the characters, we averaged about 100 total. Here are some close ups of the characters inside the box card. The cool thing about this is each card was different. No card had the exact same characters, which left the kids chatting about it after they were handed out. Who got what inside their invitations!

Close up #1: Enderdragon, Villager, Creeper, Blaze and Steve
Minecraft 3D Box Birthday Party Invitations (click to enlarge)
Close up #2: Enderdragon, Steve, Pig, Cow, Creeper and Ghast

Minecraft 3D Box Birthday Party Invitations (click to enlarge)

I hope you found this an interesting post. We had tons of fun making these and handing them out. There will be more post to come about the party decor, games and food.

Minecraft 3D Box Birthday Party Invitations (click to enlarge)
 Here is a list of more of my Birthday Party Invitations:

Boy Birthday Invitations:
- Harry Potter Hogwarts Invites
- Lego Bionicle Mask of Light

Girl's Birthday Invitations:
- Angelina Ballerina Birthday Party Invitations

Thank you for viewing my post today. Please leave me a comment below if you like what you see.
Photobucket
Coordinator for Party Time Tuesdays Challenge Blog

Thursday, November 8, 2012

Decorating on a Dollar with Core'dinations and Helmar


Core'dinations Cardstock, Helmar, Holidays and Decorating on a Dollar with Grace 
Good Morning Everyone I wanted to share this project post I did for the Helmar blog yesterday.
 Homemade ornaments are all the rage and today I am going to show you how Core'dinations Cardstock and Helmar make it look amazing! So, are you ready to pull out the craft supplies and get ready for the holidays? This would be a great low cost gift idea too! Lets call this one a Decorating on a Dollar project.
Step 1: Take 1 12x12 sheet of Core'dinations Cardstock and cut it into twelve 1" wide strips. Then cut those strips into 2" long pieces. You should have a lot of 1"x 2" pieces of Core'dinations Cardstock...
You can find the rest of this tutorial on Helmar's blog. 

Wednesday, February 29, 2012

Moss and Book page hanging wall art - Decorating on a Dollar

Hello everyone,

I am still wrapping up all the "homework" I have from CHA I have been having some creative fun this past week. Moving into spring and starting to gear up for Easter how about you? Us crafty types start early... got to leave time to make those fantastic projects, right?

Today I bring you a very large, yet simple and sweet, wall art project.

Bless this nest wall art

Here was my favorite part... moss is messy but I found this Super Moss Mat (a flat roll) at my local craft store and when you use Helmar 450 (click for tutorial post) with it... OH MY GOODNESS, it was SO EASY AND FAST!

Helmar and super moss

Here is a close up. You can see the "N" is one of the 3D letters and the "E" and "S" are chipboard and are flat.
Bless this nest wall art closeup_L Grace Lauer_Helmar

I actually went through and curled all the page corners forward to give it some playfulness and then I was done.

Bless this nest wall art_L Grace Lauer_Helmar 450 Acid Free

I hope you have enjoyed this post. Please feel free to let me know your thoughts in the comments below or if you are working on any spring projects I would love to see them.

Have a Happy Scrappy Day!

Photobucket
 Pin It

Wednesday, February 15, 2012

Patterned Paper & Cardstock Organization Challenge

Challenge #8 Week #2 PART 1 - Patterned Paper/ Cardstock

Every single one of us has it... but is it working for you the way you have it organized?

THE KEY TO GOOD PATTERNED PAPER ORGANIZATION IS TO: have it organized to match your train of thought.

HORIZONTAL OR VERTICAL?(from http://www.creative-scrapbook-layout s.com/scrapbook_pap...

"Scrapbook Paper Storage Idea #1: Horizontal Paper http://www.scrapbook.com/gallery/?m=image& id=257936...

Most scrapbook stores will store their paper horizontally because they have the room for rows and rows of shelves and racks. Now, most of us don't have room for all those shelves, but horizontal storage is still a possibility with 12" x 12" plastic snap top cases. You can buy them individually or as part of a three-drawer or six-drawer cart, so you can make the most use out of your vertical space.

Racks: http://www.scrapbook.com/gallery/?m=image& id=257017...

Wire cubes: http://www.scrapbook.com/gallery/?m=image& id=226956...

Cubes: http://www.scrapbook.com/gallery/?m=image& id=251533...

Scrapbook Paper Storage Idea #2: Vertical Paper http://www.scrapbook.com/gallery/?m=image& id=258040...

Depending on your preferences, you can use traditional magazine storage files for 8.5" x 11" paper (or on your scrapbook table to store scrap paper), but you will have to get special storage files for 12" x 12" scrapbook paper. Vertical paper storage is best for cardstock or other papers that you will be accessing frequently because you can just slide the storage file out and pick the paper you need.

These paper holders also come with dividers, so you can store multiple colors within a singe file! Just one thing to keep in mind is that you will need very tall shelves if you plan on using these vertical storage files in a bookshelf."

Baskets: http://www.scrapbook.com/gallery/?m=image& id=250118...

Cubes vertical: http://www.scrapbook.com/gallery/?m=image& id=250438...

Files: http://www.scrapbook.com/gallery/?m=image& id=888475...

HOW TO ORGANIZE IT - Now that you have thought about WHAT to store them in lets talk about HOW...

Cardstock - seem simple enough, by color right or brand? But what about those patterned papers? Do you Separate your cardstock from your patterned paper? Or would it work better for you if you had all the pink patterned paper then pink cardstock together?

Patterned Papers -

    1) By color - Are you the type that reaches for the color first when you need something in your scraproom? Within each color do you organize it from lighter to darker colors?

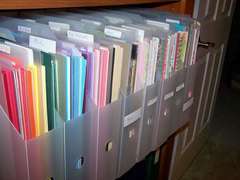
    Cropper hoppers by color:
    Scraproom Re-org - Photo 5 By Deend31

    http://www.scrapbook.com/gallery/?m=image& id=130054...

    http://www.scrapbook.com/gallery/?m=image& id=210448...

    2) By Brand - do you have a great memory for brands. Do you think to your self when you are scrapping..."that rust and white flourish paper from the Everafter line that Cosmo Cricket put out would be perfect!" If so they by Brand and collection would be the way for you to organize.

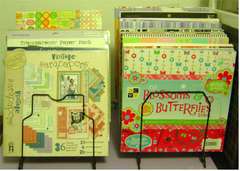
    Great way to organize by collection and brand if you like to keep them in their stacks...
    Paper storage By Missqueen

    3) By Theme and Pattern - Are you a graphic scrapper? One who knows they need a stripe or a polka-dot paper to balance out the floral you just picked as the background paper. Or do you scrap by theme a lot. Maybe you create a lot of mini albums or you prefer ballet shoe paper for your little princesses recital page.


There ya go... these are the best ways to organize it... now you can do it in sub categories... say you want to organize it by Brand but within each brand you want it by theme or color. Maybe it is by color first and within that color it is by pattern and theme. That works too but one of these three will be the Main way you will organize with a possible sub category.

Consider size - do you sort the scraps (if you separate these from your full sheets we will go over how to store them latter this week) into your full sheets or maybe you buy 6x6 paper. Do you sort it into your 12x12? That is up to you. Just keep in mind that when you are working on a 12x12 page you can't always use the 6x6.

THINGS YOU SHOULD KNOW...

    1) never store in direct sunlight preferably a cool, dry place

    2)
    Store it completely separate from other supplies. If you mix them you are undoubtedly asking for creasing or tearing.

    3)When looking for storage make sure that you choose a container that fits a 12x12 piece of paper or a 8x8, if that is your size preference. Keeping the paper fitting snugly will keep it from getting bent or damaged.

    4)If you keep it organized it will lead to an easier scrapbooking experience. So make sure you keep it organized.


You can store them on shelves without organizational units. Keep in mind though that they will slip easily and have a chance of making a mess. Storing horizontally with out organizers creates the same problem. When you need one near the bottom all the others will begin to fall and it becomes one large balancing act.

**** Don't have the cash to fork out for these organizers? Try these almost free solutions -

Horizontal: http://www.scrapbook.com/gallery/?m=image& id=65087&...

Vertical: http://www.scrapbook.com/gallery/?m=image& id=123371...

Step by step instructions: http://www.wescrap.com/scrapbooking-resource s/tutorials...

JUST TO DROOL OVER....

Scraproom Challenge By Ande

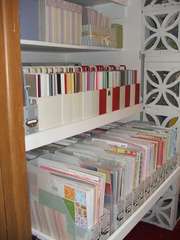
 Here is my patterned paper and cardstock. I organize by "P(pink cause I have a girl) ROYGBIV N(neutrals such as black, grey, white and shades of brown)" Patterned paper on the left of the divider and CS on the right in each cropper hopper. 12x12 on the top, 8.5 x11 on the bottom left and scraps and chipboard in the binders on the right.


 Photobucket