Showing posts with label Cricut. Show all posts

Sunday, June 1, 2014

Turn Your Favorite Scrapbook Paper Into Wall Art in 4 Simple steps!

Welcome back  for an extremely easy project that is sure to spruce up any room. It can be made as simple as you want or you may embellish it with stunning flowers, gems and trinkets.


 Turn your favorite scrapbook paper (you know the stuff... it's been in your stash for so long because you won't dare cut into it or cover it up with photos because it is so pretty) into decorative wall art panels.


Are you ready to get started?

Here we go... 


Supplies: 
  • Beautiful Scrapbook Papers to match your room
  • Embellishments of  flowers, gems, book pages and trinkets and words
  • Picture Hanging Hardware for the back  
  • Helmar Acid Free Glue 
  • 12 x 12 wood board 1/2 inch thick so you can add the hardware to the back (as many as you desire to make... it works best if you make them in pairs, 2, 4, 6, 8 depending on the space you wish to hang them.) 
  •  

Step #1: 

Spread your Helmar Acid Free Glue over 1/2 of your board (I bought a board at the big box hardware store and they even cut it for me into 12 x 12 blocks for free) or you can purchase them at a local hobby and craft stores pre-cut.  This is raw wood so the glue will absorb faster to into the surface, I used a bit more then I would usually.   You can gesso the wood prior to this step and use less glue and save a painting step later on.


Step #2: 

Place your beautiful scrapbook page over the top of the Acid Free Glue while it is wet and use a Helmar Glue Spreader/Old Credit Card/School ID to smooth out all bubbles and creases. I prefer for this step a flimsy credit card type card so that there is a softer touch to the paper minimizing the chance of snagging (Paper vs. Cardstock). Begin smoothing out in the center of the paper and then to the edges. 

*Repeat step #1 for the second half of the board and then repeat step #2 to finish adhering the scrapbook paper to the board.
 

Step #3: 

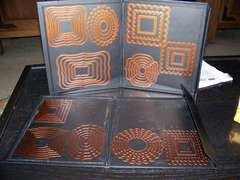
With a sanding block, distress/remove any excess parts of paper from around the edges. Round the corners with this tool as well.  Clean up any excess Acid Free Glue that may have seeped out in Step #2 and paint the sides of the boards (if you did not gesso them prior to step #1).

* If you want some simple panels (like the teal ones in the display photo at the top of this post) you could be done. How easy was that? (Skip to Step #6)

Step #4 (Optional): 

Use your glue to adhere your lettering prior to any embellishments.  I used a tiny paint brush to apply the glue to the back of the letters so there would not be much excess. I lined it up with my quilting ruler to help keep a strait line with the board. The praise I chose to add was the Chinese Proverb: A Book is like a Garden carried in the pocket.


Step #5 (Optional): 

Embellish with your style! I added these book pages using steps #1 - #3 and more flowers, bing, gemstones and trinkets too. Have fun with this!

Step #6: 

Install the picture hanging hardware on the back side of our panels. Make sure to have the right side up.

I hope you enjoyed this project. It is one of my favorites and oh so easy to create something for a powder room, livingroom, kitchen and can be done in almost any scrapbook paper size, 6" x 6", 8" x 8", 12" x 12".

These could also make great gifts for Mother's day, Teacher appreciation, birthdays etc.

Have a fantastic day!

~ L. Grace Lauer

Saturday, June 23, 2012

Prisoner of Azkaban "Wanted Poster" Photo Booth Tutorial for Harry Potter Party Post #8

Hello all you Prisoners of Azkaban,

Today I am going to share with you a bit more of the Harry Potter Party. I think I would not have broken it all down into so many post if this was not a DIY Crafty blog. LOL!


Some, ferocious dog I have... he is a Wizard in Disguise... LOL! This is a DIY post on how to make your own Harry Potter Wanted Poster Photo Booth. Using my Cricut and Helmar Acid Free Glue!

Supplies:
Cricut and the Pantin School Book Cartridge (or anything similar)
Helmar Acid Free Glue
1 - foam core board
1 - fine tip and one large black Sharpie
1 - printed graphic of the black box with small white text (I grabbed this from a larger image of Serious Black's wanted poster online)

Here is your step by step instructions:

Step 1: Print the black rectangle with white text from the Serious Black Poster image. Cut it out.

Step 2: Cut a large square out of the foam core board leaving about a 3" boarder along the left and right sides.

Step 3: Use your Sharpie to draw a 1" black border around the opening.

Step 4: Cut out letters on your cricut. The top title ones are about 3" and the small letters on the bottom in black are 1".

Step 5: GENTLY remove the letters from your mat and be extremely careful with the negative space around the smaller 1" letters. You can throw away the smaller letters but keep the negative space outline to use as a template for the small letter.

Step 6: Adhere the Larger Cricut letters to the board using Helmar Acid Free Glue center the letters on each line.

Step 7: Adhere the black rectangle with white lettering with Helmar Acid Free Glue to the bottom of the poster, just under the outlined opening.

Step 8: Use your negative space letter outline from your small Cricut letters and trace them onto the board using your fine tip Sharpie.

I taped up the back of the poster along a floor lamp so it would swing back, due to the tight nook space I used for this photo booth. I draped some fabric from the remnant section of my fabric store and some Halloween black gauze I got at the $1 store last fall.  This sets up the background to the photos too. Propped a stool behind it for the kids to sit on and boom! Photo Booth! See some of the results below.


The next two are my kiddos Trinity and Tristan (the birthday boy)

 I would have to say that this one is my favorite here.
A true Harry Potter fan!


For more Harry Potter Party Posts please see the links below. Thank you for your time. Leave a comment below if you have questions or would like me to know if you enjoyed this party. Thanks again!

Eats and Treats:
The Three Broomsticks - Butterbeer, Polly Juice Punch and more
Honeydukes Candy Display - 24 different candies
Owlery Cupcake Tower 
The Golden Snitch Cake 

Fun and Fancy:
Prisoner of Askaban Wanted Poster Photo Booth
DIY Olivander's Wands DIY

Party Decor and More:
Potions Cabinet Details DIY
Video of Helmar DIY projects for Harry Potter Party

Invitations and Printables:
Owl Post - Hogwarts Acceptance Letter Invitations mailed Owl Post 
Publications - DAILY PROPHET and the QUIBBER props 

Photobucket
 Pin It

Monday, April 9, 2012

Wedding invitations

Hello everyone,

Today I am sharing with you a little project close to my heart. My sister's wedding invitations. These beauties are held together by none other then Helmar Acid Free Glue. I love this adhesive because it is made to have flexibility to it once it is dry.

Photobucket
This made it the perfect choice to use on this project where adhesive had to be used in the folded areas of this invitation. There is no puckering, no waves in the paper... yet all of this was adhered with a liquid adhesive! Impressive... I sure think so.

Photobucket
Helmar Acid Free Glue is in my top three go to adhesives. I chose it because I make so any unique items that sometimes require some flexibility. Here is a fun fact: This glue was originally created as a book binding glue. It is meant to withstand abuse and time.
Have a Happy Helmar Day!
 Photobucket
 Pin It

Wednesday, February 8, 2012

Challenge #4 - Week #1 - Organize your Tools

Challenge #4 - Wednesday - Week #1: Tools (This includes cutting, die and embossing machines, punches, paper trimmers, brushes, scissors, cropadials, tool kits etc.)

TOOLS AT YOUR DESK: What tools do you use 100% on every page? Exacto knife, bone folder, files, paper piercing tools, cropadial (finally totally stoked mine is the orange one and not pink cause it matches my room now...LOL), compass, adhesive eraser, bone folder, etc... These can be stored in a drawer, on a shelf or on your desk the key is to try to keep them in arms reach.

DESK TOP STORAGE SOLUTIONS:


Pegboard:
http://www.scrapbook.com/gallery/?m=image& id=242155...

http://www.scrapbook.com/gallery/?m=image& id=227246...

Tool Caddy:
Altered Making Memories Carousel By Jill

Baskets and buckets:

Pen Holder full By Hanging By A Moment
http://www.scrapbook.com/gallery/?m=image& id=207749...

http://www.scrapbook.com/gallery/?m=image& id=199858...

Home made (for those handy with real tools): http://www.scrapbook.com/gallery/?m=image& id=161339...

CUTTING AND EMBOSSING MACHINES:


These need table top space. If you don't store them on the table top you at least need a sheared space you can use when you bring the machine out to use it. The dies and cartridges need to be stored close at hand to the machine. If you have electrical cartridges store them in a dry, temperature controlled, dust free environment. The cricut needs storage for the tools and a place to store the mats flat as well.

Cricut: The biggest thing about this machine is that it needs room to work. Make sure you have a clearance in front and behind for the mat to go in and out.
http://www.scrapbook.com/gallery/?m=image& id=226609...

Cartridges and books:
Space saver: http://www.scrapbook.com/gallery/?m=image& id=258816...

http://www.scrapbook.com/gallery/?m=image& id=258022...

In boxes: http://www.scrapbook.com/gallery/?m=image& id=173015...

Sizzix:
Machine needs a flat surface with enough room to operate it.

Dies:
Cubby and shelf storage: http://www.scrapbook.com/gallery/?m=image& id=228940...

http://www.scrapbook.com/gallery/?m=image& id=153177...

http://www.scrapbook.com/gallery/?m=image& id=163798...

http://www.scrapbook.com/gallery/?m=image& id=101273...

Thincuts container: http://www.scrapbook.com/gallery/?m=image& id=229450...

Cuddlebug: Similar storage to the Sizzix. Please share your ideas.

Spellbinders:
Magnet strips: Spellbinder Die Storage By Mother Goose

CD cases: http://www.scrapbook.com/gallery/image/scrapro om/331037...

CD book case (this one is well organized and portable) - http://www.scrapbook.com/gallery/image/scrapro om/281807...

Magnetic Storage book: Quickutz Storage - Nestabilities By CreativeJamie

PUNCHES:

Can be stored just about any where! They are durable though they are bulky.

Towel rack or curtain rods:
punch storage By Scrappin Kitty

Punch storage By Mercytiara

Baskets:
http://www.scrapbook.com/gallery/?m=image& id=199858...

http://www.scrapbook.com/gallery/?m=image& id=391769...

Thumbtacks (Cheap and ingenious): Punches By Rosita

In a drawer:
http://www.scrapbook.com/gallery/?m=image& id=146730...

Door hanging shoe rack:
Punch storage By Jopadiet

On a shelf: http://www.scrapbook.com/gallery/?m=image& id=138264...

CropinStyle Punch Pall: http://www.scrapbook.com/gallery/?m=image& id=875359...

PAPER TRIMMERS:

Paper trimmers must have a flat surface to work correctly. They can be stored else where but when operating them they need to be on a hard table top. Some paper trimmers come with decorative blades that can be switched out. These blades and extra strait edge or perforated replacement blades need a storage place out of reach of little ones.

Bind - it - all... the only thing about these for storage is to make sure you have the room to use it where you want to. It would be nice like all machines if you don't use it that often to have a cover for it or a bag to store it in, but not necessary as long as you clean it occasionally with some air in a can.

Lamination Machines - I could not find anything about home lamination Machines. I know the refill material is usually heat sensitive so I would suggest to store that in a cool place. You few that have one might want to check your product guide to see if there are any specifications.

OTHER: Did I miss anything? Lamination machines etc... does anyone have those?

Lets Do this!!! (I have a lot of work to do... new machine and where the cricut goes is a disaster! LOL!)
Photobucket

Friday, September 30, 2011

Decorating on a Dollar - Trick or Treat Wreath.

Today I am going to show you how to take a 12" $1 store foam wreath and turn it into an 18"-20" holiday decoration. This wreath is on display and for sale at Dinah's On D St. Bookstore. Please feel free to contact her or myself if you are interested in purchasing it.
Photobucket
Begin with a $1 wreath from the Dollar Store. Some Acid Free Glue from Helmar and a smidgeon of water. I thinned out the Acid Free glue with a bit of water in a disposable cup. Using a brush with the glue and strips of newspaper strips to the wreath. I chose this glue because of the finish it has when it dries. It sealed the paper with tough, flexible surface.
Photobucket
Once the wreath is dry use Helmar Premium Craft Glue to help adhere book pages that are rolled and stapled in a cone shape.
Photobucket
Using Helmar Premium Craft Glue allows a little slower dry time for you to place and adjust the book pages into a circle and place the points where you like them. Continue all the way around the wreath adding width and volume. You need to have a hole about 5"-6" wide in the center.
Photobucket
Print a circular frame off of the computer on cardstock. Cut a circle around it and ink the edges with a complimentary color to the crape paper in the next step. Place it upside down for the next step.
Photobucket
Using Premium Craft Glue from Helmar, glue black (or any other desired streamers) crape paper streamers around the back of the printed frame.
Photobucket
Measure the center of the printed frame and cut a circle out of coordinating (with the desired glitter as seen in the first photo) cardstock to fit inside of it. Spray Helmar V2 Vellum Adhesive to cover the entire circle and let it sit (per instructions on the back of the can) for a few minutes.
Photobucket
Then glitter with desired color of glitter. Glue this circle into the center of the printed frame with either some Helmar V2 Vellum Adhesive or Helmar 450 Quick Dry. Using a die cut machine cut a silhouette image out of black cardstock and use Helmar 450 Quick Dry to adhere it to the center of the printed frame and glittered circle. I used the trick or treat witch image from the Cricut Cartridge "A Child's Year".
Photobucket
Glue the Printed, glittered image over the center of the wreath and use Helmar 450 Quick Dry to glue it down to the inside of the rolled book pages. Once dry tie a ribbon or string around the top of the wreath to hang it from the back.
Hope you enjoyed this project.
Photobucket

Friday, June 3, 2011

Crafty Couponing... an entirely different type of Extreme

I am so excited to share this project with you today. After crafting all boy stuff in May for my son's birthday party I finally can get back to my own style and create what makes me really happy! I have two major hobbies crafting and couponing! Yup, I just love to save me some money on groceries so I can spend it on crafty goodies! I have to say when I saw the Lawn Fawn stamp set Sew Lovely I knew I had to use it to make my "Craft Fund" binder... er... coupon binder. LOL.

I think I will be the most stylish couponer out there. Let me show you a bit about this binder that I just love!
This Lawn Fawn stamp cluster is sew cute! The dress is created with a simple paper piecing technique and the button was simply stamped over the circle that was there from the patterned paper. I then colored over it with an opaque gold pen to hide the other lines from the paper. Did I mention I loved this Lawn Fawn set?
This is all just stamped on the patterned paper I chose for the cover. It was stamped using a mask over the paper pattern (the old world flourish). This will allow for the stamps to look like they were behind the pre-printed patterned paper images. Several masks were also used to make all of the spools and the sewing machine look like they are on top and in front of each other. Then I simply just colored it in with coordinating color markers. This truly is sew lovely! Now let's look inside!
Here it is... This binder started as a used binder. It had two pockets on each side. Each change of paper is so the pockets are still useable. The stamps in there are the same as the stamps on the outside but some different techniques. To recover the binder I used Helmar's 450 Quick Dry Adhesive... it works great gluing to plastics and paper. Tip: work in small areas... it dries really fast!

Check out this boarder! I love Lawn Fawn's acrylic stamps for this reason! I was able to make a nice rectangular boarder in a snap! The paper piecing is a little different here using an extra layer of paper. I have used the Helmar Acrylic Sealer to seal over all the paper piecing layers. This will help seal them in so that they don't start pealing off with all the wear and tare that this binder is expecting to get. I also used it all over the cover too to help protect it. I love that stuff!

After putting so much work into this binder I was really worried about it falling apart like most plastic binders do. So I reinforced the binding on the inside with some canvas ribbon. I stamped it with more of Lawn Fawn Stamps from the Sew Lovely set to decorate the binding. Also I used Helmar 's Acid Free Glue to adhere the ribbon to the binder this will help strengthen the binding with a flexible bond.

Here you can see the ribbon well. I adhered it to the front and inside using the Helmar's Quick-fix Adhesive Runner with its permanent bond it was just perfect! Nice smooth edges and oh my, it was so easy and quick to use! Love it!!

Would you like to see what the binder looked like before I altered it? YIKES!!!

Here it is again after! It makes me happy!

Like I mentioned before my other passion is saving money. Do you want to know how much I spent making this binder. Here is my supply list and how much I spent...

Helmar Products: FREE (Thanks Helmar once again! I am honored to be a part of your DT)

Lawn Fawn Stamps: FREE (Thanks Lawn Fawn for your generosity as a Helmar Preferred Partner!)

Stampin Up Paper Pack: FREE (a demonstrator friend gave it to me for a thank you for helping her out)

Brocade Template: FREE (Thanks to the Crafters Workshop, also a Helmar Preferred Partner)

Binder: Used - FREE

Cricut Cartridge: $14.60 (almost 300 images = $0.05 each) I used six letters totaling = $0.30

Pens/Markers: Gold pen $.99 (on clearance), Red SW marker $1.67 (discounted)

Ribbon: Canvas - 2" = $0.25, Black Satin - 7" = $1.51

Total Cost: $4.72 not bad...

Having the most stylish coupon binder in my coupon swap group... PRICELESS! Thanks for reading about my new favorite project and I hope you have a happy, scrappy day!

Photobucket

Monday, March 7, 2011

Altered Tree Branch and 100 Flowers in 20 min Video Tutorial

Hello everyone! I am so excited to share this project with you this morning. This is my Caring Tree. It used to be a low hanging branch in one of our trees in the front yard. The hubby cut it down for me and I love it!

I have made 500 flowers, 280+ leaves (video posted below) from the Mother's Day Cart on my Cricut. Check out the videos and photos and let me know what you think about it.

This first photo is of the entire project. The tree was made to display the cards I make. It will have cards all over it whenever I make them... or get them out of the drawer... LOL. Right now I am just enjoying the tree as it is.


This is a closeup of the flowers and leaves. Like I said before there are 500 flowers and 280+ leaves on this tree. That took the longest to do believe it or not. Hours with a HIGH temp hot glue gun... not my idea of fun but well worth the pain... er... I mean time it took.


This photo shows a few of the 30 office clips I have throughout the tree. They will be holding cards.


MY CARING TREE - is a tree made of ...

1 - branch from the tree in my front yard
1 - Vase on clearance at wally world
1 - hot glue gun
3 - boxes of mini office clips
7 - hot glue sticks
286 - cricut cut leaves - misted, folded and curled
500 - cricut cut flowers - distress inked, doodled, misted with two colors, glued and then glittered.
500 - pieces of bling

oh ya and two really bad hot glue gun burns... but all worth it.


Completed Tree project video:


100 Flowers in 20 min - Video Tutorial:


I enjoyed making this project and what I will use it for. Happy Scrapping everyone!

~ Grace ~