Thursday, March 26, 2009

What a wonderful RAK Thanks to Jess @ Crafty Cafe

Good morning everyone. I don't have a new layout today but I wanted to share a wonderful RAK I received last week. I am late on posting it but I am so excited and grateful about the items I got that must share it with you. I was chilling at the Crafty Cafe the other day. I believe it was for the SNR blog a log for March 15th. Jess over there had a wonderful ribbon flower tutorial. She had a random drawing from the comments that were left that day and my number popped up. Wooo Hooo! I never win the random stuff. Jess gave a way a $20 gift certificate to AC Bailey Designs. I was so excited I went shopping right away. Now if you all have not been to AC Bailey Designs I suggest you go stop by. It is a beautiful site and they have a large store and I loved taking an hour or so to sneak and peek though the pages of goodies. Here is what I wound up with for a few more dollars then my gift certificate I had to have this overlay sheet. I just loved it.
There are Three bugs in a Rug papers and three Cosmo Cricket papers both are CS and double sided. Three Bugs in a Rug rub-ons. Some felt flowers, CC ribbons, May Road Chipboard tags and beautiful buttons. I love this overlay sheet from Screen Prints by Handby and these scrumptious rub-ons from Fancy Pants Designs.

Thanks so much Jess for the gift certificate. I love everything I found at the AC Bailey Designs store. I placed my order in the morning and had an email by the afternoon stating it had been shipped... within the week I had it on my doorstep. Ohhh now it is time to play!!!!!

Wednesday, March 25, 2009

Swingin' In Style

Good Morning... or evening or what ever it is to you at this awful time of the day. I have been up all night ... by accident... scrapping and lost track of time. HEHE I do that way to much.

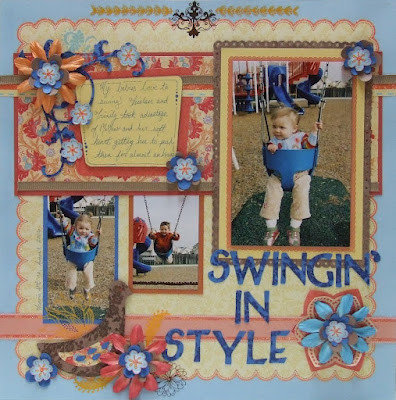
Here is my newest one of the kiddos. I have to admit though I am so far behind in my scrapping that this one is from 2006. These are some my mother took of the kids. *wave* hi MOM! She is a wonderful photographer for family shots though this day was just some candid at the park. I had to run to someones house for a bit and she snuck out her camera and went to town. I love these pics. My kids are swing freaks. No matter what they must hop on the swing if there is one in sight.

This LO was based on the Single page sketch contest over at Coordinate Collections. I cant wait till next weekend. They are hosting a cyper crop and it is my first one I want to attend. Not quite sure what to expect accept to get some layouts done... hehe. The theme is March Magic... so I need to go searching for some pics.

Journaling says:
"My babies love to swing! Tristan and Trinity took advantage of MeMaw and her soft heart getting her to push them for almost an hour."

Swingin' In Style Details:
Background: This is a DCWV paper from their spring stack it has the blue boarder and the yellow scalloped print all in one sheet. I took my orange iridescent glitter glue and went along the scalloped edge to give it some sparkle.

Top Left:
This is a wonderful cluster I just love the complimentary colors of the blue and orange. I have taken a coordinating floral paper and cut it to anchor the pictures from above. As if they were swinging from it. I put iridescent white glitter glue on the blue flowers in this pattern. I love making the cheaper paper look rich by adding glitter or chalk to it. This was backed with a off red/coral color cardstock.
The ribbon is the grosgrain and the orange glitter is a strip of paper from the coordinating boarder paper. Love that! I just added the orange glitter glue to that orange strip.
The journal box is a shape from the cricut. I just cut it out one size smaller for the yellow cardstock then for the coral patterned paper. I edged, doodled and wrote on the yellow cardstock with a light blue marker.
The flourishes are from the cricut also cut out of blue cardstock. I stamped them with versa mark and heat embossed them with a clear powder. I added a blue floral rub on and the little blue flowers I cut out of a boarder that was on the coordinating boarder paper.
The large flowers are prima and the brown and blue are cut with the cricut and each petal rolled around an ink pen.

Bottom Left:
The ribbon type coral color paper was cut from a coordinating paper and then I added glitter glue to the dark coral stripe along the top and bottom. I added some rub-ons to this cluster and the bird is from the cricut. I cut it and the wing out of brown cardstock, the floral paper from above and the blue cardstock used in the flourishes listed above. Then I took and layered the different elements of the bird together. I added rub-ons and the flowers are the same as above also. I have the location and the date journaled up the left of the pic of my daughter.

Bottom Right:
The matting of the large pic is brown cardstock stamped with versa mark ink and then punched with a scalloped heart boarder punch. I layered a yellow cardstock in there and topped it off with the coral scalloped strip I cut out from the coordinating boarder paper. I raised the photo with foam squares.
The title was from the cricut and was heat embossed just like the flourishes in the Top Left closeup. The Flower cluster here is a little different the bottom layers were part of the patterned paper I took the coral ribbon from. I added a bottom layer flower of a dark coral from that same sheet and cut the yellow petals out along the inside coral layer so I could raise and roll them up. The inside coral layer I glitter glued with the orange iridescent glue. Then it is topped off with a similar flower cluster as the others.

Thank you so much for viewing. Please leave me a message so I now if this is helpful or how you liked it. May your Wednesday be full of wonders.

Tuesday, March 24, 2009

ALS Graduation

The Scrappiest did it again. Liz always has a way to challenge my creativity. As soon as I saw this wonderful sketch I knew I had just the pics for it... funny thing is I always have a hard time scrapping my Hubby's military moments. Maybe it is the importance of the event or the protocol of the military that keeps me from wanting to scrap these career milestones. These three have been in my "In Progress" file for almost a month now and every time I took them out I just could not do it.
I remember this night vividly. This was my first ever major military event and the beauty of the traditions were just amazing. The ceremony began with the presentation of the colors. The color guard airmen entered from the back of the room. You could hear a pin drop it was so quiet. The intensity of emotion in the room became overwhelming as everyone in attendance filled with pride for our country. The color guard presented the colors at the front of the room and the National Anthem was played. Fallowed by a moment of silence for the fallen heroes. Which they had a table set off to the side in the front of the room reserved for the memory of those who have given their life from every branch of the military. I am getting choked up right now just going through this memory.
We went to the graduation and had no idea he would have been acknowledged for any special award. As they began they did the graduation ceremony.They did the awards next and my hubby received the Distinguished Graduate award for scoring in the top 10% of his class of over 150 students. I was extremely proud. I was the happiest wife in the room. They finished up the awards with three specialty awards given and decided on by their instructors and nominated by their piers. He was only one of two graduates to receive multiple awards. You should have seen me ... beaming ear to ear... I was now the proudest wife on Travis Air Force Base at that moment.

Journaling:
I was able to convince my Hubby to write this journaling. I typed it up and love that he had input on this layout. I typed it up and played with the lettering of the title on Microsoft word. Printed it out and colored it in with coordinating markers.

Details:
Background:
This is a fairly simple LO for me. I started with a chocolate brown cardstock and added some chocolate brown in to it just to create a soft tone on tone texture. I added the stripe rectangle with lighter tones then the rest of the page. The was to create some contrast with out adding to much to the layout. I edged it in my Zig gold ink pen. I hand drew the bracket shape with a few measurements on the back of the navy and star paper. Once this was cut I used it as a template to create the same curves on the red and the white papers. I edged each layer with the gold Zig pen.
Top Left: The detail here is simply the finish on the grungeboard by Tim Holtz. I just took my thyme green colored ink pad and pressed the grungeboard lightly on top of it with no rubbing, just blotting. Then instead of putting brads inside these pre-punched holes I took my large gold paint marker and colored the inside edges of each hole. This created a nice rivet/eyelet look.

Top Right: The detail here is just the printed title and how I colored it in with all the coordinating markers for this layout. Notice the flag though. It is a laser cut die cut and I chalked the white and red pieces to soften them to a more muted color for this page. I have had that for years and never used it...hehe. It is a stash piece.

Bottom Right: This flourish is also a piece of the grungeboard set by Tim Holtz. I did the same finish with the thyme colored ink yet I only doodled the gold dots on it. I added the USA letters in the antique brass and I love the simplicity of it all.

Thanks for viewing this layout and I want to thank everyone who is reading this if you are a military family member, an active duty member or retired... Thank you for serving I am proud to stand next to you as a military spouse and be a part of the entire military family. Salute!


What a wonderful day!!!

So I woke up yesterday to find out I am a new Auntie... to a beautiful baby girl. Congrats to Ellen and Craig for binging little Naomi Analise into our lives. I wish I was closer to you all!!!!!

Then I went to see what the daily blog post was about over at GCD Studios. I am falling in love with this company. If you have not seen their papers and embellishments you MUST go check it out. So as I was saying I clicked on the link down on the right side of my blog and up loads this article called... "Winner + DT Update = Welcome Monday" ... not to be unexpected they had a sketch contest this past weekend. I submitted the layout in the post below this one. But oh my what do I see... oh my it is the POLAR EXPRESS!!! Yes yes I won their wonderful challenge. I must say this major multi pic layout was just that a challenge. However I am always up for a good challenge and I knew right when I saw that sketch what I would be doing for it. Thanks GCD Studios for being part of my wonderful day!

Oh on a side note... GCD Studios is still accepting applications for their Design Team for a few more days... go check it out!

Sunday, March 22, 2009

Believe

Believe... This is the theme of The Polar Express Movie. In the winter of 2007 we were lucky to score some tickets to the California State Railroad Museum's Polar Express train. It was a magical night for our children. This is one of their favorite holiday movies and the CSRM did a wonderful job capturing the magic. I love these pics of our family enjoying these special moments of a lifetime.

This LO was created for a sketch challenge that was put together by GCD Studios from a wonderful LO that Pam Callaghan designed for them.
I rotated this 90 degrees and added my own scrappy goodness. I love the result and how well this turned out.

Details:
Background:
The papers are from DCWV. I started off with a white card stock and cut the 1/2" red boarder patterned paper and placed it over the top of the card stock. I put little sparkle dots of red glitter glue through out and then added a puffy finish to the mittens and doves in the pattern paper. I love texture. The stripe I cut down and then scalloped the edges. I took my favorite Zig silver fine point pen and traced the scallops along the edge on all sides. The next layer is a simple green to match the one in the stripe and only 1/16" is showing around our next patterned paper. This tone on tone gray has a wonderful pattern with red flourishes.

Title and journaling:
Simply brown Creative Memories stickers and the Zig pen topped off with a few small brown crystal rhinestones. The journaling is just who is in the photos. The main information is on the Train ticket.

Embellishments:
The Bell and the train pic are form the internet and I just doodled, glittered, or enhanced with rub-ons or crystals. I used epoxy stickers from Michael's. The chipboard snowflakes I finished with the same gray, tone on tone paper that the photos are on but I took my silver pen and doodled with the pattern of the paper. I finished the edges in red ink.
The circles under the Ho ho ho is a white layer with doodles and a red patterned paper layer that matches the outside boarder. This is scalloped just slightly larger then the green glittered circle. These are topped with the red glittered chipboard saying "ho ho ho" this was all one piece I cut it into three.
The Bell was just printed off the internet and cut out then the ribbon was glittered and I added the crystals as studs along the ridge of the bell... I LOVE this part... my favorite embellishment on this LO.

I added a few rub-ons to the pics. Mostly they are the silver snowflakes and reindeer. I also added some epoxy stickers around.

I hope you enjoyed the page from our magical evening with the grand "Pol Ex". Here are some more of the wonderful pics I did not get scrapped on this page... maybe I foresee a second page for a two pager... hehe.