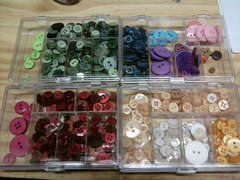
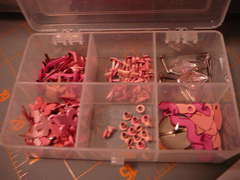
Challenge #10 Week #3 - Buttons/Metals, Eyelets, brads, etc.
I know some of you are done with this (woo hoo a night off for you). Today we are going after all our little pieces, Itty bitty embellishments.
Lets go over really quick all those types of little pieces.
Buttons: Some of us are at a loss of what to do with them so here is an article excerpt from Ezine @rticles it is written by Christine Perry
Buttons are not just for clothing. It's unclear when scrapbooking with buttons began as a trend. Even in early scrapbook albums, it wasn't unusual to see a button placed on a scrapbooking page. Quite often it was a keepsake button, like from a vintage piece of clothing or a baby girl's first dress. As scrapbooking pages started to become more 3-D and scrappers looked for unique embellishments for their pages, buttons became more popular. Manufacturers started offering buttons to coordinate with their paper lines, and buttons with themes like Christmas and sports became available. Monthly scrapbooking kits and page kits often include complementary buttons as part of their packages. Consider these tips for using buttons on your pages.
1. Buttons lined up together can make a border for your scrapbooking page layouts.
2. Place buttons in your titles by using them to dot your "i"s. You can also use them as the center of letters like "o" and "p."
3. Buttons can be secured to a page using embroidery floss by sewing it onto the page.
4. Glue dots work very well to adhere larger-sized buttons to a page, as well as buttons that are not flat on the bottom.
5. A few buttons make nice accents to anchor a ribbon border to a page. Again, glue dots will securely attach the buttons to the ribbon.
6. Try placing a button on the flap of an envelope to decorate a simple page element.
7. Flowers are still very popular on scrapbooking pages. Silk or paper flowers come in all sizes and colors now. A button makes a perfect center for a flower. An added benefit is that the button can hide the adhesive that typically shows through a paper flower.
8. Take 4 small buttons and attach them to the 4 corners of a photograph. The buttons will look like they are holding the photo to the page.
9. Create a bullet list for journaling. Use buttons as the bullets.
10. Scrapbooking tags can be used for page elements, photo mats, and journaling blocks on a scrapbooking page. You can use a button to decorate the hole at the top of a tag.
11. Try placing a button on a page and then hanging the string from a scrapbooking tag from it as an anchor.
12. An antique, vintage or unusual button can be used individually on a page as a page element all its own. Try double matting the button to highlight it on your layout.
13. Attach a button to a page with the holes empty, or thread some floss through the holes and tie it in a knot or bow for an added accent.
14. Don't limit yourself to one size of buttons on your page layout. Mix sizes and styles of buttons. You could stay with the same color, but have a variety of different buttons in that same color on a single page.
15. Buttons can be memorabilia. Save buttons from shirts, handbags, hats and other clothing that have sentimental value, but that you no longer can use. The buttons can be added to a scrapbooking page to remember the times when you wore those items. Baby buttons look cute on a baby page layout as well.
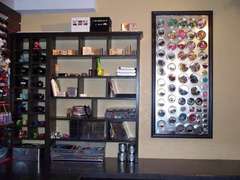
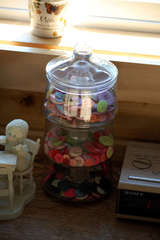
Metals:These will be your clips, hinges, keys, name plates, tabs, wire, frames, staples, tags etc. Anything that is metal (accept brads and eyelets). Some of you may not have any of these... I love adding metal to my pages but I always forget I have them. They are stuffed in the back of a drawer. Lets take some time to organize them.
Eyelets:These are great for lacing ribbon techniques or just adding color and texture to you page. They are the metal and have a hole in the middle. These items that take a cropadile or two tools to set them into your paper. They come in all shapes and several sizes. I have seen a few that don't have the hole in the middle but that is rare.
Brads:Are the ones with the two prongs on the back of the metal shape. They have no holes usually but I have seen them mimic eyelets every now and then. The prongs are pointy and can pierce the paper then be folded back behind the sheet to secure the item onto your page or card. They are colorful and can add a little extra pop to your work.
Beads: There are various beads being used in the scrapbooking world too. These are also used on flowers, strung with wire or even the micro beads that are adhered like glitter with adhesive to your project. Beads come in glass and plastic and can add a 3-D sparkle by catching the light with their commonly shinny surfaces.
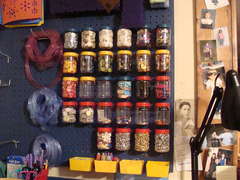
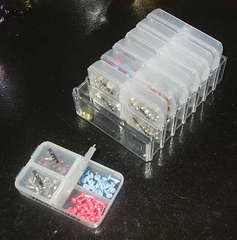
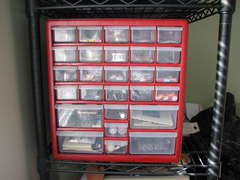
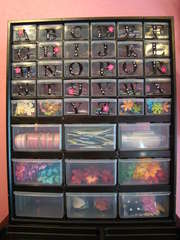
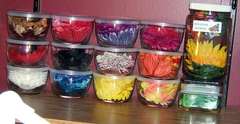
STORAGE SOLUTIONS: The majority of these are tiny and micro sized so we are going to be looking at much smaller options for storage today. You will need to decide if you want to sort them by color or by style, MFG, shape or size.
Plastic Floss Container:
This is well altered and supper cute: http://www.scrapbook.com/gallery/?m=image&id=1793203&type=searchwords&s=brad+storage&start=60&types=1,3,5
Vending Machine containers:
Flower Pots: http://www.scrapbook.com/gallery/?m=image&id=2523735&type=searchwords&s=brad+storage&types=1,3,5
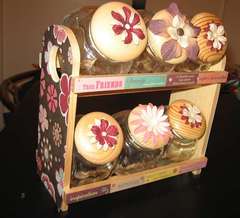
Brad House (supper cute!!! With screw on jewelry containers): http://www.scrapbook.com/gallery/?m=image&id=2213761&type=searchwords&s=brad+storage&start=20&types=1,3,5
Bead Stackers:
http://www.scrapbook.com/gallery/?m=image&id=819749&type=searchwords&s=brad+storage&start=120&types=1,3,5
Spice rack (these small jars are perfect for these little items):
http://www.scrapbook.com/gallery/?m=image&id=2211503&type=searchwords&s=brad+storage&start=20&types=1,3,5
Bead storage box: http://www.scrapbook.com/gallery/?m=image&id=1977651&type=searchwords&s=brad+storage&start=40&types=1,3,5
Magnetic Wall mount with tins:
Metal Container with tins: http://www.scrapbook.com/gallery/?m=image&id=1756215&type=searchwords&s=brad+storage&start=60&types=1,3,5
http://www.scrapbook.com/gallery/?m=image&id=1324183&type=searchwords&s=brad+storage&start=80&types=1,3,5
Pegboard: http://www.scrapbook.com/gallery/?m=image&id=1597939&type=searchwords&s=brad+storage&start=60&types=1,3,5
http://www.scrapbook.com/gallery/?m=image&id=1280827&type=searchwords&s=brad+storage&start=100&types=1,3,5
Food Jars: http://www.scrapbook.com/gallery/?m=image&id=1590429&type=searchwords&s=brad+storage&start=80&types=1,3,5
MM Jars:
Jar (I have to admit I am totally loving what Kelli is doing in her space):
Starbucks Frap Jars: http://www.scrapbook.com/gallery/?m=image&id=1572967&type=searchwords&s=button+storage&start=60&types=1,3,5
Apothecary jars: http://www.scrapbook.com/gallery/?m=image&id=1942181&type=searchwords&s=button+storage&start=40&types=1,3,5
Jars - Mixed all of them and sorted by color: http://www.scrapbook.com/gallery/?m=image&id=1358279&type=searchwords&s=brad+storage&start=80&types=1,3,5
Unique candy dish:
Cropper Hopper: http://www.scrapbook.com/gallery/?m=image&id=1374041&type=searchwords&s=brad+storage&start=80&types=1,3,5
Pill Container:
Small drawer tool organizer:
Drawer dividers: http://www.scrapbook.com/gallery/?m=image&id=1554141&type=searchwords&s=button+storage&start=60&types=1,3,5
What I truly love about most of these is you can think outside the Box store and create a trash to treasure by using something you would find at a thrift store, garage sale, Craig list or for free from your kitchen. Even the metal storage tins on the metallic board. Try using a cookie sheet and some wedding treat tins, adding magnets on the back. Have fun!
Saturday, February 19, 2011


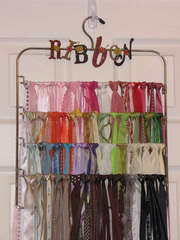
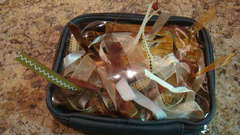
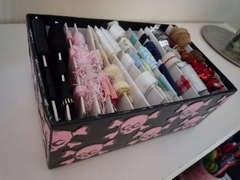
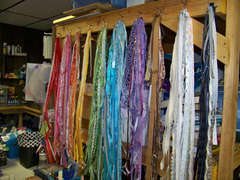
Challenge #12 Week #3 - Ribbons and fibers
Challenge #12 Week #3 - Ribbons and fibers
The biggest problem with these items is the potential of tangling and unraveling from the spool. The largest storage problem is the size that the spools take up. Because of these issues many scrapbookers remove the ribbon from their spools, especially if they collect a lot.
You will find most people sort them by color. However there are few that do it my MFG. It all depends on what way will be easiest for your brain to search and find what you need.
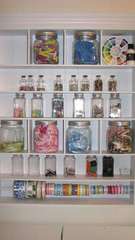
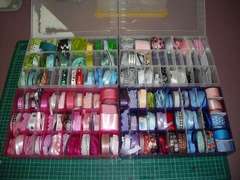
Storage Options for spools of ribbon:
Embellishment Center: http://www.scrapbook.com/gallery/?m=image&id=2601851&type=searchwords&s=ribbon+storage&types=1,3,5
Cropper Hopper Embellishment Center:
Handmade Ribbon Box: http://www.scrapbook.com/gallery/?m=image&id=2590261&type=searchwords&s=ribbon+storage&types=1,3,5
SUPER CUTE CUPCAKE HOLDER: http://www.scrapbook.com/gallery/?m=image&id=2533709&type=searchwords&s=ribbon+storage&start=20&types=1,3,5
SUPER CUTE CAKE STAND:
http://www.scrapbook.com/gallery/?m=image&id=2458823&type=searchwords&s=ribbon+storage&start=40&types=1,3,5
SUPER CUTE BIRDCAGE:
http://www.scrapbook.com/gallery/?m=image&id=2426029&type=searchwords&s=ribbon+storage&start=40&types=1,3,5
Craft locker: http://www.scrapbook.com/gallery/?m=image&id=759299&type=searchwords&s=ribbon+storage&start=436&types=1,3,5
Ribbon box: http://www.scrapbook.com/gallery/?m=image&id=1082721&type=searchwords&s=ribbon+storage&start=396&types=1,3,5
Plastic Bins:
http://www.scrapbook.com/gallery/?m=image&id=1241917&type=searchwords&s=ribbon+storage&start=360&types=1,3,5
Wire Shelves:
http://www.scrapbook.com/gallery/?m=image&id=1422579&type=searchwords&s=ribbon+storage&start=280&types=1,3,5
Wire Prima Flower shelf used now for ribbon:
http://www.scrapbook.com/gallery/?m=image&id=2398261&type=searchwords&s=ribbon+storage&start=40&types=1,3,5
Curtain Rods: http://www.scrapbook.com/gallery/?m=image&id=2383973&type=searchwords&s=ribbon+storage&start=40&types=1,3,5
Towel Rack (Behind the door): http://www.scrapbook.com/gallery/?m=image&id=1977521&type=searchwords&s=ribbon+storage&start=120&types=1,3,5
In a Drawer:
http://www.scrapbook.com/gallery/?m=image&id=1708725&type=searchwords&s=ribbon+storage&start=220&types=1,3,5
Vertical Pegs: http://www.scrapbook.com/gallery/?m=image&id=1643919&type=searchwords&s=ribbon+storage&start=240&types=1,3,5
http://www.scrapbook.com/gallery/?m=image&id=892841&type=searchwords&s=ribbon+storage&start=416&types=1,3,5
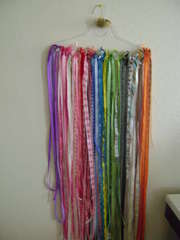
[b]Storage Options for removing them from the spools:[/b]
Pant Hanger (closet organizer):
Easy Pulls Handmade:
Ribbons on cards in a photo box: http://www.scrapbook.com/gallery/?m=image&id=2594297&type=searchwords&s=ribbon+storage&types=1,3,5
SUPPER CUTE AND CLEVER RIBBON TREE: http://www.scrapbook.com/gallery/?m=image&id=2580475&type=searchwords&s=ribbon+storage&types=1,3,5
Coat Hanger:
Towel Rack (behind the door):
Embroidery floss plastic boxes:
In Jars (though I would worry about creasing):
http://www.scrapbook.com/gallery/?m=image&id=1590437&type=searchwords&s=ribbon+storage&start=240&types=1,3,5
Shoe rack (Door Hanger):
http://www.scrapbook.com/gallery/?m=image&id=1423261&type=searchwords&s=ribbon+storage&start=280&types=1,3,5
Card and paper clips: http://www.scrapbook.com/gallery/?m=image&id=145223&type=searchwords&s=ribbon+storage&start=496&types=1,3,5
On Rings:
Close up of he rings:
http://www.scrapbook.com/myplace/index.php?mod=galleries&u=272253&m=view&id=2386071&type=5&start=1&page=1
Clothes pins and Jars:
The biggest problem with these items is the potential of tangling and unraveling from the spool. The largest storage problem is the size that the spools take up. Because of these issues many scrapbookers remove the ribbon from their spools, especially if they collect a lot.
You will find most people sort them by color. However there are few that do it my MFG. It all depends on what way will be easiest for your brain to search and find what you need.
Storage Options for spools of ribbon:
Embellishment Center: http://www.scrapbook.com/gallery/?m=image&id=2601851&type=searchwords&s=ribbon+storage&types=1,3,5
Cropper Hopper Embellishment Center:

Handmade Ribbon Box: http://www.scrapbook.com/gallery/?m=image&id=2590261&type=searchwords&s=ribbon+storage&types=1,3,5
SUPER CUTE CUPCAKE HOLDER: http://www.scrapbook.com/gallery/?m=image&id=2533709&type=searchwords&s=ribbon+storage&start=20&types=1,3,5
SUPER CUTE CAKE STAND:
http://www.scrapbook.com/gallery/?m=image&id=2458823&type=searchwords&s=ribbon+storage&start=40&types=1,3,5
SUPER CUTE BIRDCAGE:
http://www.scrapbook.com/gallery/?m=image&id=2426029&type=searchwords&s=ribbon+storage&start=40&types=1,3,5
Craft locker: http://www.scrapbook.com/gallery/?m=image&id=759299&type=searchwords&s=ribbon+storage&start=436&types=1,3,5
Ribbon box: http://www.scrapbook.com/gallery/?m=image&id=1082721&type=searchwords&s=ribbon+storage&start=396&types=1,3,5
Plastic Bins:
http://www.scrapbook.com/gallery/?m=image&id=1241917&type=searchwords&s=ribbon+storage&start=360&types=1,3,5
Wire Shelves:
http://www.scrapbook.com/gallery/?m=image&id=1422579&type=searchwords&s=ribbon+storage&start=280&types=1,3,5
Wire Prima Flower shelf used now for ribbon:
http://www.scrapbook.com/gallery/?m=image&id=2398261&type=searchwords&s=ribbon+storage&start=40&types=1,3,5
Curtain Rods: http://www.scrapbook.com/gallery/?m=image&id=2383973&type=searchwords&s=ribbon+storage&start=40&types=1,3,5
Towel Rack (Behind the door): http://www.scrapbook.com/gallery/?m=image&id=1977521&type=searchwords&s=ribbon+storage&start=120&types=1,3,5
In a Drawer:
http://www.scrapbook.com/gallery/?m=image&id=1708725&type=searchwords&s=ribbon+storage&start=220&types=1,3,5
Vertical Pegs: http://www.scrapbook.com/gallery/?m=image&id=1643919&type=searchwords&s=ribbon+storage&start=240&types=1,3,5
http://www.scrapbook.com/gallery/?m=image&id=892841&type=searchwords&s=ribbon+storage&start=416&types=1,3,5
[b]Storage Options for removing them from the spools:[/b]
Pant Hanger (closet organizer):
Easy Pulls Handmade:
Ribbons on cards in a photo box: http://www.scrapbook.com/gallery/?m=image&id=2594297&type=searchwords&s=ribbon+storage&types=1,3,5
SUPPER CUTE AND CLEVER RIBBON TREE: http://www.scrapbook.com/gallery/?m=image&id=2580475&type=searchwords&s=ribbon+storage&types=1,3,5
Coat Hanger:
Towel Rack (behind the door):

Embroidery floss plastic boxes:
In Jars (though I would worry about creasing):
http://www.scrapbook.com/gallery/?m=image&id=1590437&type=searchwords&s=ribbon+storage&start=240&types=1,3,5
Shoe rack (Door Hanger):
http://www.scrapbook.com/gallery/?m=image&id=1423261&type=searchwords&s=ribbon+storage&start=280&types=1,3,5
Card and paper clips: http://www.scrapbook.com/gallery/?m=image&id=145223&type=searchwords&s=ribbon+storage&start=496&types=1,3,5
On Rings:
Close up of he rings:
http://www.scrapbook.com/myplace/index.php?mod=galleries&u=272253&m=view&id=2386071&type=5&start=1&page=1
Clothes pins and Jars:

Friday, February 18, 2011
CHALLENGE #11 Week #3 - IT's FRIDAY PHOTOS AND FUN CHALLENGE
CHALLENGE #11 Week #3 - IT's FRIDAY PHOTOS AND FUN CHALLENGE - Photos & Memorabilia
For the full Photo and Memorabilia Challenge please see (Page 33)
SET A GOAL: Remember how we talked about setting goals for this challenge so it would be done by the end of the month? Well... share with us what your goal is... how is it going and should you re-evaluate it.
NEW FRIDAY FUN CHALLENGE: We all know that "A Scrap a day keeps the psychiatrist away" or other wise known as scrap therapy... but what about those times you really need to scrap to stay sane and you can't think of what to do or create?
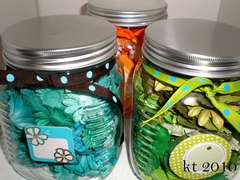
Here is a little game I came up with this week (mine is not done so I can't show you photos yet) You can make a spinner for this game. Or you can make it out of some jars or like containers. You can make this anyway you want to. It is for you and what inspires you. I am going to explain my version and you come up with one that will help you get out of that creative block.
Creative Ciaos Game: (you can name it what ever you like)
I have three jars full of things to inspire me.
That's it... shake up each jar and draw out a piece of paper... look up your inspiration and get scrapping! (Don't forget to put the papers back into the containers.)
Decorate/alter the jars/containers to match your space. Create these places, numbers and colors and put them into the containers... say goodbye to creative block!
For the full Photo and Memorabilia Challenge please see (Page 33)
SET A GOAL: Remember how we talked about setting goals for this challenge so it would be done by the end of the month? Well... share with us what your goal is... how is it going and should you re-evaluate it.
NEW FRIDAY FUN CHALLENGE: We all know that "A Scrap a day keeps the psychiatrist away" or other wise known as scrap therapy... but what about those times you really need to scrap to stay sane and you can't think of what to do or create?
Here is a little game I came up with this week (mine is not done so I can't show you photos yet) You can make a spinner for this game. Or you can make it out of some jars or like containers. You can make this anyway you want to. It is for you and what inspires you. I am going to explain my version and you come up with one that will help you get out of that creative block.
Creative Ciaos Game: (you can name it what ever you like)
I have three jars full of things to inspire me.
- Jar #1 - Has lots pieces of paper, each with a place of inspiration for me. For example: Stampin' Up Catalog, Scrapbook.com Funny Votes, Scrapbook.com Inspirational Votes, Scrapbook.com Favorites, Scrappiest(a sketch challenge blog I like) Sketches, etc... These are all places I get inspired from when I look through what is in them. Notice, I used the voting and favorites from right here on SB.com. I vote a lot and have pages of projects I like. If you save your articles from your mags and make a binder out of those articles (something we will be talking about later) ... that would be a great place of inspiration.
- Jar #2 - Has numbers in it. Numbers 1-99. Sometimes I will draw one and sometimes I will draw to and add them together. That will be the page, project or article I draw my inspiration from when paired with the item in Jar #1 that I drew.
For Example: If I drew SB.com Favorites from Jar 1 and #55 from Jar two I would look at the project in my Scrapbook.com Favorites and then use my 55th project in there that I had already marked as "Favorite" months ago. Scrap lift it or take some embellishment ideas from it... whatever will inspire you and get you out of the creative block. - Jar #3 - Colors - I have a list of the colors I use in my room... mostly ROY G BIV (the colors of the rainbow, Red-Orange-Yellow-Green-B lue-Indigo-Violet)... but I also add Black and White, Browns and Pinks.
This will help if creating a card... though I usually draw my color inspiration from my photos if I am scrapping a page.
That's it... shake up each jar and draw out a piece of paper... look up your inspiration and get scrapping! (Don't forget to put the papers back into the containers.)
Decorate/alter the jars/containers to match your space. Create these places, numbers and colors and put them into the containers... say goodbye to creative block!
Wednesday, February 16, 2011
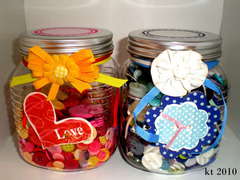
A Glittery Confection
This glittery confection was created to house some our valentine treats. They are favor boxes adorned with P K Glitter Glitz. The cricut and P K Glitz Sticky Paper provide the means to an easy assembly and impressive display.

Want to see how it is made? Check out the video tutorial on my YouTube channel.
The Cricut Design Studio allowed these heart shaped windows to be cut inside the cake favor box pattern and the lids as well. P K Glitter Glitz in Crimson and Golden Cadillac provide the sparkle and glitz.

It was enough to make your mouth water and with these tempting chocolate cake favor boxes as the means to pass out our favorite chocolate treats, it was a fitting combination.
EDIT: This post was highlighted on Party Time Tuesdays Your Daily Dose blog on February 6th, 2014.
Leave a comment below and have a fantastic Valentines Day!
Tuesday, February 15, 2011
The Chirp and I
Big news for me! The editor of Cricut Newsletter "The Chirp" has chosen me and my project "Key to my Heart" card as the Customer Spotlight of this weeks newsletter. Here is the link if you wish to view it.
http://www.cricut.com/newsletters/volume.aspx?ID=309
Happy Scrapping everyone!
~ Grace ~
http://www.cricut.com/newsletters/volume.aspx?ID=309
Happy Scrapping everyone!
~ Grace ~
Monday, February 14, 2011
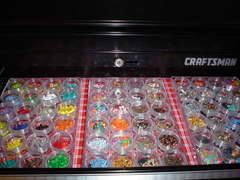
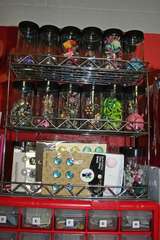
Challenge #9 Week #3 - FLOWERS
Challenge #9 Week #3 - FLOWERS
There are lots of ways to store flowers, colorful, beautiful flowers. This is the fun stuff, in my opinion. hehe...
SORTING: You can sort your flowers by size, or color, or MFG or types. Most people do it by color or MFG.
Before choosing a storage option think of how many you have... what sizes they range from and how you want to sort them. Please leave room for you to grow. :) :heart:
STORAGE OPTIONS:
Page protector pockets: (by MFG then collection) http://www.scrapbook.com/myplace/index.php?mod=galleries&u=332501&m=view&id=2110883&type=-1&start=20&page=1&f=1
Tool Drawers:
http://www.scrapbook.com/gallery/?m=image&id=1203581&type=searchwords&s=flower+storage&start=220&types=1,3,5
Displayed in Jars:
http://www.scrapbook.com/myplace/index.php?mod=galleries&u=332501&m=view&id=1337319&type=-1&start=60&page=4&f=
Over the door shoe storage: http://www.scrapbook.com/gallery/?m=image&id=2458791&type=searchwords&s=flower+storage&types=1,3,5
Starbucks bottles: http://www.scrapbook.com/gallery/?m=image&id=137485&type=searchwords&s=flower+storage&start=260&types=1,3,5
Art Bin: http://www.scrapbook.com/gallery/?m=image&id=2308163&type=searchwords&s=flower+storage&start=20&types=1,3,5
http://www.scrapbook.com/gallery/?m=image&id=1241135&type=searchwords&s=flower+storage&start=200&types=1,3,5
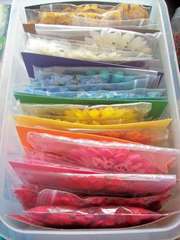
Ziploc and Boxes: (one of the most space saving options) http://www.scrapbook.com/gallery/?m=image&id=2198833&type=searchwords&s=flower+storage&start=40&types=1,3,5
Ziplocs could also be used to sort them... punch a hole in the corner of the baggie and loop them by color families or MFG with a ribbon or a ring and hang them up on the peg board.
http://www.scrapbook.com/gallery/?m=image&id=1652349&type=searchwords&s=flower+storage&start=140&types=1,3,5
Clear food containers: http://www.scrapbook.com/gallery/?m=image&id=1634989&type=searchwords&s=flower+storage&start=140&types=1,3,5
Spice Rack (reused): http://www.scrapbook.com/gallery/?m=image&id=1307261&type=searchwords&s=flower+storage&start=200&types=1,3,5
Only problem with spice racks is the size. If you want room to grow they will not allow you to add larger flowers.
Bead Containers: http://www.scrapbook.com/gallery/?m=image&id=1110739&type=searchwords&s=flower+storage&start=220&types=1,3,5
These come in various sizes.
I hope everyone has fun sorting and storing these beautiful embellishments.
As always please share any thoughts. :heart:
There are lots of ways to store flowers, colorful, beautiful flowers. This is the fun stuff, in my opinion. hehe...
SORTING: You can sort your flowers by size, or color, or MFG or types. Most people do it by color or MFG.
Before choosing a storage option think of how many you have... what sizes they range from and how you want to sort them. Please leave room for you to grow. :) :heart:
STORAGE OPTIONS:
Page protector pockets: (by MFG then collection) http://www.scrapbook.com/myplace/index.php?mod=galleries&u=332501&m=view&id=2110883&type=-1&start=20&page=1&f=1
Tool Drawers:
http://www.scrapbook.com/gallery/?m=image&id=1203581&type=searchwords&s=flower+storage&start=220&types=1,3,5
Displayed in Jars:

http://www.scrapbook.com/myplace/index.php?mod=galleries&u=332501&m=view&id=1337319&type=-1&start=60&page=4&f=
Over the door shoe storage: http://www.scrapbook.com/gallery/?m=image&id=2458791&type=searchwords&s=flower+storage&types=1,3,5
Starbucks bottles: http://www.scrapbook.com/gallery/?m=image&id=137485&type=searchwords&s=flower+storage&start=260&types=1,3,5
Art Bin: http://www.scrapbook.com/gallery/?m=image&id=2308163&type=searchwords&s=flower+storage&start=20&types=1,3,5
http://www.scrapbook.com/gallery/?m=image&id=1241135&type=searchwords&s=flower+storage&start=200&types=1,3,5
Ziploc and Boxes: (one of the most space saving options) http://www.scrapbook.com/gallery/?m=image&id=2198833&type=searchwords&s=flower+storage&start=40&types=1,3,5
Ziplocs could also be used to sort them... punch a hole in the corner of the baggie and loop them by color families or MFG with a ribbon or a ring and hang them up on the peg board.
http://www.scrapbook.com/gallery/?m=image&id=1652349&type=searchwords&s=flower+storage&start=140&types=1,3,5
Clear food containers: http://www.scrapbook.com/gallery/?m=image&id=1634989&type=searchwords&s=flower+storage&start=140&types=1,3,5
Spice Rack (reused): http://www.scrapbook.com/gallery/?m=image&id=1307261&type=searchwords&s=flower+storage&start=200&types=1,3,5
Only problem with spice racks is the size. If you want room to grow they will not allow you to add larger flowers.
Bead Containers: http://www.scrapbook.com/gallery/?m=image&id=1110739&type=searchwords&s=flower+storage&start=220&types=1,3,5
These come in various sizes.
I hope everyone has fun sorting and storing these beautiful embellishments.
As always please share any thoughts. :heart:
Subscribe to:
Posts (Atom)


