These were both weekday challenges last year. I am combining them to a weekend challenge so we can have more photo days. These should be things you are organizing together or at least considering how to organized them at the same time as you work. Sorry if it seems like a lot between these posts. Really I think working on these at the same time will work out nicely.
Challenge #8 Week #2 PART 2 - Kits, Scrap paper, and die cuts
Several of you have already begun sorting a few of these categories. So we will be going over them quickly.
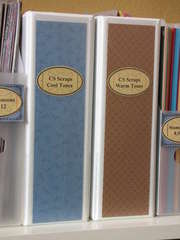
KITS: Most kits come packaged in large Ziploc or cellophane baggies. Kits are coordinated and work best if you can keep them together until you use them. They are great for crops those times when you want to produce something quickly. Since most kits will included a color scheme and multiple MGS I would suggest sorting them by theme or kit club you received them from.
You can create you own kits if you wish out of your stash or you can purchase them from various companies and kit-clubs online or at your LSS.
Storage Solutions:
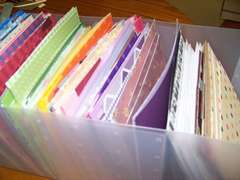
See last challenge for standard paper storage... for example you can have a vertical cropper hopper just for kits, etc.
Clip it up: http://www.scrapbook.com/gallery/?m=image&id=2294421&type=searchwords&s=kit+storage&start=20&types=1,3,5
A shelf: http://www.scrapbook.com/gallery/?m=image&id=2226799&type=searchwords&s=kit+storage&start=20&types=1,3,5
Wire tower of drawers categorized by theme: http://www.scrapbook.com/gallery/?m=image&id=1400183&type=searchwords&s=kit+storage&start=80&types=1,3,5
SCRAPS: Scraps are a nuisance but since most of scrapbooks are part "collector" then we tend to save them for a rainy day or we pawn them off on our kids. LOL.
Scraps should be sorted like you sorted your PP and CS... if you did that by color then sort the scraps by color. If you did it by theme then ... sort your scraps by theme...etc.
BE REALISTIC!!! Only keep the scraps you know you will use... for example if you cut up 1/2 of a 12x12 piece of paper then you have a 6x12 scrap that can be used on a smaller page, run through a cricut or even to make cards. Don't keep (and I am guilty of this) a random shaped piece of paper big enough for one punch from a decorative punch. What I have come to decide is, if I want to save every little piece is this rule:
It must be at least 4.25"x5.5" to keep in my sorted scraps or I take my punches and punch flowers or hearts or leaves etc. and sort those into my die cuts.
Fallowing this rule keeps my scrap storage organized by size and only usable scraps are saved. My punches and die cut shapes are there for me and my kids to purge at our leisure.
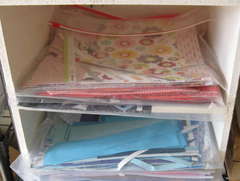
Storage solutions:
Storage Photo Box: If your determined to use the scraps as photo mats or cards then this will work for you: http://www.scrapbook.com/gallery/?m=image&id=2453369&type=searchwords&s=scrap+paper+storage&start=20&types=1,3,5
File drawer (vertical storage): http://www.scrapbook.com/gallery/?m=image&id=2289501&type=searchwords&s=scrap+paper+storage&start=20&types=1,3,5
File Container: http://www.scrapbook.com/gallery/?m=image&id=1396437&type=searchwords&s=scrap+paper+storage&start=140&types=1,3,5
Plastic drawers (horizontal storage): http://www.scrapbook.com/gallery/?m=image&id=2229691&type=searchwords&s=scrap+paper+storage&start=40&types=1,3,5
Shelves: Ziploc:
Cropper Hopper: Ziploc:
Ziploc hanging on the back of the door:
Scrapease file system:
Binders: (one of the most inexpensive ways to go)
DIE CUTS: Extra die cuts and punches are another batch of little items to sort like chipboard. The majority of the time they are not too large (especially the extra punches). There are not many examples of how to store this on this site's gallery... here is an idea of a container I would use to store my smaller die cuts and extra punched papers... (like I said before I do tend to collect extra punched papers from my smaller scraps before I throw them away).
Plastic divided container: http://www.scrapbook.com/gallery/?m=image&id=315379&type=searchwords&s=extra+punched+paper+storage&types=1,3,5
Baseball card binder: http://www.vanillajoy.com/die-cut-shape-storage-idea.html
In this article: http://www.scrapjazz.com/topics/Organization/Embellishments/343.php they suggest that you do this...
Storage Solution:
To protect your die cuts and stickers and still keep them visible when you want flip through and access them, use clear storage pages. I used baseball card holders, 4 x 6 photo sleeve pages, 5 x 7 photo sleeve pages, full page protectors or special plastic pages made for accent storage. All these options were available at my local Wal-Mart and other discount stores. Any of these pages will fit in standard 3-ring binders.
Storage bins like these work great too: http://www.accucut.com/Die_Cut_Storage_Bins-c309-p2,309.html
Does anyone else have a storage solution to share? I am hoping this will be an easy challenge for you all tonight since we are tackling our paper storage this week.
Saturday, February 12, 2011

Challenge #8 Week #2 PART 1
Challenge #8 Week #2 PART 1 - Patterned Paper/ Cardstock
Every single one of us has it... but is it working for you the way you have it organized?
THE KEY TO GOOD PATTERNED PAPER ORGANIZATION IS TO: have it organized to match your train of thought.
HORIZONTAL OR VERTICAL?(from http://www.creative-scrapbook-layouts.com/scrapbook_paper_storage_ideas.html)
"Scrapbook Paper Storage Idea #1: Horizontal Paper http://www.scrapbook.com/gallery/?m=image&id=2579363&type=searchwords&s=paper+storage&types=1,3,5
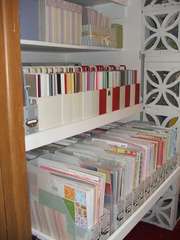
Most scrapbook stores will store their paper horizontally because they have the room for rows and rows of shelves and racks. Now, most of us don't have room for all those shelves, but horizontal storage is still a possibility with 12" x 12" plastic snap top cases. You can buy them individually or as part of a three-drawer or six-drawer cart, so you can make the most use out of your vertical space.
Racks: http://www.scrapbook.com/gallery/?m=image&id=2570177&type=searchwords&s=paper+storage&types=1,3,5
Wire cubes: http://www.scrapbook.com/gallery/?m=image&id=2269565&type=searchwords&s=paper+storage&start=140&types=1,3,5
Cubes: http://www.scrapbook.com/gallery/?m=image&id=2515333&type=searchwords&s=paper+storage&start=40&types=1,3,5
Scrapbook Paper Storage Idea #2: Vertical Paper http://www.scrapbook.com/gallery/?m=image&id=2580403&type=searchwords&s=paper+storage&types=1,3,5
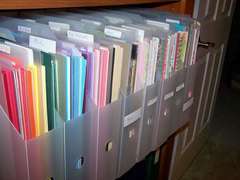
Depending on your preferences, you can use traditional magazine storage files for 8.5" x 11" paper (or on your scrapbook table to store scrap paper), but you will have to get special storage files for 12" x 12" scrapbook paper. Vertical paper storage is best for cardstock or other papers that you will be accessing frequently because you can just slide the storage file out and pick the paper you need.
These paper holders also come with dividers, so you can store multiple colors within a singe file! Just one thing to keep in mind is that you will need very tall shelves if you plan on using these vertical storage files in a bookshelf."
Baskets: http://www.scrapbook.com/gallery/?m=image&id=2501181&type=searchwords&s=paper+storage&start=40&types=1,3,5
Cubes vertical: http://www.scrapbook.com/gallery/?m=image&id=2504381&type=searchwords&s=paper+storage&start=40&types=1,3,5
Files: http://www.scrapbook.com/gallery/?m=image&id=888475&type=searchwords&s=paper+storage&start=780&types=1,3,5
HOW TO ORGANIZE IT - Now that you have thought about WHAT to store them in lets talk about HOW...
Cardstock- seem simple enough, by color right or brand? But what about those patterned papers? Do you Separate your cardstock from your patterned paper? Or would it work better for you if you had all the pink patterned paper then pink cardstock together?
Patterned Papers -
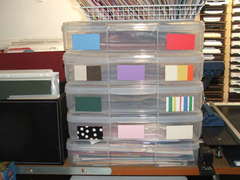
1) By color - Are you the type that reaches for the color first when you need something in your scraproom? Within each color do you organize it from lighter to darker colors?
Cropper hoppers by color:
http://www.scrapbook.com/gallery/?m=image&id=1300547&type=searchwords&s=paper+storage&start=600&types=1,3,5
http://www.scrapbook.com/gallery/?m=image&id=2104481&type=searchwords&s=paper+storage&start=240&types=1,3,5
2) By Brand - do you have a great memory for brands. Do you think to your self when you are scrapping..."that rust and white flourish paper from the Everafter line that Cosmo Cricket put out would be perfect!" If so they by Brand and collection would be the way for you to organize.
Great way to organize by collection and brand if you like to keep them in their stacks...
3) By Theme and Pattern - Are you a graphic scrapper? One who knows they need a stripe or a polka-dot paper to balance out the floral you just picked as the background paper. Or do you scrap by theme a lot. Maybe you create a lot of mini albums or you prefer ballet shoe paper for your little princesses recital page.
There ya go... these are the best ways to organize it... now you can do it in sub categories... say you want to organize it by Brand but within each brand you want it by theme or color. Maybe it is by color first and within that color it is by pattern and theme. That works too but one of these three will be the Main way you will organize with a possible sub category.
Consider size - do you sort the scraps (if you separate these from your full sheets we will go over how to store them latter this week) into your full sheets or maybe you buy 6x6 paper. Do you sort it into your 12x12? That is up to you. Just keep in mind that when you are working on a 12x12 page you can't always use the 6x6.
THINGS YOU SHOULD KNOW...
[list]1) never store in direct sunlight preferably a cool, dry place
2)Store it completely separate from other supplies. If you mix them you are undoubtedly asking for creasing or tearing.
3)When looking for storage make sure that you choose a container that fits a 12x12 piece of paper or a 8x8, if that is your size preference. Keeping the paper fitting snugly will keep it from getting bent or damaged.
4)If you keep it organized it will lead to an easier scrapbooking experience. So make sure you keep it organized.
You can store them on shelves without organizational units. Keep in mind though that they will slip easily and have a chance of making a mess. Storing horizontally with out organizers creates the same problem. When you need one near the bottom all the others will begin to fall and it becomes one large balancing act.
**** Don't have the cash to fork out for these organizers? Try these almost free solutions -
Horizontal: http://www.scrapbook.com/gallery/?m=image&id=65087&type=searchwords&s=paper+storage&start=900&types=1,3,5
Vertical: http://www.scrapbook.com/gallery/?m=image&id=1233713&type=searchwords&s=paper+storage&start=680&types=1,3,5
Step by step instructions: http://www.wescrap.com/scrapbooking-resources/tutorials/altered-art/168-creating-decorated-verticle-paper-storage-boxes
JUST TO DROOL OVER....
Every single one of us has it... but is it working for you the way you have it organized?
THE KEY TO GOOD PATTERNED PAPER ORGANIZATION IS TO: have it organized to match your train of thought.
HORIZONTAL OR VERTICAL?(from http://www.creative-scrapbook-layouts.com/scrapbook_paper_storage_ideas.html)
"Scrapbook Paper Storage Idea #1: Horizontal Paper http://www.scrapbook.com/gallery/?m=image&id=2579363&type=searchwords&s=paper+storage&types=1,3,5
Most scrapbook stores will store their paper horizontally because they have the room for rows and rows of shelves and racks. Now, most of us don't have room for all those shelves, but horizontal storage is still a possibility with 12" x 12" plastic snap top cases. You can buy them individually or as part of a three-drawer or six-drawer cart, so you can make the most use out of your vertical space.
Racks: http://www.scrapbook.com/gallery/?m=image&id=2570177&type=searchwords&s=paper+storage&types=1,3,5
Wire cubes: http://www.scrapbook.com/gallery/?m=image&id=2269565&type=searchwords&s=paper+storage&start=140&types=1,3,5
Cubes: http://www.scrapbook.com/gallery/?m=image&id=2515333&type=searchwords&s=paper+storage&start=40&types=1,3,5
Scrapbook Paper Storage Idea #2: Vertical Paper http://www.scrapbook.com/gallery/?m=image&id=2580403&type=searchwords&s=paper+storage&types=1,3,5
Depending on your preferences, you can use traditional magazine storage files for 8.5" x 11" paper (or on your scrapbook table to store scrap paper), but you will have to get special storage files for 12" x 12" scrapbook paper. Vertical paper storage is best for cardstock or other papers that you will be accessing frequently because you can just slide the storage file out and pick the paper you need.
These paper holders also come with dividers, so you can store multiple colors within a singe file! Just one thing to keep in mind is that you will need very tall shelves if you plan on using these vertical storage files in a bookshelf."
Baskets: http://www.scrapbook.com/gallery/?m=image&id=2501181&type=searchwords&s=paper+storage&start=40&types=1,3,5
Cubes vertical: http://www.scrapbook.com/gallery/?m=image&id=2504381&type=searchwords&s=paper+storage&start=40&types=1,3,5
Files: http://www.scrapbook.com/gallery/?m=image&id=888475&type=searchwords&s=paper+storage&start=780&types=1,3,5
HOW TO ORGANIZE IT - Now that you have thought about WHAT to store them in lets talk about HOW...
Cardstock- seem simple enough, by color right or brand? But what about those patterned papers? Do you Separate your cardstock from your patterned paper? Or would it work better for you if you had all the pink patterned paper then pink cardstock together?
Patterned Papers -
1) By color - Are you the type that reaches for the color first when you need something in your scraproom? Within each color do you organize it from lighter to darker colors?
Cropper hoppers by color:
http://www.scrapbook.com/gallery/?m=image&id=1300547&type=searchwords&s=paper+storage&start=600&types=1,3,5
http://www.scrapbook.com/gallery/?m=image&id=2104481&type=searchwords&s=paper+storage&start=240&types=1,3,5
2) By Brand - do you have a great memory for brands. Do you think to your self when you are scrapping..."that rust and white flourish paper from the Everafter line that Cosmo Cricket put out would be perfect!" If so they by Brand and collection would be the way for you to organize.
Great way to organize by collection and brand if you like to keep them in their stacks...
3) By Theme and Pattern - Are you a graphic scrapper? One who knows they need a stripe or a polka-dot paper to balance out the floral you just picked as the background paper. Or do you scrap by theme a lot. Maybe you create a lot of mini albums or you prefer ballet shoe paper for your little princesses recital page.
There ya go... these are the best ways to organize it... now you can do it in sub categories... say you want to organize it by Brand but within each brand you want it by theme or color. Maybe it is by color first and within that color it is by pattern and theme. That works too but one of these three will be the Main way you will organize with a possible sub category.
Consider size - do you sort the scraps (if you separate these from your full sheets we will go over how to store them latter this week) into your full sheets or maybe you buy 6x6 paper. Do you sort it into your 12x12? That is up to you. Just keep in mind that when you are working on a 12x12 page you can't always use the 6x6.
THINGS YOU SHOULD KNOW...
[list]1) never store in direct sunlight preferably a cool, dry place
2)Store it completely separate from other supplies. If you mix them you are undoubtedly asking for creasing or tearing.
3)When looking for storage make sure that you choose a container that fits a 12x12 piece of paper or a 8x8, if that is your size preference. Keeping the paper fitting snugly will keep it from getting bent or damaged.
4)If you keep it organized it will lead to an easier scrapbooking experience. So make sure you keep it organized.
You can store them on shelves without organizational units. Keep in mind though that they will slip easily and have a chance of making a mess. Storing horizontally with out organizers creates the same problem. When you need one near the bottom all the others will begin to fall and it becomes one large balancing act.
**** Don't have the cash to fork out for these organizers? Try these almost free solutions -
Horizontal: http://www.scrapbook.com/gallery/?m=image&id=65087&type=searchwords&s=paper+storage&start=900&types=1,3,5
Vertical: http://www.scrapbook.com/gallery/?m=image&id=1233713&type=searchwords&s=paper+storage&start=680&types=1,3,5
Step by step instructions: http://www.wescrap.com/scrapbooking-resources/tutorials/altered-art/168-creating-decorated-verticle-paper-storage-boxes
JUST TO DROOL OVER....
Friday, February 11, 2011
CHALLENGE #7 Week #2 - FRIDAY PHOTOS AND FUN CHALLENGE
CHALLENGE #7 Week #2 - FRIDAY PHOTOS AND FUN CHALLENGE - Photos & Memorabilia
For the full Photo and Memorabilia Challenge please see Last week's Photo Challenge Post.
SET A GOAL: Remember how we talked about setting goals for this challenge so it would be done by the end of the month? Well... share with us what your goal is... how is it going and should you re-evaluate it.
FRIDAY FUN CHALLENGE: Only use this as a reward to getting your photo goal for the day done! I have spies everywhere and I will know if you don't! LOL... j/k.
This one is about two things...
Tick-Tock, the time slips by when we are creative, do you have a clock on your wall? No, not the tiny one on the corner of the computer screen or on your phone. A clock that is visible from just about anywhere in your space? This challenge is to get a clock and alter it... or make one. I don't care. If you don't have time to alter it then please just get one for your room. Steal it out of the kitchen if you have to.
You have the choice to alter a clock or any other item this week. The catch is it has to be for your space. It could be something you will use to organize other things in, something for your wall, a sign for your room or just something pretty for your desk. You just have to find something to alter. That is the creativity challenge. But please, make sure you get a clock!
Thursday, February 10, 2011
Challenge #6 Week #2: ALPHAS
Challenge #6 Week #2: ALPHAS
Some of you have already worked on this but lets think for a moment what we use alpha's for and what type of Alpha's we have. (probably should have done this one before chipboard, sorry)
There are two ways to organize them in your space. Think about which one or a combo of the two will work for you before we begin to sort our alphas.
1) Keeping the embellishment types together and sorting them with in the type of embellishments they are. (Alpha Brads with Brads, Alpha Chipboard with Chipboard etc)
2) We remove the alphas from all their like embellishments and create an alpha center with everything from Chipboard - Stickers - Foam - Thicker - paper die cuts - even stamps - etc.
This all depends on how you search for Alphas for your layouts. Do you know you want chipboard alphas or do you just go after the letters you need no matter what type of alpha they are? Do you like the whimsical fun look and mix your alphas on the page or do you prefer to have them all matching?
TYPES OF ALPHAS:
Chipboard Alphas: These alphas add dimensional to the page and can be refinished to coordinate with any color or style on your LO.
Sticker Alphas: These are always ready to use with minimal need for adding details. Stick and Go!
Paper Die Cut Alphas: These can be purchased, punched or even cut with die cut machines. They can be embellished, made of PP or CS.
Tile Alphas: These are things like scrabble tiles or any other type of block tile shape. They usually add dimension and a spirit of fun and game play to your layouts and cards.
Metal Alphas: These also add dimension and the metal element to the page. Possibly some sparkle if they are shinny. These could be large or small enough to be made from brads.
Cork Alphas: These are also thick and add dimension. You can embellish them if you'd like and they also add a visual texture.
Ghost Letter Alphas: These are unique and quite subtle. They can be altered with inks and stamps but they allow you to see through them to see the paper layered underneath.
Rub-on Alphas: It is probably wise to still store these on the original sheet and not separate them by letter but they still fall into the alpha category.
Other: I am sure there are more so please share with us if I missed one.[/list]
Now, As I said up above how you organize these is up to how you think when you are scrapping. Keep this in mind.
Storage Solutions:
Tool Drawers:
http://www.scrapbook.com/gallery/image/scraproom/2590375.html]KellyCali
Plastic drawer minis - http://www.scrapbook.com/gallery/?m=image&id=2557797&type=searchwords&s=alpha+storage&types=1,3,5
http://www.scrapbook.com/gallery/?m=image&id=2229655&type=searchwords&s=alpha+storage&types=1,3,5
Storage drawers: (ikea style) http://www.scrapbook.com/gallery/?m=image&id=1678255&type=searchwords&s=alpha+storage&start=40&types=1,3,5
Decorative baggie (I linked this before but I think it is great and apply s here also.) http://www.scrapbook.com/gallery/?m=image&id=1546741&type=searchwords&s=chipboard+baggie&types=1,3,5
Clip it up: If you could dedicate a section or an entire unit if you needed to holding your alphas. You could use ziplocs to hold the items that don't come on the sheets, sorted by letters or by type.
Baseball and Pocket pages: Using a binder these could be well organized into one. Use Baseball and pocket pages to organize the loose letters and page protectors to hold things like rub-on and sticker sheets.
Drawer dividers: You could also build dividers out of cardboard or chipboard and use larger drawers making smaller compartments.
I hope this helps and gets you thinking about how you scrap and what will work best for you.
Tuesday, February 8, 2011
Dynamic Duo!
Dynamic Duo? Yup, I have a pair that are just amazing together. They are as different as oil and water but when it comes down to it they make things in this life more beautiful. Here is a layout to prove it.

I am so excited to tell you about my Dynamic Duo... no not my kids! My Ritzy Ditzy Glitz and my P K Glitter Glitz, of course! My kids we call "T & T Dynamite"... but that is for another post all together. Lets take a closer look...

Ok fine... I will chat for a second about my sweet darlings...
Trinity likes Pink, Tristan likes Blue
Trinity will eat almost anything, Tristan is a picky eater.
Trinity is a social butterfly, Tristan is happy all by himself most of the time.
See what I mean... Oil and Water. The "T & T" well that stand for their names... and the "Dynamite" well that is because when they are in room together for a while it looks like some dynamite exploded in there.
Alright enough chatting about my rugrats. I hope you like this LO and I wish you a Happy Scrappy day!
~ Grace ~
Monday, February 7, 2011
Challenge #5 Week #2 - Chipboard
CHALLENGE WEEK #2: THE PAPERS
• Monday - Challenge #5 - Chipboard
• Wednesday - Challenge #6 - Alphas
• Friday - Challenge #7 - Photo Fridays & Fun
• Weekend Challenge #8- Cardstock and Pattern Paper, Kits, Scrap paper, die cuts
Monday Challenge #5 Week #2 - Chipboard
Chipboard is one of those more difficult things for me to organize. I have everything from letters and numbers to tons of other designs. Some in natural chipboard and some colored and glittered. So what do you do with pieces as small as 1/2" all the way to 12"x12"?
Well let me see if I can help.
First we need to ask ourselves a couple of questions.
1) Do you cover your own chipboard or purchase only the prefinished colored ones?
2) Do you have graphic designs as well as alphas?
3)Do you have so many you can sort them by themes?
SORTING: Lets begin by deciding how you want to sort the naked or finished chipboard...
I suggest separating your alphas and numbers from your graphics. Organize your alphas and numbers in order for easy access.
Sorting graphics...
Finished Chipboard Collectors - If you only purchase prefinished chipboard it might work for you to sort the graphics by color, MFG or theme (remember what way works best for you with the rest of your room).
Finished and Non Finished Collectors - Here is where it can get complicated. For me no matter what finish is on the chipboard I search by shape. If it doesn't match then I just refinish it. If you don't refinish the chipboard that is already prefinished then I would suggest separating it from the naked chipboard. However for me I will be separating by types of shapes, for example... I put all my swirly chipboard together, all my flowers together. How you sort these graphics will be determined by what you have.
STORAGE SOLUTIONS: WHAT TO PUT THEM IN?
Binders:
Binders Page protectors:
Jars -
Drawers-
Tool organizer
Altered drawers http://www.scrapbook.com/gallery/?m=image&id=2512589&type=searchwords&s=chipboard+storage&types=1,3,5
plastic mini drawers http://www.scrapbook.com/gallery/?m=image&id=1835617&type=searchwords&s=chipboard+storage&start=40&types=1,3,5
Canisters -
Cropper hopper in a basket in a cube - http://www.scrapbook.com/gallery/?m=image&id=1420291&type=searchwords&s=chipboard+storage&start=40&types=1,3,5
Art Bin
Cute galvanized tins, if you have the room... http://www.scrapbook.com/gallery/?m=image&id=1313879&type=searchwords&s=chipboard+storage&start=40&types=1,3,5
Baggies... supper cute ziplocs!!! http://www.scrapbook.com/gallery/?m=image&id=1546741&type=searchwords&s=chipboard+storage&start=40&types=1,3,5
baggies in a drawer... http://www.scrapbook.com/gallery/?m=image&id=1289033&type=searchwords&s=chipboard+storage&start=40&types=1,3,5
baggies in a basket in a cube... http://www.scrapbook.com/gallery/?m=image&id=697045&type=searchwords&s=chipboard+storage&start=40&types=1,3,5
Now if you sort your chipboard into baggies you can make them like the one above or You can file them in a drawer, on a clip-it-up, in a basket or store them flat in a cropper hopper (separated by baggies). If you do the decorative baggie solution then maybe make one or two extra empty bags so you have them to match.
The Key here is to LEAVE ROOM TO GROW!!!
• Monday - Challenge #5 - Chipboard
• Wednesday - Challenge #6 - Alphas
• Friday - Challenge #7 - Photo Fridays & Fun
• Weekend Challenge #8- Cardstock and Pattern Paper, Kits, Scrap paper, die cuts
Monday Challenge #5 Week #2 - Chipboard
Chipboard is one of those more difficult things for me to organize. I have everything from letters and numbers to tons of other designs. Some in natural chipboard and some colored and glittered. So what do you do with pieces as small as 1/2" all the way to 12"x12"?
Well let me see if I can help.
First we need to ask ourselves a couple of questions.
1) Do you cover your own chipboard or purchase only the prefinished colored ones?
2) Do you have graphic designs as well as alphas?
3)Do you have so many you can sort them by themes?
SORTING: Lets begin by deciding how you want to sort the naked or finished chipboard...
I suggest separating your alphas and numbers from your graphics. Organize your alphas and numbers in order for easy access.
Sorting graphics...
Finished Chipboard Collectors - If you only purchase prefinished chipboard it might work for you to sort the graphics by color, MFG or theme (remember what way works best for you with the rest of your room).
Finished and Non Finished Collectors - Here is where it can get complicated. For me no matter what finish is on the chipboard I search by shape. If it doesn't match then I just refinish it. If you don't refinish the chipboard that is already prefinished then I would suggest separating it from the naked chipboard. However for me I will be separating by types of shapes, for example... I put all my swirly chipboard together, all my flowers together. How you sort these graphics will be determined by what you have.
STORAGE SOLUTIONS: WHAT TO PUT THEM IN?
Binders:

Binders Page protectors:

Jars -

Drawers-
Tool organizer

Altered drawers http://www.scrapbook.com/gallery/?m=image&id=2512589&type=searchwords&s=chipboard+storage&types=1,3,5
plastic mini drawers http://www.scrapbook.com/gallery/?m=image&id=1835617&type=searchwords&s=chipboard+storage&start=40&types=1,3,5
Canisters -

Cropper hopper in a basket in a cube - http://www.scrapbook.com/gallery/?m=image&id=1420291&type=searchwords&s=chipboard+storage&start=40&types=1,3,5

Art Bin

Cute galvanized tins, if you have the room... http://www.scrapbook.com/gallery/?m=image&id=1313879&type=searchwords&s=chipboard+storage&start=40&types=1,3,5
Baggies... supper cute ziplocs!!! http://www.scrapbook.com/gallery/?m=image&id=1546741&type=searchwords&s=chipboard+storage&start=40&types=1,3,5
baggies in a drawer... http://www.scrapbook.com/gallery/?m=image&id=1289033&type=searchwords&s=chipboard+storage&start=40&types=1,3,5
baggies in a basket in a cube... http://www.scrapbook.com/gallery/?m=image&id=697045&type=searchwords&s=chipboard+storage&start=40&types=1,3,5
Now if you sort your chipboard into baggies you can make them like the one above or You can file them in a drawer, on a clip-it-up, in a basket or store them flat in a cropper hopper (separated by baggies). If you do the decorative baggie solution then maybe make one or two extra empty bags so you have them to match.
The Key here is to LEAVE ROOM TO GROW!!!
Subscribe to:
Posts (Atom)


