Saturday, July 11, 2015

Octopus covered Nesting Table set - functional art

Hello everyone!

I am just so excited to share with you all this project... if you want to see more please head over to my website and check out all the fantastic details and photos. Thanks for your support!


Photobucket

Find me on...
Facebook: Uniquely Grace
Twitter: Grace Lauer Artist @gracelauer
Instagram: @gracelauer_henna_artist
Pinterest: L. Grace Lauer

Wednesday, July 1, 2015

Shabby Chic Storage Cabinet Step by Step Tutorial - pressed wood

Shabby Chic Storage - Chippy & Distressed

Once upon a time there was an artist. She was surrounded by wonderful people in her life who believed in her, so much so that when she put her mind to it she could create just about anything! This is how I felt with this sweet and stunning shabby piece I am sharing with you today. I personally am not an extremely shabby person though I like a soft distressing now and then. So this one was a challenge for me.

Shabby Paints chic pinterest cabinet shimmers chalk acrylic paint uniquely grace night stand end table
Meet Cinderella, her name was chosen from the rags to riches story because I truly feel that was what this cabinet went through. She was a cleaning supply storage cabinet in a bathroom before I got her.
before after shabby chic paints cabinet table end night stand laminate pressed wood makeover fab furniture flippin contest uniquely grace
I feel like her fairy godmother and my paint brush is my magic wand. She is glistening in her Shabbiness now. Though the Shabby Paints Shimmer Paints and Glazes probably have something to do with that too.

Shabby Chic paints shimmer chalk acrylic chippy distressed laminate pressed wood uniquely grace end table night stand cabinet

Want to know how to create this Look? Keep reading for my step by step tutorial...
Step A: Clean... with Vinegar/Water (50/50 mix) and a splash of blue dawn, rinse with water and a clean microfiber cloth.
Step B: Sand... and scuff up the surface to help the paint have something to hold onto, since this is not real wood. Wipe it down with a damp microfiber cloth to collect all the dust.
Step C: Paint in layers... I painted the following layers:
  1. Three layers of Brown Bronze Shimmer Glaze over the creamy laminate like surface. Let dry to touch.
  2. One dry brush layer of Buffalo Brown. Let dry over night.
  3. Rubbed a bar of soap all over the areas I wanted distressed.
  4. One full coat of Vanilla Bear with whole rice mixed in (to scrape off later)  Let dry to touch.
  5. One layer of Stunning Silver Shimmer Paint. Let dry to touch.
  6. A watered down later of Hazelnut ReVax and scrape off while wet with a metal or hard plastic putty knife, exposing the darker brown & bronze layers underneath. Work quickly and in small sections!
  7. Used more Hazelnut ReVax with a small artist's brush to shade and darken corners and under the tops of the shelves and overhangs.
  8. Went back in with a smaller brush and added some Black ReVax to darken the corners and under the overhangs even more.
close up chippy distressed shabby chic paints uniquely grace furniture flip makeover shimmer

Shabby Chic Definition:

"Shabby chic (pronounced: "sheek") is a form of interior design where furniture and furnishings are either chosen for their appearance of age and signs of wear and tear or where new items are distressed to achieve the appearance of an antique" - Wikipedia
If only the world could now how much work it takes to make something this old, old enough that someone may want to refinish it. LOL! I hope you have a wonderful day and a blessed weekend. Thank  you all very much for stopping by!
This item was entered into the "The Fab Furniture Flipin' Contest" for the month of June, I was honored to be a part of this contest last month and thrilled to be in it now. This months theme is  "Shabby Chic Storage" and is sponsored by The Old Fashioned Milk Paint Company. Though I was not able to use their product for this project. Take a moment to go check them out.

997068_920154666073_3072223900727714781_n

Hosts this month did shabby projects also here are their blog links:

OFMP: The Marissa Dresser (by Carrie of 38th St)

SHABBY TO CHIC STORAGE WITH OLD FASHIONED MILK PAINT ( by Charlotte of Ciburbanity)

FFFC post graphic final (png)

Interested bloggers should contact Stacy (info@anastasiavintage.com) or Evey (info@eveyscreations.com) if interested in participating in future contests.
Thanks Again!!!!
~ Grace
Photobucket

Find me on...
Facebook: Uniquely Grace
Twitter: Grace Lauer Artist @gracelauer
Instagram: @gracelauer_henna_artist
Pinterest: L. Grace Lauer

Sunday, May 24, 2015

Yard Sale Find Flipped to a Colonial Antebellum Home Inspired Dresser

Welcome everyone to my Colonial Antebellum inspired Dresser Flip. It began with this $20 dresser yard sale find. This 10 drawer find I thought was in fairly good condition aside from some deep scratches on the top that needed to be sanded out or filled. They were even kind enough to deliver it.


Once I got it home and out of their grass...  I could see the work I had in store for me. The above image shows how much cosmetic work was needed to be done to the side of the footings and moldings. Most of it I was able salvage after removing 6 nails and 4 screws, all of them were driven in from the outside of the piece and were visible. The molding was in 3 pieces in the front and missing the back foot.

Repairs were made and she was brought back to life... Possibly even a grander life then she had before with the addition of the shutters to her mirror and new hardware. This dresser was inspired by the Colonial Antebellum architecture found frequently here in the south. I am in love with all the history around here that comes with being on the east coast.

Meet Mrs. Hayward


I will admit I felt like this project was never going to end. Rebuilding, repairs, patching and sanding. It so far was the largest rehab I have done. Her Body is finished with Alamo White antiqued with Black ReVax, sealed with Sheer Vax.


Her top is Licorice (black) with Black Revax as a sealer.


Here is one full look at the before and after of what Shabby Paints can do for any piece of furniture! If you love it please make sure to take a second to comment below or Pin it to your favorite furniture board on Pinterest.


This beauty was sold in 4.5 hrs after I walked out of the store I set her up in. She is a stunning piece and I am sure going to be well admired once again. 


Want to know where to get Shabby Paints? I am happy to let you know I am now a Shabby Paint's Stylist. Currently I am taking pre-orders as I await my first shipment of inventory to arrive. You can message me and flip through the colors I will have in stock on my Facebook Page: Uniquely Grace.


These items will arrive by and be ready to ship to all you fantastic people June 1st-15th! These colors are on their way so pre-orders are being accepted!We can ship APO!!!
Posted by Uniquely Grace on Wednesday, May 13, 2015

I soon will have an online store where you will be able to shop and order off of FB. If you have any questions on how much to order or how to complete a project I am always here to help. Message me at Uniquely Grace on FB and I will be happy to walk you though it.

Hop you have a fantastic Memorial Day weekend!

Photobucket

Shabby Paints Stylist (contact me if you would like to order paints and sealers.)

Find me on...
Facebook: Uniquely Grace
Twitter: Grace Lauer Artist @gracelauer
Instagram: @gracelauer_henna_artist
Pinterest: L. Grace Lauer

Tuesday, May 19, 2015

Jasper Cabinets Secretary Desk Furniture Flip with Chalk Paint and Shimmer

Hello my wonderful readers! I am very excited to show you my new pride and joy. I don't know if I can part with her but I also don't think the hubby will let me keep her. LOL! She is an entry to the "The Furniture Flippin' Contest"! So leave me some love in the comments below so the judges can tell you like her as much as I do!

Meet Anastasia


The theme for this contest is "Inspired by Mom". Though the name of this piece was totally inspired by a comment my hubby made one day while I was painting. This piece was truly planned out to reflect who my mother is to me.  She is quiet and reserved but once you get to know her she really "opens up". She was created with Shabby Paints Cali Taupe & Licorice Chalk Acrylic Paints with a couple of layers of Old Gold Shimmer. Sealed with a mix of 50/50 Hazelnut ReVax/Sheer Vax. It all is distressed and is more beautiful with age... just like my mom!


My mother is my rock, hence the shades of grey (yes I know... that too was the comment my hubby made... "Is that your 15 shades of grey cabinet?"). But really it was to represent the colors of greys in most stones.


This is a Jasper Cabinet secretary desk. What is my mother's profession? You guessed it... she was a secretary/receptionist most of her life. She was always so good at keeping the office in order and dealing with customers.


The damask stencil was chosen as a representation of her style... she always tried her best to find nice things for us but she, a single mother of one, always had a hard time affording them. She was a great teacher of all things frugal. She also inspired me to be an artist as a young child. I can remember seeing her work in arts and crafts and thinking "I wish I could be as good as her someday".


Now today I can honor her with this piece and how this furniture flip. Mom... look how far everything you taught me has come. I love you, thank you for all you have done for me and one day I can fully repay you a thousand times over. You deserve every last once of love and kindness.

I just love the piece! Anastasia has been entered in "The Fab Furniture Flippin Contest" with the theme of "Inspired by...
Posted by Uniquely Grace on Thursday, May 21, 2015

More information about the "The Furniture Flippin' Contest":

  • If your interested in participating: Bloggers can contact Stacy Info@anastasiavintage.com or Evey info@eveyscreations.com


  • Two of our Hosts this month are Evey and Stacy. (Click on their names for their featured contest posts.)


Thank you all once again! Please take a moment to leave a comment blow. Also check me out on social media also... many ways to keep up to date on this artsy gal. Thank you for your support.

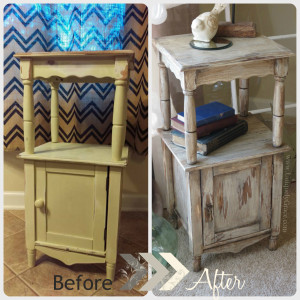
Here is a quick Before & After image. Hope you enjoy this thread.


UPDATE: I am so excited to share with you all that I received a Judges Pick award for this piece in the May, Fab Furniture Flippin' Contest!


Thank you to these Judges for putting my piece in your top three!

Evey from Sweet Songbird
Carrie from Thirty Eighth St.
Lynn from Fern Avenue
Photobucket

Find me on...
Facebook: Uniquely Grace
Twitter: Grace Lauer Artist @gracelauer
Instagram: @gracelauer_henna_artist
Pinterest: L. Grace Lauer

Wednesday, May 6, 2015

ATen-Hut! Dresser Makeover brings sitting room to attention!


This was a fantastic makeover to really pull the space together. Using Shabby Paints products made it ever so easy! Now it has an almost military look about it. Which is fitting since our sitting room is decorated with military items and things from our travels.


The only thing wrong with this dresser in the before state was the finish on the top. The drawers work like a hot knife going through butter and the pulls are all there and in good condition. But it's presence in the room was just "there".


A quick hand sanding to get off all the peeling finish on the top and a good cleaning was all I needed to do for prepwork. Here is the original finish (the base before being painted black) with the new Hazelnut ReVax top finish. This was a color recipe of (1 part = 1 teaspoon): 
  • 3 parts Hazelnut re-vax
  • 1 part old gold shimmer/water (50/50)
  • 1/8 part Licorice


I think it is stunning and it went right over the top of all that golden yellow finish! So easy!


Next I painted the drawer fronts the same way and finished the base frame with Licorice (black) chalk paint and sealed it with the Sheer Vax by Shabby Paints. The pulls are old vintage 60's cabinet handles from ebay... but I loved the details and brass addition to the piece. I used the old holes for the pulls on the outside and drilled new holes just inside those to attach these handles.

Please let me know what you think of this piece. I am happy to answer any questions if you want to leave them in the comments or contact me on social media listed below. Thanks for reading! 


Photobucket

Find me on...
Facebook: Uniquely Grace
Twitter: Grace Lauer Artist @gracelauer
Instagram: @gracelauer_henna_artist
Pinterest: L. Grace Lauer

Wednesday, April 22, 2015

Happy Earth Day! - Oak Table Flip to World Map Statement Piece

Hello World of readers! Happy Earth Day to you!

Well this one took a while but well worth it. He is done... meet Magellan! Painted by hand with my favorite paints on the market! These make refinishing so easy to do!

Shabby Paints Brand paints used were: Cali Taupe, Old Gold Shimmer, Hazelnut ReVax, Sheer Vax and a custom Mixed color...

Vintage Sue Blue -
 
  • 3 parts marine blue
  • 2 part licorice
  • 1/2 part so serene
  • 1/2 part oh so shabby

This blue was hand mixed by myself to achieve a color from my childhood. Our living room was this color for many, many years. In honor of my mother and her "vintage" love for this blue... It is now my first custom color I will be offering and it is called "Vintage Sue Blue". Love you Mom!

The entire piece has been hand painted and the land masses were drawn and painted freehand.


Here is an insight to the creative processes. I really wanted to label the land masses and larger bodies of water. So I took some transparencies and cut them into pieces and wrote on them while they were laying on top of the map design... testing to see how it would look.


I asked around and in the end I decided not to add the words. The top was then distressed and dry brushed with Hazelnut ReVax.  


The bottom legs have a gold dip dyed look to them with old gold shimmer dry brushed onto the Vintage Sue Blue base. I began this step by painting Cali Taupe under all the old gold shimmer edging.


Once the old gold was painted on I painted the legs with the Vintage Sue Blue recipe listed above. I painted it down over the tops of the Cali Taupe/Old Gold to a measured height and created the line you see here.


Once the blue was cured over night I dry brushed the Old gold on the underside of the table with a chip brush. Don't you just love the depth it adds to the legs?


The entire piece was sealed with two coats of Sheer Vax. I love the Vax product by +Shabby Paints, it is so easy to use, non toxic, VOC free and MADE IN THE USA!


Hope you like this project. Please help support me by sharing, pinning or commenting below with your thoughts about this piece. Thank you!

EDIT/UPDATE: This project won a prize from Shabby Paints as a monthly favorite project. Thank you Shabby Paints!!!! I could not have created this without you!


Photobucket

Sunday, April 19, 2015

A worn down Pier One End Table gets refinished with chalk paint

Hello everyone!

THIS ITEM IS FOR SALE AT: 
Déjà Vu Thrift Boutique (Elgin, SC)

Today I am sharing with you this fantastic lil' end table that went from drab to fab! This worn down beauty had see better days for sure.

Pin it! If you like it!
Look at all that water damage on the legs!!!


But with some attention, love and the right kind of paints it is now a lovely piece suitable for any home.

Pin it! If you like it!

The top is done in Shabby Paint's Hazelnut Re-Vax on Raw wood. Giving it a beautiful color and a seal too.

Share it if you care for it!

The base and legs are done in Shabby Paint's Alamo White with Hazelnut Re-Vax and Sheer Vax as a sealer and to add a beautiful tint of color and

Love it then support it!
Pin it! If you like it!


Isn't this a striking combination? Simple, rustic and elegant at the same time!


Share it if you care for it!

Now that is "ALL GUSSIED UP"!

How do you care for a piece of furniture like this? Check out the Shabby Paints chalk paint manufacture page.
Photobucket

Find me on...
Facebook: Uniquely Grace
Twitter: Grace Lauer Artist @gracelauer
Instagram: @gracelauer_henna_artist
Pinterest: L. Grace Lauer

Saturday, April 18, 2015

Wooden Crow Gets a Chalk Paint Makeover - Henna Style

This Crow was found at a second hand store. Sweet and simple in his black slightly distressed paint he attracted my eye. No tag, no name, no home. Until now!


After his makeover I gave him the name Wolfrum. Don't you just adore him? He was painted with Alamo White, Shabby Paint's and sealed with Hazelnut Re-Vax. The designs are Henna patterns as I am a henna artist too.


His details cover him from tail feather to beak tip. Let me know what you think about this makeover of Wolfrum the Crow... leave a comment below!


Now that is "ALL GUSSIED UP"!

How do you care for a piece of furniture like this? Check out the Shabby Paints chalk paint manufacture page.

Photobucket

Find me on...
Facebook: Uniquely Grace
Twitter: Grace Lauer Artist @gracelauer
Instagram: @gracelauer_henna_artist
Pinterest: L. Grace Lauer