Showing posts with label boarder punch. Show all posts

Wednesday, May 6, 2009

Enjoy the Little things - Mother's Day Gift

Happy Hump Day Everyone! I have an exciting project to share with you all today. I have been working on this all week. I hope you enjoy the little things with in this mini album. I created this for my Mother for Mother's Day ... good thing she never reads this blog... lol. It pays sometimes to have a mother who hates technology. I can only get her to learn one new thing online every few months or so. Anyhow, this was the perfect project for her. I just love how it turned out.
I created this mostly out of one of the beautiful April kits from Coordinates Collections. This is the Petals kit for April and OH ME OH MY I loved every inch of this paper and the embellishments in the kit were so fun and adorable. I don't have time to go into all the details of an entire album but if you see something and want to know how it was done please feel free to post a comment an ask. I am happy to answer.


Tuesday, March 31, 2009

Family Portrait

What a Terrific Tuesday! I have a some fun and wonderful news... Several things actually!

First off I am going to be a stinker and share with you all my new layout first... hehe. This is one I did this weekend over at Coordinates Collections March Madness Cyber Crop (MMCC). Which brings me to my first set of good news... I know I cant keep quiet... I said I would share later but this is exciting for me too. I won the grand prize for the crop and get two free kits from them!!! Got to love that. They are really a great bunch of ladies over there and if you have not checked their message boards yet, and want a relaxing and fun place to hang out and get inspired, you need to head on over. Background:
All these papers are from the Memory Stor. I love this bulk pack I got at COSTCO!!! Yes it is thick double sided cardstock and came in a great accordion file case. LOVE IT!
The main 12 x 12 is actually the blue denim style textured paper. I then layered the brown texture over that as a frame. I simply cut a 6 x 6 hole out of the center of the brown. Before adhering it to the blue I stitched around the edge in three colors and inked the edges with a brown ink. The only other layer of patterned paper is the stripe boarder. I created this with a boarder punch and four 1 1/4 " pieces of paper. I also trimmed these down to 11" long. I lined them up and mitered the corners. Inked the edges with the brown ink I used already and glued them together to create the frame. Before adhering it to the brown paper I laced the ribbon. Tied the ribbon in two corners. Then tacked it down to the background papers.
Embellishments:
These are simply leaves and flowers cut on coordinating cardstock with the cricut. I added a few sheer prima flowers behind the navy cardstock flowers. I took my gold marker and went to town doodling.
Title:
The word family was cut out of navy cardstock and traced with the gold Zig painty marker I love so much. The "portrait" was created with some stamps and coordinating patterned paper that was used to finish the grunge board plate.
Journaling:
I had wrote about the day and MeMaw taking the pics along the small brown strip ... it is in tone on tone ink pen so hard to see in this pic. But that is how I like my journaling... quietly there.

I have more from the crop I will add as the week goes on. Thanks to Coordinates Collections for such a fun weekend. I got my mom in CO to attend and we cyber cropped together over the internet and phone... hehe.

DRUM ROLL PLEASE!!!!!!!!!!

Here is the announcement of the day!!! You might have noticed a new little logo in the upper right hand corner of my blog. Last week I was approached by Marisol Jiminez from Scrapbook News and Review. She offered me a staff position on their wonderful online magazine. I needed to chat over the decision with my hubby who was out of town at the time. She let me see how well they work under the pressure of a deadline this weekend and I must say I was really impressed. Lots of long hard tireless hours put into every issue and yet they still remain pleasant and respectful to each other. As of yesterday when all of the dust had settled from the March Issue debut, I emailed her to let her know I was ready to accept the staff position.

There it is folks... I am officially a...

Staff Member for Scrapbook News and Review!!!

You can find me on the Message Boards!!!

You can be published too... check out what projects and layouts we are looking for in our April Issue!!!

Wednesday, March 25, 2009

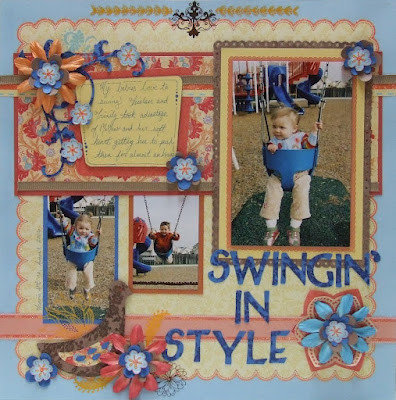
Swingin' In Style

Good Morning... or evening or what ever it is to you at this awful time of the day. I have been up all night ... by accident... scrapping and lost track of time. HEHE I do that way to much.

Here is my newest one of the kiddos. I have to admit though I am so far behind in my scrapping that this one is from 2006. These are some my mother took of the kids. *wave* hi MOM! She is a wonderful photographer for family shots though this day was just some candid at the park. I had to run to someones house for a bit and she snuck out her camera and went to town. I love these pics. My kids are swing freaks. No matter what they must hop on the swing if there is one in sight.

This LO was based on the Single page sketch contest over at Coordinate Collections. I cant wait till next weekend. They are hosting a cyper crop and it is my first one I want to attend. Not quite sure what to expect accept to get some layouts done... hehe. The theme is March Magic... so I need to go searching for some pics.

Journaling says:
"My babies love to swing! Tristan and Trinity took advantage of MeMaw and her soft heart getting her to push them for almost an hour."

Swingin' In Style Details:
Background: This is a DCWV paper from their spring stack it has the blue boarder and the yellow scalloped print all in one sheet. I took my orange iridescent glitter glue and went along the scalloped edge to give it some sparkle.

Top Left:
This is a wonderful cluster I just love the complimentary colors of the blue and orange. I have taken a coordinating floral paper and cut it to anchor the pictures from above. As if they were swinging from it. I put iridescent white glitter glue on the blue flowers in this pattern. I love making the cheaper paper look rich by adding glitter or chalk to it. This was backed with a off red/coral color cardstock.
The ribbon is the grosgrain and the orange glitter is a strip of paper from the coordinating boarder paper. Love that! I just added the orange glitter glue to that orange strip.
The journal box is a shape from the cricut. I just cut it out one size smaller for the yellow cardstock then for the coral patterned paper. I edged, doodled and wrote on the yellow cardstock with a light blue marker.
The flourishes are from the cricut also cut out of blue cardstock. I stamped them with versa mark and heat embossed them with a clear powder. I added a blue floral rub on and the little blue flowers I cut out of a boarder that was on the coordinating boarder paper.
The large flowers are prima and the brown and blue are cut with the cricut and each petal rolled around an ink pen.

Bottom Left:
The ribbon type coral color paper was cut from a coordinating paper and then I added glitter glue to the dark coral stripe along the top and bottom. I added some rub-ons to this cluster and the bird is from the cricut. I cut it and the wing out of brown cardstock, the floral paper from above and the blue cardstock used in the flourishes listed above. Then I took and layered the different elements of the bird together. I added rub-ons and the flowers are the same as above also. I have the location and the date journaled up the left of the pic of my daughter.

Bottom Right:
The matting of the large pic is brown cardstock stamped with versa mark ink and then punched with a scalloped heart boarder punch. I layered a yellow cardstock in there and topped it off with the coral scalloped strip I cut out from the coordinating boarder paper. I raised the photo with foam squares.
The title was from the cricut and was heat embossed just like the flourishes in the Top Left closeup. The Flower cluster here is a little different the bottom layers were part of the patterned paper I took the coral ribbon from. I added a bottom layer flower of a dark coral from that same sheet and cut the yellow petals out along the inside coral layer so I could raise and roll them up. The inside coral layer I glitter glued with the orange iridescent glue. Then it is topped off with a similar flower cluster as the others.

Thank you so much for viewing. Please leave me a message so I now if this is helpful or how you liked it. May your Wednesday be full of wonders.

Tuesday, March 24, 2009

ALS Graduation

The Scrappiest did it again. Liz always has a way to challenge my creativity. As soon as I saw this wonderful sketch I knew I had just the pics for it... funny thing is I always have a hard time scrapping my Hubby's military moments. Maybe it is the importance of the event or the protocol of the military that keeps me from wanting to scrap these career milestones. These three have been in my "In Progress" file for almost a month now and every time I took them out I just could not do it.
I remember this night vividly. This was my first ever major military event and the beauty of the traditions were just amazing. The ceremony began with the presentation of the colors. The color guard airmen entered from the back of the room. You could hear a pin drop it was so quiet. The intensity of emotion in the room became overwhelming as everyone in attendance filled with pride for our country. The color guard presented the colors at the front of the room and the National Anthem was played. Fallowed by a moment of silence for the fallen heroes. Which they had a table set off to the side in the front of the room reserved for the memory of those who have given their life from every branch of the military. I am getting choked up right now just going through this memory.
We went to the graduation and had no idea he would have been acknowledged for any special award. As they began they did the graduation ceremony.They did the awards next and my hubby received the Distinguished Graduate award for scoring in the top 10% of his class of over 150 students. I was extremely proud. I was the happiest wife in the room. They finished up the awards with three specialty awards given and decided on by their instructors and nominated by their piers. He was only one of two graduates to receive multiple awards. You should have seen me ... beaming ear to ear... I was now the proudest wife on Travis Air Force Base at that moment.

Journaling:
I was able to convince my Hubby to write this journaling. I typed it up and love that he had input on this layout. I typed it up and played with the lettering of the title on Microsoft word. Printed it out and colored it in with coordinating markers.

Details:
Background:
This is a fairly simple LO for me. I started with a chocolate brown cardstock and added some chocolate brown in to it just to create a soft tone on tone texture. I added the stripe rectangle with lighter tones then the rest of the page. The was to create some contrast with out adding to much to the layout. I edged it in my Zig gold ink pen. I hand drew the bracket shape with a few measurements on the back of the navy and star paper. Once this was cut I used it as a template to create the same curves on the red and the white papers. I edged each layer with the gold Zig pen.
Top Left: The detail here is simply the finish on the grungeboard by Tim Holtz. I just took my thyme green colored ink pad and pressed the grungeboard lightly on top of it with no rubbing, just blotting. Then instead of putting brads inside these pre-punched holes I took my large gold paint marker and colored the inside edges of each hole. This created a nice rivet/eyelet look.

Top Right: The detail here is just the printed title and how I colored it in with all the coordinating markers for this layout. Notice the flag though. It is a laser cut die cut and I chalked the white and red pieces to soften them to a more muted color for this page. I have had that for years and never used it...hehe. It is a stash piece.

Bottom Right: This flourish is also a piece of the grungeboard set by Tim Holtz. I did the same finish with the thyme colored ink yet I only doodled the gold dots on it. I added the USA letters in the antique brass and I love the simplicity of it all.

Thanks for viewing this layout and I want to thank everyone who is reading this if you are a military family member, an active duty member or retired... Thank you for serving I am proud to stand next to you as a military spouse and be a part of the entire military family. Salute!