This is the day we sort out our colors! Any color altering items or ink.

Lets discuss and figure out what we are going to do with these items.
*** Pens - Storing Scrapbook Pens, pencils and Markers (quoted from scrapbook.lifetips .com)
"One of the most important things to remember when storing pens and markers is to store them horizontally so that the ink flows evenly. Most people may be inclined to buy containers that stand vertically, but storing them this way will make all the ink flow to one end. If the ink is at one end of the pen or marker they may not last as long or work as well. Storage drawers will allow the markers and pens to be stored horizontally. You can leave your markers in their original box and store them in a desk drawer or plastic organizer drawer.
Another suggestion is to buy a marker storage case that holds pens and markers; these cases are portable and make it easy to keep all of your coloring and writing utensils in the same place for quick access."
Once you have decided where to store them you will need to TEST every pen quickly to make sure they still work. Trash the ones that don't! Make a list in your binder of ones that need to be replaced.
Sort pens by: Color or color families
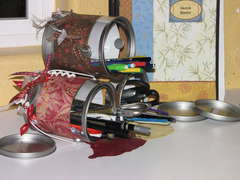
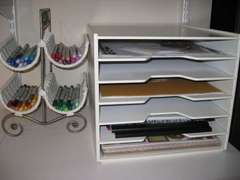
Storage Solutions: Organized within a drawer, wine bottle holder, Altered Cylinder containers form the kitchen.
PVC PIPES
Pails on the side of your table
Plastic 1$ pen boxes: Scraproom By LeaLa
Acrylic cups
Colored Pencil Storage and Swatch File
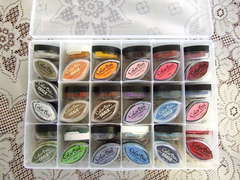
*** Ink pads and refills - (quoted from Scrapjazz)
"Ink pads are best stored flat. Each pad is filled with liquid ink, and this ink can travel throughout the pad over time if not stored properly. For example, if you stored your ink pads vertically, over time the ink would drop to the bottom edge of the pad, and you would no longer be able to get a fully-inked image when you tried to use the full surface of your ink pad. For this same reason, it is highly recommended that you store your ink pads upside down (unless you have Stampin' Up they already are designed to do this). This will keep the ink flow at the surface of the pad, rather than allowing the ink to seep down to the bottom. This is especially important for dye-based ink pads, as this ink is thinner than some other inks and will migrate through the pad at a faster rate. Ink pads containing thicker inks, such as pigment ink, can be stored face up."
How to sort your in pads? - By color, manufacture, ink type or size
Storage solutions:
Wooden Cassette holder
Custom built holder, store bought rotating caddies, or simply stack on a shelf (make several smaller stacks. This will make it easier to access without towers of inks toppling down when you need the bottom color.)
Ink pads can be cumbersome at your workstation. Most people store them off to the side. Why not have a reference guide at your table so you know exactly what color you will need?
This is a MUST SEE IMAGE of a great Color Swatch for your Inks.
*** Mists - These can be stored or displayed nicely on a shelf. Putting them in a color order would make it appealing. If you have the mini misters you can store them on a counter top in the store bought holder or have your resident handy man drill some holes into a block of wood and don't forget to alter it to match your space decor.
Mini Mister holder
Shelf Unit
Drawer Storage - Though I love the organization of this option I don't like not seeing the colors of the mists. Maybe if you put a dot sticker (used for yard sale pricing, found at Walmart) You can spray it as a sample and stick it to the top of the lid.
*** Paints - Paints have no specific way to store them as long as they are not exposed to extreme temperatures hot or cold. Though I have found if you store them upside down you can make your experience working with them a bit less frustrating. One of the benefits is you can always see the colors through the bottom of the bottles. If the bottom is up then you can see at a glance what colors you have. When the bottle gets low just dab the bottom of the container with the paint and let dry. The other reason is that the paint will be near the top when you go to use the bottle so it can easily be removed quickly onto your paint pallet. If you do this just make sure the lids are on tight and know that with less air in and out of the bottle when in use the less they will dry out.
*** Other (?) - Did I miss anything? Please bring it to my attention.
REMEMBER: Always leave room for your stuff to grow!!! Especially you collectors!


No comments:
Post a Comment
Thank you so much for taking the time to let me know how you feel about this post. I hope you enjoyed your time here and will come back and view more. Don't forget to fallow my blog to keep updated with new projects and ideas.
~ Grace ~