Wednesday, February 3, 2010

Scraproom Clean up - Challenge # 1

Hello everyone - I thought I would post this info here. I am running a challenge to organize your scrap space on www.scrapbook.com and I thought I would share the challenges here. We discuss each topic and challenge there. But here is the basic challenges so you can participate and fallow along on your own if you wish. There will be 4 challenges a week focusing on different areas of the scrap rooms.

Week #1 THE DESK

Challenge #1 - Color Altering Items - Inks, pens, mists, powders, paints, embossing supplies and glitters

This is the day we sort out our colors! Any color altering items or ink.

Lets discuss and figure out what we are going to do with these items.

  • Pens - Storing Scrapbook Pens and Markers (quoted from scrapbook.lifetips .com)
"One of the most important things to remember when storing pens and markers is to store them horizontally so that the ink flows evenly. Most people may be inclined to buy containers that stand vertically, but storing them this way will make all the ink flow to one end. If the ink is at one end of the pen or marker they may not last as long or work as well. Storage drawers will allow the markers and pens to be stored horizontally. You can leave your markers in their original box and store them in a desk drawer or plastic organizer drawer.

Another suggestion is to buy a marker storage case that holds pens and markers; these cases are portable and make it easy to keep all of your coloring and writing utensils in the same place for quick access."

Once you have decided where to store them you will need to TEST every pen quickly to [u]make sure they still work[/u]. Trash the ones that don't! Make a list in your binder of ones that need to be replaced.

Sort pens by: Color or color families

Storage Solutions: Organized within a drawer, wine bottle holder, Altered Cylinder containers form the kitchen.

ZIG Pen Storage

PVC PIPES

Mason Jars


Plastic 1$ pen boxes

Acrylic cups


  • Ink pads and refills - (quoted from Scrapjazz)"Ink pads are best stored flat. Each pad is filled with liquid ink, and this ink can travel throughout the pad over time if not stored properly. For example, if you stored your ink pads vertically, over time the ink would drop to the bottom edge of the pad, and you would no longer be able to get a fully-inked image when you tried to use the full surface of your ink pad. For this same reason, it is highly recommended that you store your ink pads upside down (unless you have Stampin' Up they already are designed to do this). This will keep the ink flow at the surface of the pad, rather than allowing the ink to seep down to the bottom. This is especially important for dye-based ink pads, as this ink is thinner than some other inks and will migrate through the pad at a faster rate. Ink pads containing thicker inks, such as pigment ink, can be stored face up."

How to sort your in pads? - By color, manufacture, ink type or size

Storage solutions:

Wooden Cassette holder

Cat Eye Storage

custom built holder, store bought rotating caddies, or simply stack on a shelf (make several smaller stacks. This will make it easier to access without towers of inks toppling down when you need the bottom color.)

  • Mists - These can be stored or displayed nicely on a shelf. Putting them in a color order would make it appealing. If you have the mini misters you can store them on a counter top in the store bought holder or have your resident handy man drill some holes into a block of wood and don't forget to alter it to match your space decor.

Mini Mister holder


  • Powders - No special way you need to store these but they do look pretty and can be stored nicely. Try finding an old, small metal cookie sheet at the local thrift store. Paint or alter it a bit and put thin magnets on the bottom of the powder containers. Hang it on the wall up above the work space. Or Stack them and store them on a shelf. Maybe even store them in a nice basket that you can keep handy.

Note: if storing in a box, basket or drawer... turn them upside down. Not for he reasons you do inks but so you can see the colors inside the jars, instead of the white/black lids.


  • Glitters and Glitter Glues - I LOVE glitter... there are so many options for storing regular glitter many have been mentioned above in other items. The glitter glue however works best, with the least amount of bubble explosions on your page, if you store them upside down.

Storage Options:

Tool rack, Velcro them to a clear flier display protector

Hanging under a shelf: here is what I did last year for my storage solution.
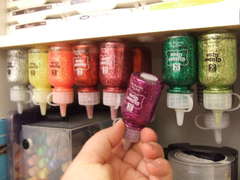


  • Embossing supplies - Now normally the embossing tool would be placed in with the tool category but if you want to create a mini embossing center and organize it in with your embossing supplies then I would suggest you do what works for you. I created a drawer for all my supplies and organized it all within that drawer. A Basket would work well or if you want a counter top embossing center we can discuss better ways to display these items.

Storage Solutions:
Decorative Box

  • Chalks - Most of these come in good storage containers. You just need to find a drawer or a shelf to display them on.

Other (?) - Did I miss anything? Please bring it to my attention.


REMEMBER: Always leave room for your stuff to grow!!! Especially you collectors!

Thursday, January 28, 2010

The Scrappiest Design Team Anouncement

Well I have to admit I am very excited to be returning to scrapbooking with a bang by being selected to join this fabulous design team over at The Scrappiest Blog:

* Arlene Camacho

* Gail Knowles

* L. Grace Lauer <---- (that's me... hehe)

* Kim Tupponce

* Kylie Symons

* Laurel Seabrook

* Pearl Liu

* Susan Bourgeois

* Lisa Hidy

Thank you Liz for allowing me to return after my hiatus this past fall. I am happy to be back and thrilled to be working with such talented ladies.

Friday, January 22, 2010

The Angelina Ballerina Ballet Birthday for my Beautiful 5 year old

Welcome all you Angelina Ballerina Fans!


 Last weekend my daughter had her fifth birthday party. I cant believe my Baby Girl is five now. My outlook has to change about her because as my Aunt informed me, "Five is a big girl! Not a baby. Melanie (my cousin) has a baby. She wears diapers." So I may have to give up the title for "Baby" Girl... my Aunt does have a point... hehe. Anyways. The party was a blast and Trinity loved every minute of it. The cake I made for her as Angelina Ballerina. This was her theme she wanted as she is extremely into all things ballet at the moment.

The next photo here is of me and her and thanks to Miley Cirus' line of clothes at walmart I was able to create a Ballet Grand Dame. I know that seems crazy but the low waisted tutu attached to a tank top with a pair of black leggings underneath was just what I needed to go under this gray top I had. I thought the girls a little ballet dance to a rhyme and we made dancing ribbons as a craft.

This other photo is Trinity being stubborn with her toes where my DH and her were posing he was trying to get her to point her toes and be as graceful as a ballerina... NA she was in a playful mood and would not comply. He is the one that took the pic at the top of this post and did a great job helping me with the party and all the set up.

These are the tutus I made for all the girls... seven of them to be exact. I was able to create these with a no sew pattern and embellish them with some ribbons.


This is a picture of the Angelina Ballerina New Ballet Party Class. They had a wonderful time and it truly was a memorable event. Don't they look great! The life size Angelina Ballerina was made by me and the hubby.

I hope you all enjoyed these. I had a blast making the tutus and the dancing ribbons... but that cake. That was HARD... LOL. Glad you took the time to peek into the craziness that is my mind when it comes to my kid's parties. What can I say. It is the memories that last a lifetime that drives me to be like this.

Check my post with our 3D Tutu Angelina Ballerina Birthday Invitations. They were so much fun to make and I just love how well they turned out.

Monday, January 18, 2010

Scraproom/area Makeover Challenge Invitation

I wanted to invite you all to join me and other scrapers while we brainstorm organizational, decorative and inspiring solutions to our scraproom woes. I will be posting my projects, my struggles and my solutions as I go though setting up my new scraproom at the new house but if you want to participate with the conversation and the other girl's ideas and their solutions then you will need to go to the link and sign up.

Just a quick FYI I am hosting this years Scraproom/area makeover challenge at this forum on Scrapbook.com. Please feel free to invite others to do this too and I hope to chat with you there.

Here are the rules...

"Hello everyone!

My name is Grace and I am inspired by an old scraproom challenge I participated in last year (the 28 day challenge) to organize, decorate and clean up those scrap areas. It seems there is no such challenge this year and I would like to step up and take the lead since I have a new home and my first scrap room not corner or closet to decorate and to set up.

We will begin Feb. 1st 2010 it will end when you have a more beautiful and functional space. It is just for fun and to make scrapping easier.

Who would like to join me in this project? The lvl of commitment depends on how much scrap stuff you have. Here is what I will put forth to help you along the way.

1) One weekly organizational project
2) One weekly creative project (mostly decor or alteration and others)
3) Two or Three Mini Weekday Challenges
4) Fun and inspiration with everything from room colors and decor to organization and storage options ON A BUDGET!!!
5) Encouragement to finally get things organized to make it easier to scrap!

To sign up you will need to do/answer the fallowing:

1) Name/user name
2) Type of scraping area (closet, corner, room etc.)
3) Your biggest problem area that is hard to keep organized
4) The link to your new album to keep your pics in (create a new album in your gallery to upload all of the before and after pics, ingenious ideas and problem area pics)

So come and join me in cleaning up our areas and making the scraproom a place that will inspire creativity and allow us to crop till we drop."

Here are my pictures from last years before and after...
AFTER

BEFORE

Saturday, January 16, 2010

Our little "Home of the Buffaloes"


Nebraska fans beware... no entry allowed! This room is a room solely for the University of Colorado Buffaloes fan.

Fight CU down the field
CU must win
Fight, Fight for victory
CU knows no defeat
We'll roll up a mighty score
Never give in
Shoulder to Shoulder
We will Fight, Fight
Fight, Fight, Fight


In our new home my Hubby wanted to have a room all to himself and so we decided he could get an office/man cave. These are the final pictures of my paint job for him.

Over the last few years I have been collecting bits and pieces of CU history and we have them all saved to put up in a room like this. Now that it is complete, we will be unpacking these boxes and decorating away!!! He loves the new look for his room. There are still a few surprises up my sleeves. I have more in store for him but those ideas will remain a secret until they are ready to be relieved. Until then Check out these pics and let me know what you think. (By the way... the next room for me to work on is my scraproom!!!! I can't wait!!!)

Have a blessed day!!!

Photobucket
