Monday, May 18, 2009

Four Year Old Princess

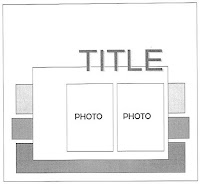
Happy Monday Everyone! I am so excited to show this layout to you. Like all of the layout I show you on Mondays this was inspired by a sketch from Liz over at The Scrappiest Blog. This weeks sketch was so much fun to create from. Though as I have said before I usually am not inspired by geometric shapes. I found this block style paper and got completely inspired. I was influenced by challenge from an online cyber crop over at Scrapparie.com. This challenge was to make your own patterned paper.
This is a photo of my sweet daughter licking the bottom of her candle from her birthday cake. Though the lighting in this photo is a bit off I love the photo itself. My daughter has been asking me to make her a pink page so I decided to do it monochromatic style with some influence from an Scrapbook News and Review publication call for May.

Journaling: (done in a pink Stampin' Up! marker)

Trinity is four years old. You call everything and everyone "Poppy" and you always have a "NooN" idea. You love to dance to Hawaiian music and practice rhythmic gymnastics. When in trouble you always give big hugs and kisses to get out of it. You are very expressive and have an explosive personality. You love to sing your own little made up songs. You zoom everywhere, my little social butterfly.

Ok so lets get rock'n on this description... it is going to be a long one!

Background: I started off with a white piece of 11 1/2" x 11 1/2" cardstock. Now I know it might be hard to believe but I did not have a light piece of pink patterned paper for this. So I created one. I know I said this was a monochromatic pink layout but ... hang in there here is what I did to create a pink bubble texture on this white cardstock. Note: Protect your counter and table by placing down a craft sheet or a protective table cloth.

1. I took a medium sized flat kitchen container about 9"x 7" and about 2" deep.
2. I added one cup of warm water
3. I added 1/2 a cup of liquid dish soap.

Yes yes I know ... you are thinking I am crazy on this one... stick with me here. I got this idea from a Crop Suey video. So you now have a dish with water so soapy you can wash dishes for a week. I then added several drops of red food dye.

4. Gently mix this in together.
5. I took a straw and blew into the water throughout the dish till they are about to over flow.

This created massive amounts of bubbles. Word of caution. Please ware eye protection...the bubbles pop and can get in your eyes. Once you have an almost overflowing dish of bubbles...

6. Take a paper towel and wipe it over the bubbles without touching the water at the bottom of the dish. This is to test the color of your water.
7. Let it dry. It will not take long and this will show you the true color of the water. Do not pop the bubbles on the paper towel either. Let them sit and pop on their own.
8. Add more color if you need too. Or water to lighten it. If you need to do this step test it again.

Once satisfied with the color then you will want to repeat steps 5 and 6 over and over (with the cardstock not the paper towel) till the paper is covered with the bubble texture. Try to add another color if you want to. Play around with this I loved it. I felt like my Mother was about to scold me not to blow bubbles in my soda, like when I was a kid. I even let my children play with this when I was done.

Taking a dark pink polka dot paper from Cosmo Cricket's Girl Friday line. I cut it into 4 - 1 1/2 " strips and punched one of the long sides with a Martha Stewart scalloped edge punch. I then adhered them to the back of my white bubble splattered cardstock. Making my finished edge 12" x 12". This also left me over 1/2 a sheet of the polka dot paper to use else where on the layout.

The next three layers were two DCWV (Die Cuts With a View) papers and one more of the bubble sheet. The back square layer (a medium pink) was cut at 9 1/2". The bubble square was cut at 9" both were then punched with a Martha Stewart edge punch. The block print patterned paper was cut at 7 3/4" and then gently inked with a pink. Center each layer on top of the other an place it off center and closer to the bottom of the large bubble background.

The Photo: This was printed as a 5"x7" and I cut it down to be a 5" square. I backed it with a square of the dark pink polka dot paper. Here is a tip. Knowing I wanted a punched edge only on one side I cut the height of the paper first. I had a piece 5 1/2" high by 12". I punched one of the 5 1/2" sides with my edge punch I used around the background paper. Then I measured and cut it square so I was left with a 5 1/2" square with one side punched. I did it this way because the edge punches cut off about 1/4" - 3/8". Punching first let me cut the width of this piece exactly the way I wanted it.

I embellished this photo with some glitter rub-ons on the corner. For one reason. My wonderful daughter had already stained her shirt and you could see it... so a rub on here and a rub on there. Tada! no more stain.

Embellishments: I used some glitter and bling pink flowers to be the main embellishment focus. I backed them with excess papers and cut them out. Then I also used a couple of Prima flowers to do back them also. I added some Prima bling and a some glitter rub-ons. As I was layering them up in the corner I decided to save a few of the small glitter flowers and one of the large ones to embellish the title.

The Title: The "FouR" was created with Colorbok chipboard covered with DCWV paper. I then glitter glued the different shades of pink in the patterned paper with pink and iridescent glitter glues by Studio G. I sanded the edges and colored it with a pink Stampin' Up! marker.
I stamped the "Year Old" in black on the excess bubble paper and colored it in with a Stampin' Up! marker and added iridescent glitter glue. I popped these up with pop dots.
I added the rub-ons thorough out the page and doodled on the flowers with my black fine point marker to tie in the black in the rub-ons and title a bit better.

I am all about making my own stuff I love how unique it makes my pages... either when I am making paper or creating my own embellishments.

Well thanks for hanging in there with me... phew! That was a long one. I hope you have the time to play with this extremely fun bubble technique! Let me know how it turns out!

I would love to know, in the spirit of creating my patterned paper it made me wonder if any of you have you ever created your own and if so how?

Saturday, May 16, 2009

Happily Ever After

Happy Saturday Everyone. Today I have been pretty busy. I am working on scrapbooking all weekend for a cyber crop with Scrapperie.com. I am loving the challenges. This one was for a tag team relay game for scrap lifting and oh my the fastest layout I have ever done!!! It took me less then an hour and a half! I would give you more details on this but I just wanted to share with you where I have been and a glimpse of what I have done this weekend. The crop does not end till Monday night so I will be pretty busy till then.
Oh on a side note I did get to run to Costco for food today... came home and decided to empty and clean my refrigerator... I hate doing that. However I feel I got something major accomplished other then scrapping ...lol. Have a great weekend!
I would love to know what your plans were this weekend. What did you do? Did you have fun? Who did you do it with? Love to hear from you all!!!

Monday, May 11, 2009

not forgotten...

Good Monday everyone! I was just going to post this for you all to see. I have created another sketch for Liz over at The Scrappiest Blog. This was our 12th sketch so far. 

I can not believe that we have been doing this for almost three months! This weeks sketch was pretty simple and I love that about her sketches. It leave room for creative interpretation. You should all go check out the wonderful layouts created by her design team. I love to see how we all came up with such different layouts. 


My layout is about remembering those soldiers who are POWs and MIAs. This was a picture of the table most military events have set up in honor and remembrance of them. The journaling card reads:

"AS YOU ENTERED THE BANQUET HALL THIS EVENING, YOU MAY HAVE NOTICED A SMALL TABLE HERE, IN A PLACE OF HONOR, NEAR OUR HEAD TABLE. IT IS SET FOR ONE (OR FOUR). PLEASE LET ME EXPLAIN. THE MILITARY CASTE IS FILLED WITH SYMBOLISM. THIS TABLE IS OUR WAY OF SYMBOLIZING THE FACT THAT MEMBERS OF OUR PROFESSION OF ARMS ARE MISSING FROM OUR MIDST. THEY ARE COMMONLY CALLED POW/MIA. WE CALL THEM "BROTHERS." THEY ARE UNABLE TO BE WITH US THIS EVENING AND SO WE REMEMBER THEM BECAUSE OF THEIR INCARCERATION."

"THIS TABLE SET FOR ONE (OR FOUR) IS SMALL -- SYMBOLIZING THE FRAILTY OF ONE PRISONER ALONE AGAINST HIS OPPRESSORS."

"THE TABLECLOTH IS WHITE -- SYMBOLIZING THE PURITY OF THEIR INTENTIONS TO RESPOND TO THEIR COUNTRY'S CALL TO ARMS. REMEMBER."

"THE SINGLE YELLOW ROSE -- SYMBOLIZING REMEMBRANCE -- DISPLAYED IN A VASE, REMINDS US OF THE FAMILIES AND LOVED ONES OF OUR COMRADES-IN-ARMS WHO KEEP FAITH AWAITING HIS RETURN, LEST WE FORGET. REMEMBER."

"THE RED RIBBON TIED SO PROMINENTLY ON THE VASE IS REMINISCENT OF THE RED RIBBON WORN UPON THE LAPEL AND BREASTS OF THOUSANDS WHO BEAR WITNESS TO THEIR UNYIELDING DETERMINATION TO DEMAND PROPER ACCOUNTING OF OUR MISSING. REMEMBER."

"A SLICE OF LEMON IS ON THE BREAD PLATE TO REMIND US OF THEIR BITTER FATE. REMEMBER."

"THERE IS SALT UPON THE BREAD PLATE -- SYMBOLIC OF THE FAMILIES TEARS AS THEY WAIT. REMEMBER."

"THE GLASS IS INVERTED, THEY CANNOT TOAST WITH US THIS NIGHT. REMEMBER."

"THE CHAIR -- THE CHAIR IS EMPTY -- THEY ARE NOT HERE. REMEMBER."

"REMEMBER, ALL OF YOU WHO SERVED WITH THEM AND CALLED THEM COMRADES. WHO DEPENDED UPON THEIR MIGHT AND AID AND RELIED UPON THEM, FOR SURELY, THEY HAVE NOT FORSAKEN YOU. (Quietly) REMEMBER."


I also wanted to share with you the purse I created to put my Mother's Gift into for Mother's Day. I finished this on Sat and she loved every inch of the mini album. I hope you all had a good Mother's Day and a wonderful weekend.

Thanks for shearing with me my creative journey.

Wednesday, May 6, 2009

Enjoy the Little things - Mother's Day Gift

Happy Hump Day Everyone! I have an exciting project to share with you all today. I have been working on this all week. I hope you enjoy the little things with in this mini album. I created this for my Mother for Mother's Day ... good thing she never reads this blog... lol. It pays sometimes to have a mother who hates technology. I can only get her to learn one new thing online every few months or so. Anyhow, this was the perfect project for her. I just love how it turned out.
I created this mostly out of one of the beautiful April kits from Coordinates Collections. This is the Petals kit for April and OH ME OH MY I loved every inch of this paper and the embellishments in the kit were so fun and adorable. I don't have time to go into all the details of an entire album but if you see something and want to know how it was done please feel free to post a comment an ask. I am happy to answer.


Monday, May 4, 2009

In Loving Memory of Nita

Nita was my Hubby's Grandmother, grand indeed. She was loving, caring and selfless. She lived her life according to God's word and seemed to always know what to say and how to handle things. Every time I saw her she always had a beautiful smile and peaceful heart. I only had the pleasure of knowing her for about five years and I sadly did not have a lot of opportunities to spend with her. The time I did spend with her she always was a good example of how I would want to live my life. She will always be remembered for many things and will always live in the hearts of her family.
Nita passed away a couple of years ago this past March. Last Christmas I created this as a shadow box for my Mother-in-law. The picture is of Nita in front of her house holding my daughter Trinity when she was 5 months old. It is one of the most beautiful pictures I have of Nita and I love the reminder, within the content of this photo, that life goes on.
Though this was created in December of last year I have not blogged about it yet. It still is one of my favorite pages. It just recently was published in Scrapbook News and Review. This is the Layout that led to me becoming a staff member for that wonderful E-zine. Now for the Details... if I can remember them...lol.

Details:
Upper Left: I this shot you can see the many layers that I used to create this shadowbox. Every thing is pop dotted the piece is about 1" thick. The background is simply a sage tone on tone paper that I cut large 1" scallops around. I lightly distressed the edges with versa mark and chalk. Within each scallop I too and punched out of scraps little flowers and glued them down. The next layer is the light purple. On this layer I printed Nita's favorite Hymn. You can see this better in the over all pic.
The hardware I used in this layout is an antique brass. This door plate was filled with a cream cardstock with a stamped image that has been heat embossed with an antique gold embossing powder. This same technique is found in the hand drawn and cut flourishes you can see here and throughout this page. The fabric flowers are all prima and the paper ones were all hand made. I used a lot of pearls to accent this layout and the flower clusters are no acception for this. On top of the purple paper is the photo backed with a cream card sock slightly distressed. The photo has an overlay on it creating that scalloped edge around the photo. The buttons here are just glued on however I love details and every button on this page had gold thread laced though them to make them appear that they have been sewn on. The last thing in this upper left detail shot would be the woven ribbon that I have used. It is a simple cotton crocheted ribbon that has a brown grosgrain ribbon woven though it every couple of inches.
Bottom Left: There is not much new here accept that one of the flowers I used in this large flower stack is a distressed chipboard flower.
Bottom Right: Here is the title of the layout. I used these wonderful letters from Joann's in an antique brass. The letters are stuck on with tacky tape. All of this title is popped up about 1/2" from the backing. It is sported with several layers of card stock. The only new element here is the ear ring. This is a vintage clip on earring that I broke off the clip part. I love how this is a suspended element on this page. The ribbons are the same type that go up the left side of the layout, however they are not woven together.
Not shown in the detail pics: There is a circular elements. The lighter patterned paper has Nita's favorite scripture. The edges have been distressed on this piece and little flowers were added around the edge. The darker brown circle was cut with fiskars decorative scissors. Inked with a cream pigment ink and doodled on. Then pearls were added.

Thanks for taking the time to look through the details with me. I hope that you too can find ways to honor those in your life that mean the most to you. Treasure all the moments you have with each and every one of your loved ones and let them know how much you care. If the events of these past two years have thought me anything it is that we need to be careful of how we live our lives and how our lives touch others.
An Inspirational Poem
Live…laugh…and Love
By John McLeod

Live well dear friends
In all you do,
Tho' paths be old
Or paths be new,
But to yourself
Be ever true,

Live well!

Laugh often friends
Tho' passing years
Bring, sometimes, smiles
And, sometimes, tears,
For mirth forever
Warms and cheers

Laugh often!

Love much dear friends
For love will bring
The healing joy
And hope of Spring,
Where pain and fear may never dwell
Nor anguish touch….

And so Live well,
Laugh often too,
And more, dear friends,

Love much!