Thursday, November 6, 2014

Jack Skellington Handmade Costume - Nightmare Before Christmas Movie

Our Jack Skellington Halloween Costume was created for my son with a puppeteering design style. Jack's head is a bobble head adding life to his glare (see video), his neck is connected to a helmet so it turns left and right with my son's head. I hope you enjoy this post. We have so much fun making all our costumes DIY for Halloween.

Handmade Jack Skellington Costume 


Jack The Pumpkin King Costume Video 


Twas the Nightmare Before Christmas and all though the house, 
Bits and pieces of Jack laid all strewn about.


His clothing was sewn by a seamstress with care,
In hopes that children would soon be aware.


Jack Skellinton is alive and moving about,
Don't be afraid, don't scream, don't shout.

It's Tristan under there like a shadow he sneaks,
Transformed from 4' to 6' trick-or-treating he creeps.


Jack's head a bobbling from left to right,
A life sized, moving Jack Skellington, oh, what a fright.


His hands are pose-able with fingers of cold, cold clay,
His arms move like puppets, right to left they sway.


Knees bending and feet walking along with Tristan's strides,
Jack the Pumpkin King no longer hides.


Now Jack sits and guards the remainder of the Halloween Candy. He may just stay around for Christmas.


Please leave a comment below with your thoughts. I hope you enjoyed this costume, video and post.

HAPPY HALLOWEEN!

Moon/Lunar Fairy - with articulated wings

Photobucket

Wednesday, October 15, 2014

Hand Painted Holiday - Wooden Halloween Raven

I was spending some time today in a small local second hand boutique in town. In a corner of a store they had this unique wooden blackbird with wire feet. I could hear him now "squawk, take me home". I picked him up, my fingers rolled down his back and I inspected the distressing and the few flaws of a life or two lived before in someone else's care. He was simply beautiful just the way he was, sleek and simple. But, I felt something missing if he was to fit into my home. He needed a fresh start, a start with a new look and a makeover idea popped into my head.


With the fantastic VOC free, Non-Toxic paints I have been using lately I thought it would be fun to put some in an empty henna cone and use the fine tip to draw with the chalk paint, Alamo White from Shabby Paints. This sweet and simple black bird was transformed into Wolfrum the Raven overnight.


Wolfrum now sports some fantastic detailing from his head to his tail feathers.


A simple heart on this tail feathers states he will be adored every Halloween as he makes his aperance in our home for the season.


Thank you so much for reading and viewing this post. Please leave a comment below letting me know your thoughts on this project.
Photobucket


Saturday, September 27, 2014

Parks and Recreation Leslie Knope's Wedding Dress Costume Tutorial! - Blog Hop

Parks and Recreation Inspired Blog Hop -lg

Welcome to the Parks and Recreation EPIC Blog Hop! Eight wonderful bloggers have joined together to create and share crafts inspired by the NBC show, Parks and Recreation, starring Amy Poehler. This fall the show enters it's 7th and final season! We'll miss Parks and Rec but the show will live on in "craft"!
 
Did someone ask if we can do an Epic Blog Hop about Parks and rec final season, Season 7, on NBC??? Well we did it and here it is!!! In the words of Leslie Knope:

"Knope we Can!" or "Yes, we can't not."
LOVE ME? PIN ME, SHARE ME!

Inspired by the wedding dress alteration designed by the character of Ann Perkins. It is a compilation of all of Leslie Knope's adventures with the Parks Department of Pawnee. 


My project I will be sharing with you today is one near and dear to my heart as crafty couture is one of my favorite things to design. The LESLIE KNOPE WEDDING DRESS I crafted is bound to inspire any Knope fan to create this dress for the up coming holiday, Halloween.  
Supply List:
  • 2" packing tape
  • scissors
  • hot glue
  • hole punch
  • ruler (24" quilting ruler works but is not necessary)
  • 6" wide white tulle (about 40 yards of it on the roll)
  • 1/2" white ribbon (enough to go around your waist 4 times)
  • white 8 1/2 x 11 printing paper
  • printer and computer to pint the images from
  • thrift shop dress 
  • 2" black ribbon
  • A flower for the waistband (or you can make one from the Pawnee Government seal like they did for the show.)

Before we get started here is a fun video of the creation of this project. 


Now let's get started!

Step 1 - Print out as many Leslie Knope memorabilia images you can find online. News paper articles from the Pawnee Sun or the Pawnee Journal, flyers and posters from her City Council Campaign, photos of her heroines; Madeleine Albright, Hillary Clinton, and Michelle Obama and Sandra Day O'Connor etc...


Step 2 - Run a piece of 2" clear packing tape along the top back of the page, 1/2" from the top. 


Step 3 - Fold pages in an accordion fold style.


Step 4 - Strongly crease the folds by rubbing it along the table edge. Punch a hole through all the folds of your page about 1"-1 1/4" from the top of the page. 


Step 5 - Use your tape to create an "aglet" on the end of your ribbon. This will help you thread the ribbon through the holes in the pages. (Did you learn something new here today? OR Did you already know what an aglet was?)


Step 6 - Take your ribbon and wrap it around your waist twice to measure it and cut. Match it up and cut a second piece of ribbon to measure and cut. You may trim it up later after your done. Step 7 - Layout your papers in order of how they will be threaded on the ribbon. Remember you will have two rows of pages. Step 8 - Thread your ribbon through the holes of each of your pages from one side to the other for both rows, use one of your cut ribbons for each row.


Step 9 - Spread out the accordion folds. And put your row of pages face down. Step 10 - Cut your tulle in 48" strips. You will need one piece of tulle for each valley fold of your papers in your top row.


Step 11 - Fold your tulle in half and follow these images to complete the knot on the top row of pages.
Take the looped end and pull it under the ribbon on the back side of the paper.
Take the two open ends and pull them through the loop
Begin to tighten by pulling the open ends more and working the tulle in place
Once it is tight make sure it lays down this way, that is the way it will hang. The top of the paper is on the right.

Step 12 - Take your top row of pages and tulle, lay them face down on your work surface and then flip the tulle over to expose the back side of the pages.


Step 13 - Line up your second (bottom) row of pages about 1 1/2" over lapping the bottom of the top row.

Step 14 - Find your center of your rows and , valley of the accordion fold. Repeat for all pieces of tulle checking your overlap frequently and work from the center out. This will hold the second row in place, hanging it from the first row.
Take the two tulle tails from the top row and feed one of them under the ribbon on the bottom row's center.
Take the second tulle tail and tie it in a knot with the first tail just under the ribbon.

Step 15 - Try on your skirt!!!! Woo Hoo!!! Check it out! If you have gaps where you see the tulle between the pages that is okay. Take extra pages that are accordion folded and glue them to the back sides of the pages you have been working with in the rows. This will cover the tulle and add more memorabilia of Leslie's adventures!


Now flaunt your stuff at the next Halloween party as the beautiful yet quirky Leslie Knope!

 
Official Parks & Recreation Website: http://www.nbc.com/parks-and-recreation

 For more Parks and Rec inspiration, follow our Pinterest board.

Moon/Lunar Fairy - with articulated wings


Whew, now that was a long post! Thank you all for hopping along with us!
Photobucket
Party Coordinator at Party Time Tuesdays

Thursday, August 7, 2014

Darkside Henna - Darth Vader Style

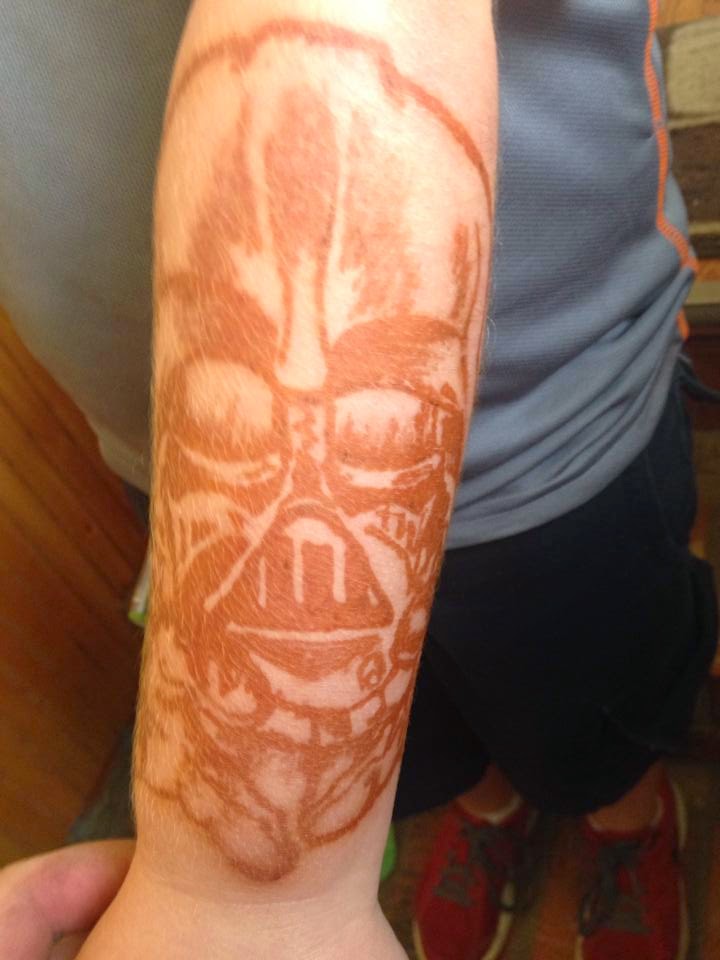
I had a fantastic customer. She was a sweet little girl with a love for Starwars, specifically Darth Vader. This project was so much fun to do, outside of my normal henna "box" of designs. The design of the iconic Imperial Forces leader was created on her forearm as if he was using the force reaching out with his hands.


 She choose a design from a deviant artist that goes by: PhillieCheesie


 Stain Progression:

(Client photos)
24 hrs after application
48 hrs after application


I love it when the client walks away so happy the smile won't leave there face. This was a great day for henna and my heart.

Remember: 
"Come to the Darkside... we have cookies!"


 For more of my Starwars creations please see these posts below:

INVITATIONS: To see the fantastically fun birthday light saber invitations. Check out my post "May the force be with you"
BIRTHDAY PARTY: Lego Starwars Birthday Party


Photobucket
DT Coordinator at Party Time Tuesday