Hello and welcome back. I have been very busy moving across country to South Carolina. Here is a quick post about a matching henna design I created for fun.
Remember: inspiration can be found anywhere. If your working on a paper project... How would these designs inspire you?
I had the pleasure this past weekend of being a part of a celebration of a life, one that will soon be introduced into this world. Nichole, is in her eighth month of pregnancy, the best time to have a Henna Belly Blessing applied. We had a consultation a few weeks before and we discussed designed for her belly and also her guests. The designs were created to coordinate so the designs her guests would choose would coordinate with her belly blessing for the photo ops.
Photo Courtesy of: Samantha Wootton
Nichole chose an off centered C shape which we flip flopped the day due to the position of her bundle of joy's feet (kicking on her right side). This way it made it easier to continue to apply the henna in a timely manner.
We began the belly just before the guests started to arrive and as they came in they all stopped to watch her receive her belly blessing. Then they all took turns sitting down with me for their designs (they will be posted soon and linked back to here).
Photo Courtesy of: Samantha Wootton
She had such a loving and supportive group of women with her that day. Can't you just see the love?
Photo Courtesy of: Samantha Wootton
Photo Courtesy of: Samantha Wootton
Henna Baby Blessings have been around for thousands of years in India and the middle east. In today's tradition it has transformed into ornamenting the belly not just the hands. It is a stunning way to embrace the changes a woman's body makes when creating a life inside.
May the birth of you child be swift and easy and my it be healthy and strong. Blessings to you, Nichole, and your family too. Thank you for allowing me to be part of your celebration!
Hello Readers!
I know it has been a while since my last post. I have been out of town... right after the Harry Potter Party I had to leave on a two week trip to Colorado for my baby sister's wedding... lots of projects to share about that too. It was my son's 10th birthday party and I know I am a sucker for going all out on the big day... he hit double digits after all.
But for now as I play catch up from this crazy busy month here is a video I made of all the Helmar Projects for the Harry Potter party. More post to come about the individual project and the rooms and other projects not in this video.
Hope you enjoy this video and like I said more detailed posts to come!
Hello everyone,
Today I am going to write about outside inspiration. This post though
it has a project made from Helmar is not my personal original idea. I
found this idea on Pinterest, the link was a general link to a photo
blog (not to an exact post) I spent hours trying to find this original
artist because I found their work so intriguing. Alas... nothing was
found and my life and family demanded me to return from cyberspace.
This
book page rose is called "altered book art" it is a simple form of the
art and if you ever want to see very extremely detailed pieces just Google the quote above and look at the images. With all this said this
has been a very popular piece at in my window display I design for a
local book store.
It was all created with a little distressing ink, one hard back book, Helmar 450 Quick Dry and Liquid Scrap Dots.
Thank you all for reading and I hope you enjoyed this little post about
this project I couldn't get out of my mind. Hats off to the person out
there who thought of doing this with a book. You inspired me, whoever
you are! Pin It
I am not sure if you all know but I am a glitter fanatic! LOL. To put it
lightly. I have over 100 shades of glitter and embossing powders. I
have almost 40 different colors of glitter glues. I am a bit obsessed
about the sparkle I think ... LOL.
Shimmer Powders and Flocking - No special way
you need to store these accept away from moisture but that is true for
about 99% of all scrapbooking supplies. They do look pretty and can be
stored nicely on display. Try finding an old, small metal cookie sheet
at the local thrift store. Paint or alter it a bit and put thin magnets
on the bottom of the powder containers. Hang it on the wall up above the
work space. Or Stack them and store them on a shelf. Maybe even store
them in a nice basket that you can keep handy.
Note: if storing in a box, basket or drawer... turn them upside down.
Not for he reasons you do inks but so you can see the colors inside the
jars, instead of the white/black lids.
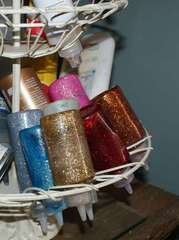
Glitters and Glitter Glues - I LOVE glitter...
there are so many options for storing regular glitter many have been
mentioned above in other items. The glitter glue however works best,
with the least amount of bubble explosions on your page, if you store
them upside down.
Storage Options:
Tool rack, Velcro them to a clear flier display protector
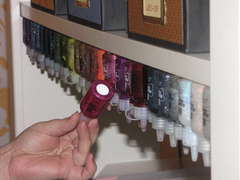
Hanging under a shelf: here is what I did last year for my storage solution.
Embossing supplies - Now normally the embossing
tool would be placed in with the tool category but if you want to create
a mini embossing center and organize it in with your embossing supplies
then I would suggest you do what works for you. I created a drawer for
all my supplies and organized it all within that drawer. A Basket would
work well or if you want a counter top embossing center we can discuss
better ways to display these items.
Storage Solutions:
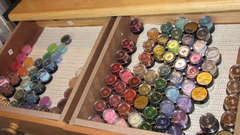
Embossing Center (really it is my color center):
I am still wrapping up all the "homework" I
have from CHA I have been having some creative fun this past week.
Moving into spring and starting to gear up for Easter how about you? Us
crafty types start early... got to leave time to make those fantastic
projects, right?
Today I bring you a very large, yet simple and sweet, wall art project.
Here was my favorite part... moss is messy but I found this Super
Moss Mat (a flat roll) at my local craft store and when you use Helmar 450 (click for tutorial post) with it... OH MY GOODNESS, it was SOEASYANDFAST!
Here
is a close up. You can see the "N" is one of the 3D letters and the "E"
and "S" are chipboard and are flat.
I actually went through and curled all the page
corners forward to give it some playfulness and then I was done.
I hope you have enjoyed this post. Please feel free to let me know
your thoughts in the comments below or if you are working on any spring
projects I would love to see them.
Here is a little project to share on Valentines day! I so just love this one. It was made from one Spellbinder die set, the pear. I used the bottom of each pear to make the petals of the rose and the background with the book pages. Helmar 450 Quick Dry is the key adhesive to this project and I just love how it's holding up. I used Helmar Gemstone Glue and a brush to paint the white chipboard frame and then glittered it.
Have a Happy Helmar Valentines Day Everyone!
PS. If you like what you see and want to see more please fallow my blog. Please leave a comment if you really like this project. Thanks.
Thank you for stopping by today! I am so happy I get to share with you some unique valentines day cards i created for CHA. Helmar adhesives were used to create these and they were displayed in the Helmar booth. Happy Helmar Day!
The photo above used Authentique papers ... LOVE IT! I used Helmar 450 Quick Dry on the ribbon trim and Zap Dots for the layers on the heart and Happy Together sticker.
I just love the idea of the "One and only Love" implied here! The pink twine is from May Arts. Each hart has a Helmar Zap Dot behind it to bring dimension to the card.
This "Love" card was created with men in mind. Once again Authentique Papers were used with Tim Holtz stamps. Once again These L O V E stickers were raised with Helmar Zap Dots and the book pages were adhered with Helamr Permanent Adhesive Runner
Authentique paper is stunning with these tangerine poppies and the teal. The Helmar 450 Quick Dry was used for the ribbon and to secure the sticker saying. Helamr Permanent Adhesive Runner was sued for the Poppy paper and some Helmar Acid Free Glue around the fussy cutting of the poppy paper.
Leave a comment below to let me know if you like them or if you have any Valentines cards that you want to share leave a link for me to check them out! Have a wonderful day!
There is so much to show you all! CHAW (Craft and Hobby Association Winter show) 2012 was amazing! It was more then I could have expected. I am in the process of dealing with the hundreds of images I took this week so here are just a few. This is Elena, from Charity Wings Organization. They bring crafters, hobbyists and artists together to help their communities and other charities through events and auctions.
To raise awareness for charities that were present at CHA, Charity Wings organized a Flash Mob during registration before CHA opened Sunday Morning. Elena wore my wings and I am on the right of her in the video (in the teal shirt). Here is the video.
She's Crafty all right! We had so much fun!
Charity Wings did this event to raise funds and awareness for the fallowing charities... Crop for a Cure, Boys and Girls club, Operation Write Home and more.
The wings I made were donated to Charity Wings and will be displayed in future events. Elena wore then throughout most of the "LIVE from CHA" online streaming event. Where Elena interviews manufactures and designers, she shows new products and tours the event for two days. Here is a photo of Tracy from Helmar during her interview. She introduced the designers and I answered a few questions about how the wings were made. With HELMAR ADHESIVES of course... hehe!
By the end of the event I felt like I needed to prop my eyes open or I would miss about a million more things. Every time I walked the floor I found more inspiring projects and new products I missed the last time! This is not a photo of me but is is most definitely what I must have looked like walking around trying not to miss anything!
Well I better get back to editing my photos and taking care of my family. I will post more later.










 Posts
Posts


